Free Crochet Pattern for the Easy, Breezy Swim Cover
/
***You can find the PDF version of this pattern in my shop by clicking HERE. Great for easy printing!***
Guys. It's almost pool season... And that makes me so happy!! There's nothing like a summer day spent in the pool, orrrrr even better at the beach (I wish-- Kansas is like the opposite of beach lol). So to celebrate this great warm season, I've got a cool and crazy-easy swimsuit cover for you in this post!

So when I say easy, I mean e a s y. This design is similar to the Cross My Heart Sweater-- which was worked in one piece. There are zero increases and decreases, so you're essentially just working one big rectangle with a hole in the middle. Score!
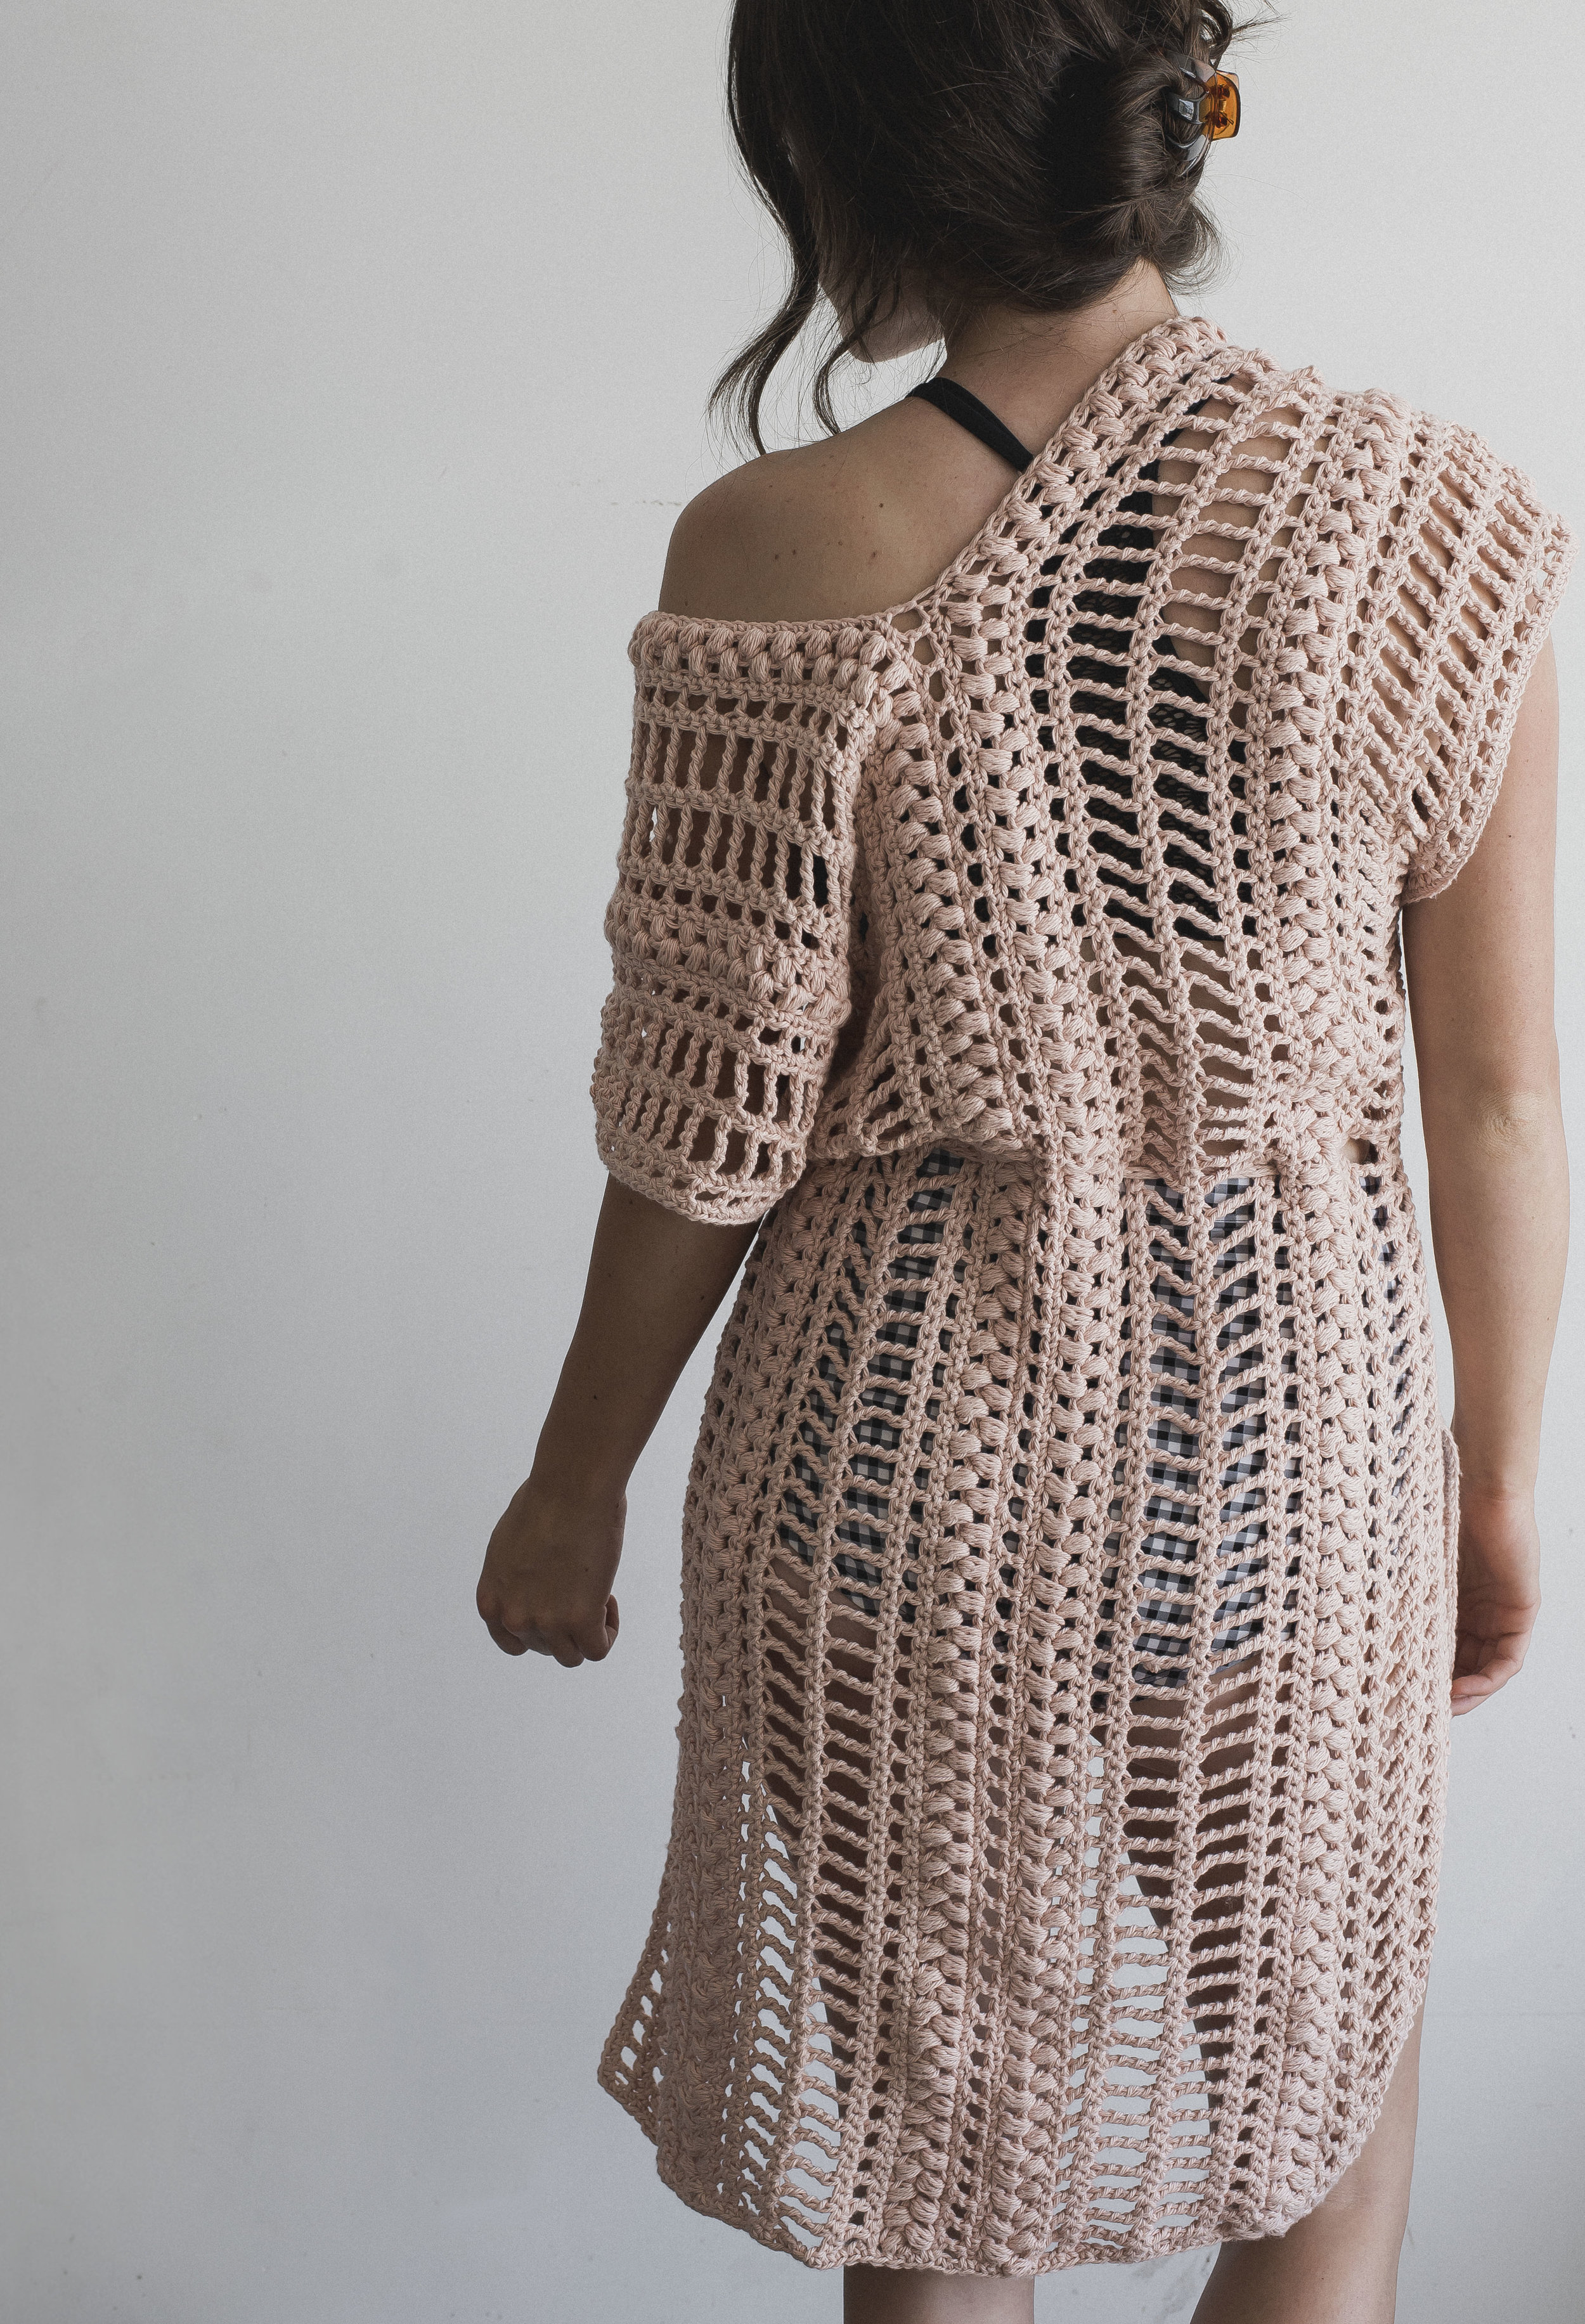
For this coverup, I thought it'd be cute to have an exaggerated hi-lo back, meaning the back side of the piece is longer--and I really love this detail. As far as sizes go, there are three sizes: s/m, l/xl, and plus size. This coverup is very forgiving, and is designed to be a bit oversized-- then when you cinch it up around the waist with your crocheted i-cord you get a more complete, cute look.
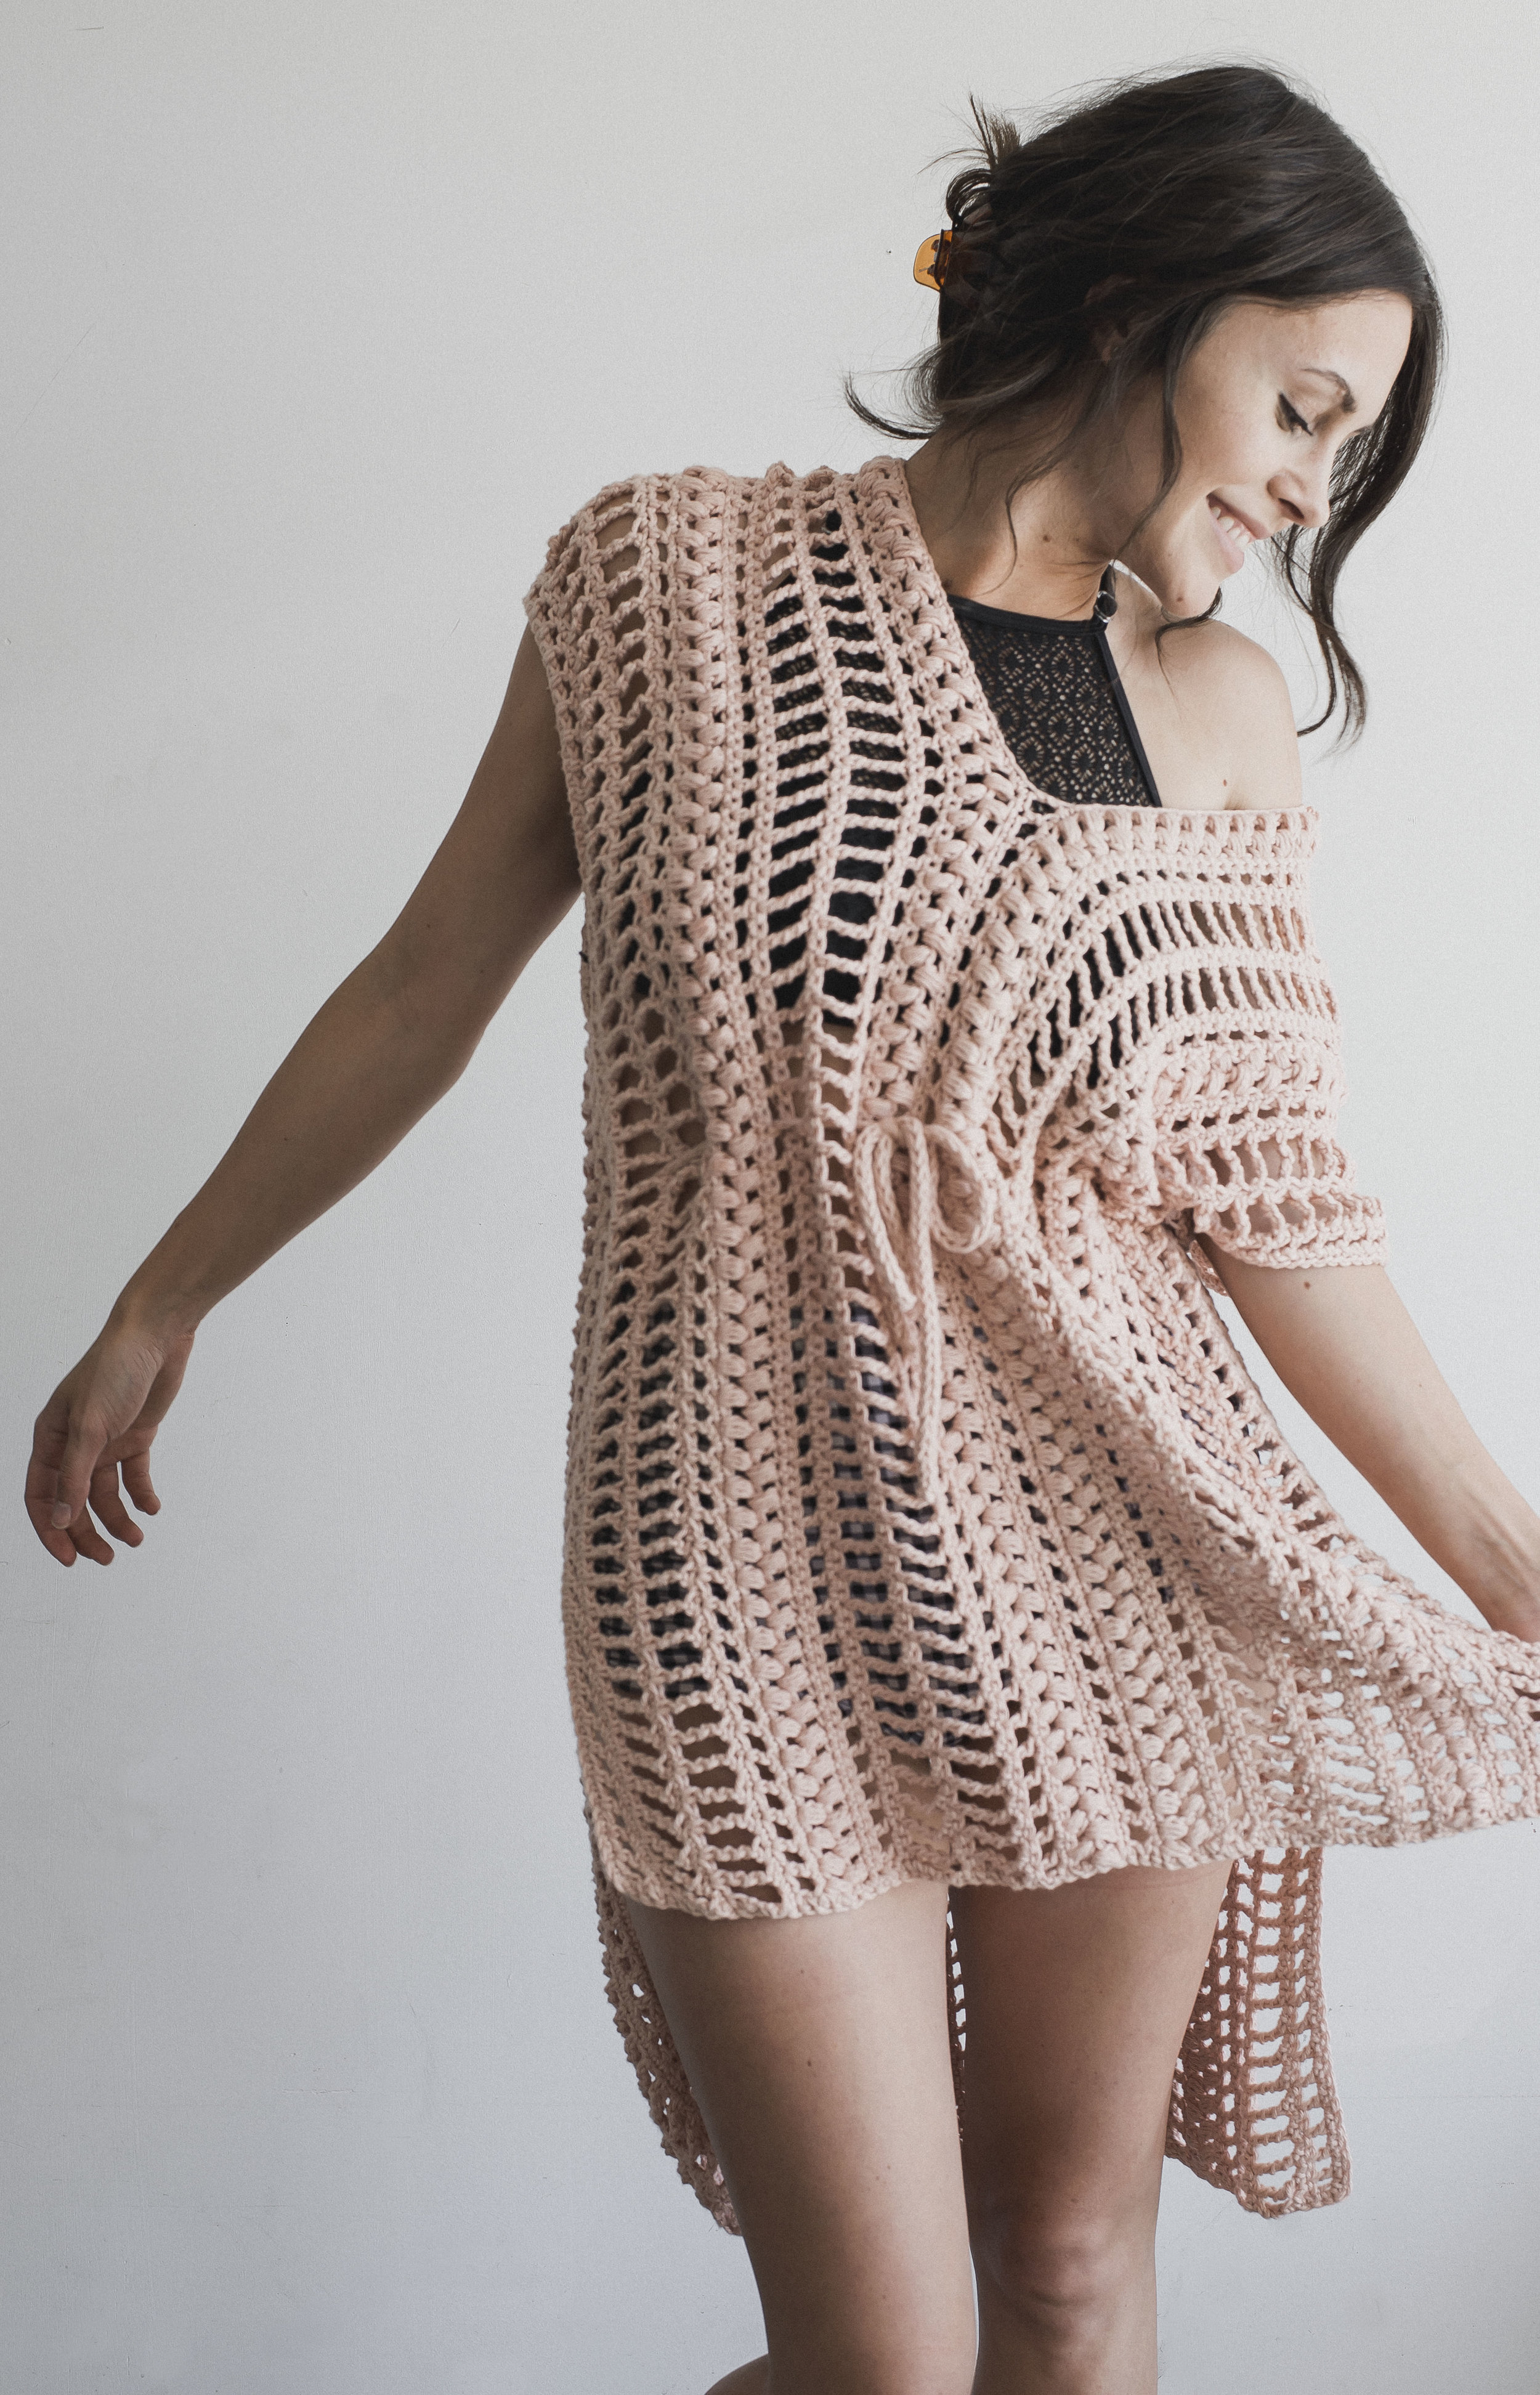
Since this piece is so simple, it's incredibly easy to customize. You can make it shorter or longer depending on your height, or even add or take away rows if you'd like a customized size. You could even add some fringe or little tassels along the bottom for more of a "boho" feel. :) I hope you get to make one of these this summer, you'll be looking cyuuuutte in it, I'll tell ya that!!

Here's a fun and totally awkward pic of me holding the coverup before assembled. It's just one big rectangle-- taller than me!
What you'll need:
-worsted weight cotton yarn (see sizing for yardage, I used Hobby Lobby's I Love This Cotton! yarn in color "Warm Blush" *linked here*, this is a great yarn for this project, incredibly soft and lightweight)
-i hook (5.5 mm), or hook needed to obtain gauge
-yarn needle
-measuring tape
Sizing:
Pattern is written for three sizes (since it's so forgiving):
SMALL/MEDIUM
Approx. 44" bust, 29" front length, 35" back length, 850 yards of yarn
LARGE/XTRA LARGE
Approx. 50" bust, 30" front length, 36" back length, 950 yards of yarn
PLUS SIZE
Approx. 56" bust, 31" front length, 37" back length, 1050 yards of yarn
Gauge:
14 double crochet by 8 rows equals a four-inch square
Abbreviations:
ch=chain, st(s)=stitch(es), sc=single crochet, sk=skip, sp=space, dc=double crochet, dtr=double treble crochet (see below for how to), beg=beginning
Stitch Explanations:
double treble crochet: yarn over THREE times, insert hook in stitch, draw yarn back through, [yarn over and draw through 2 loops] 4 times **see a video and illustration HERE for added assistance
puff stitch: 1) yarn over, insert hook in the stitch, yarn over, draw the yarn back through 2)Repeat the previous step three times- you will have nine loops on the hook. 3) Yarn over and pull through all nine loops
Notes:
-chains at the beginning of the rows do not count as stitches UNLESS noted in the pattern
-coverup is worked in one piece, from side to side as you create a neck hole in the middle
-the length of the coverup can be customized to your liking by adding or taking away stitches in multiples of two-- this will obviously change the stitch counts. I'm about 5'5 wearing a SMALL/MEDIUM, and the front hit me on my upper thigh and the back side just above the knee
-I would highly suggest checking gauge, especially if you're using a different yarn. I'd hate for you to work a whole garment only to find out you crochet differently than me!
-I worked stitches into the "ch 1" sp's, because it was faster, you could work either in the spaces or the stitches, whichever works!
-you may need to block or iron your coverup when done
***below are photos that are referenced to in the pattern:
Slideshow A:
Slideshow B:
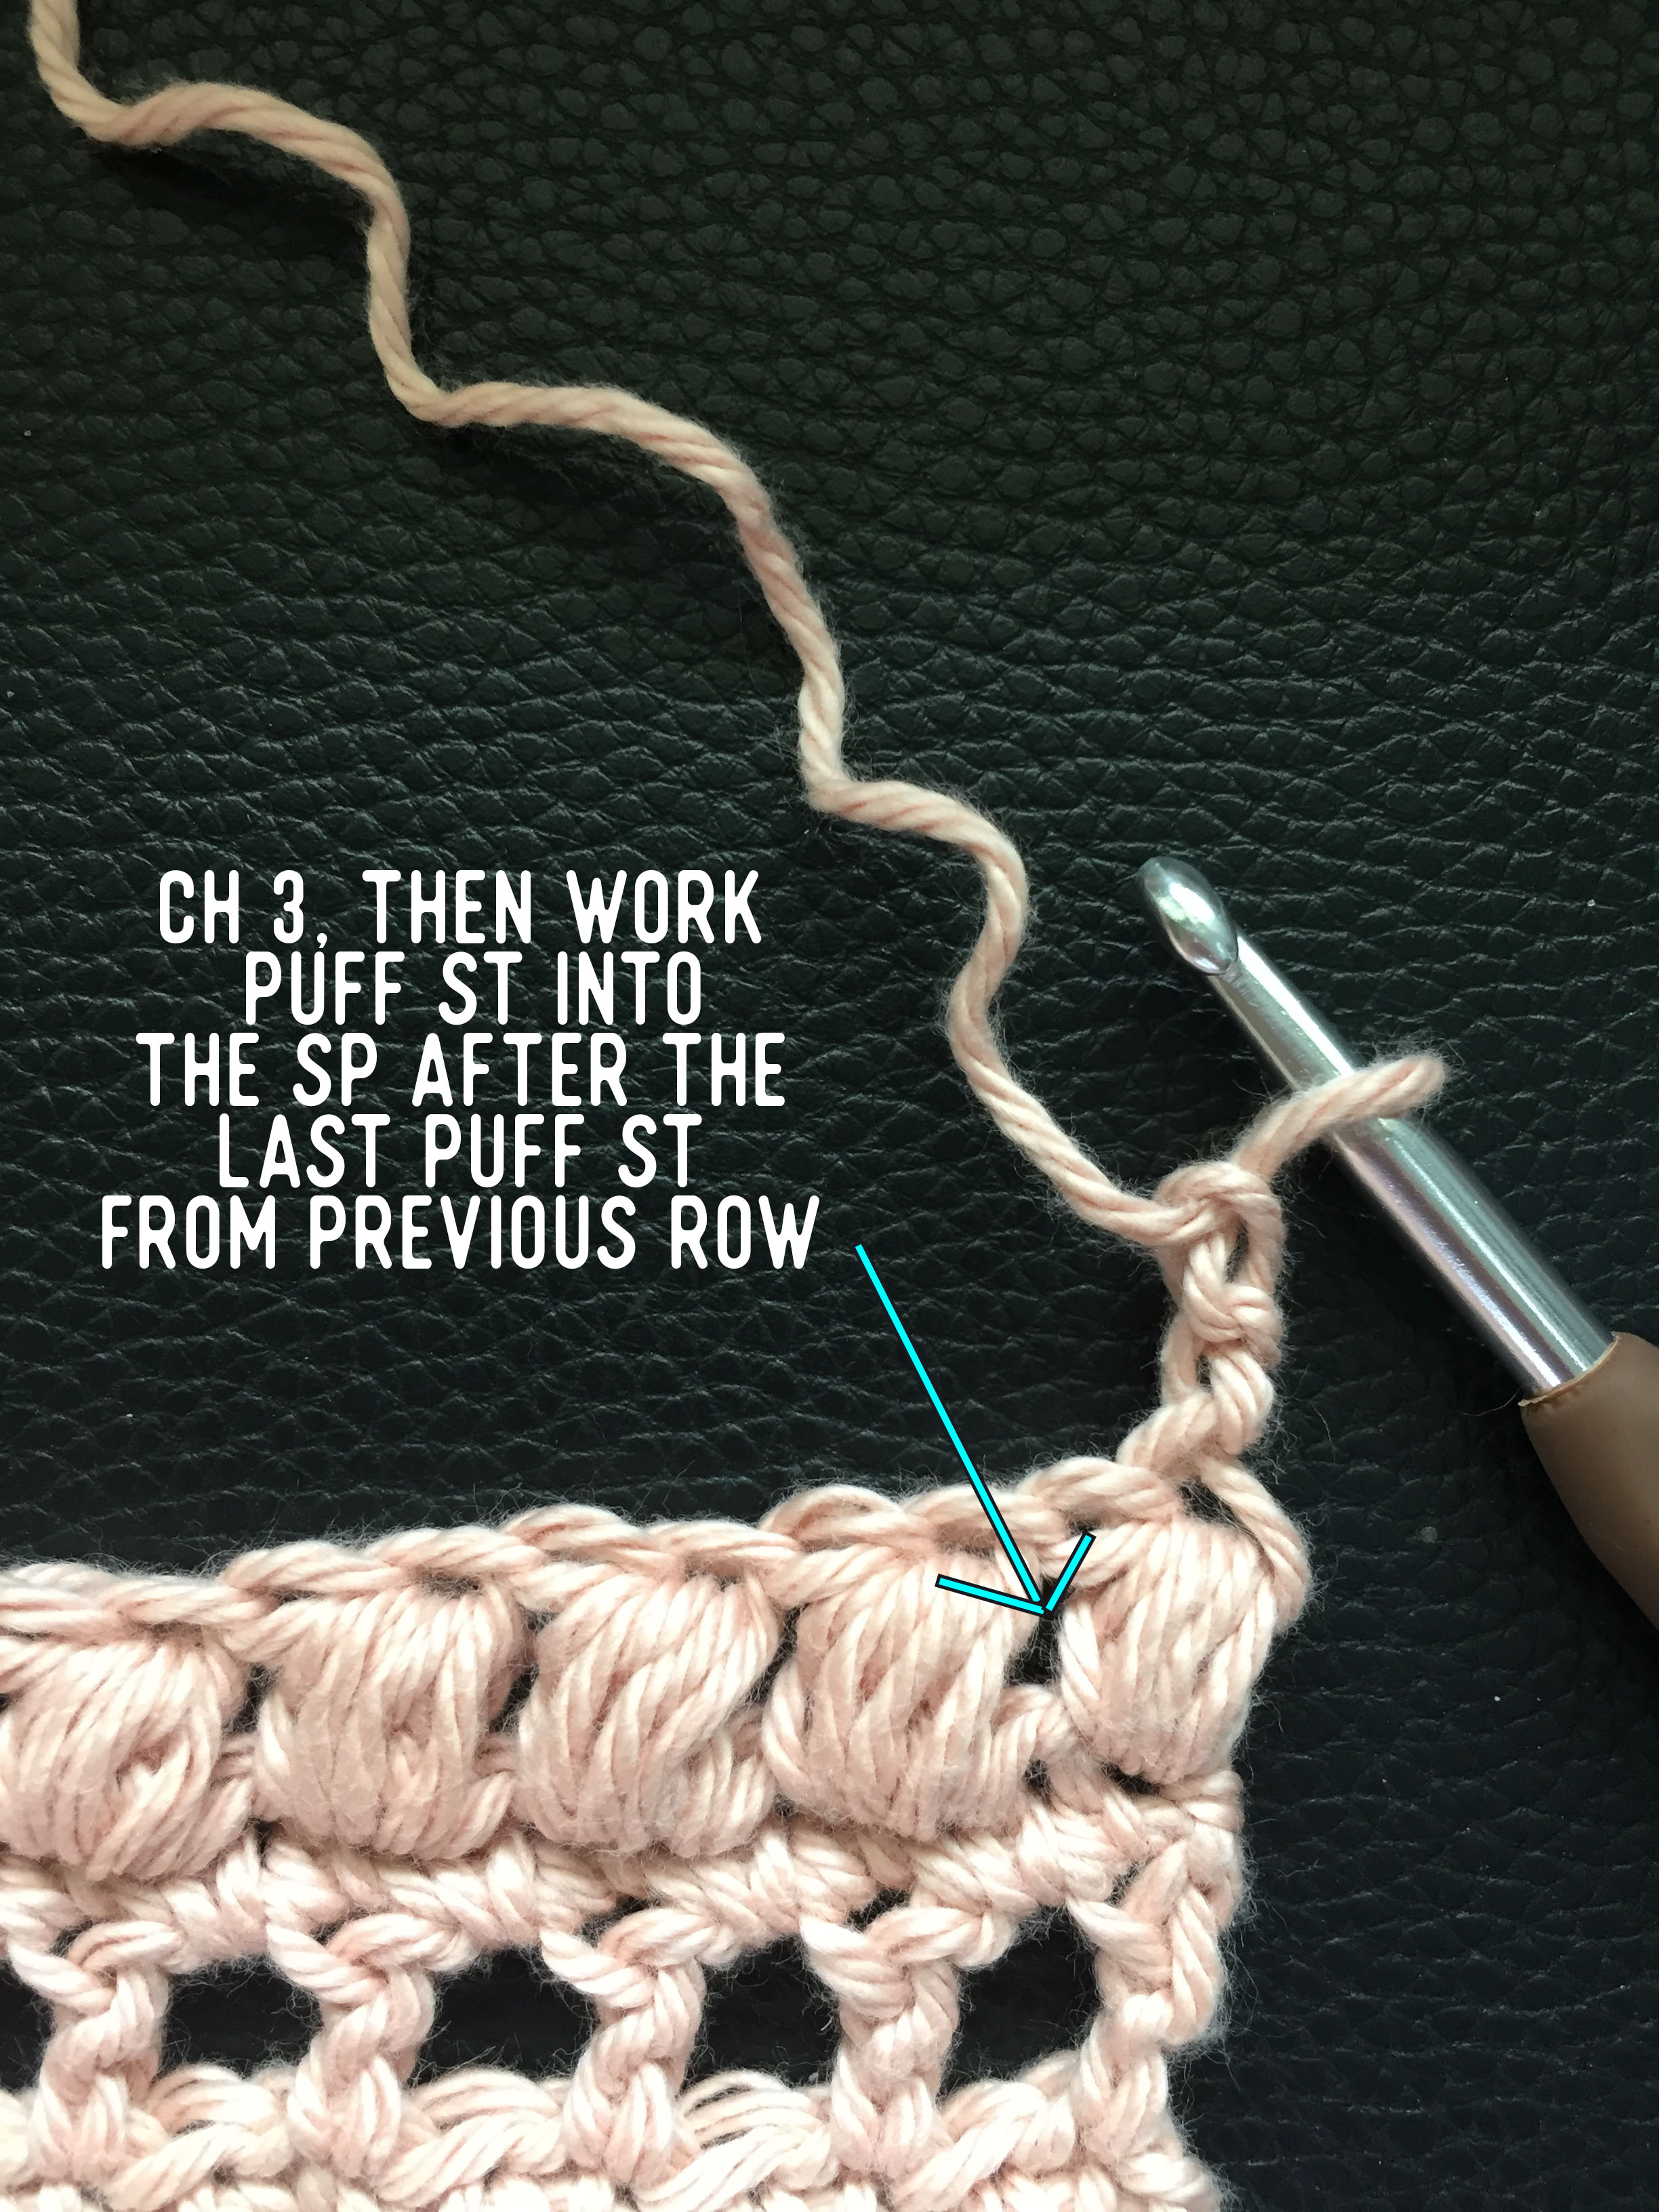
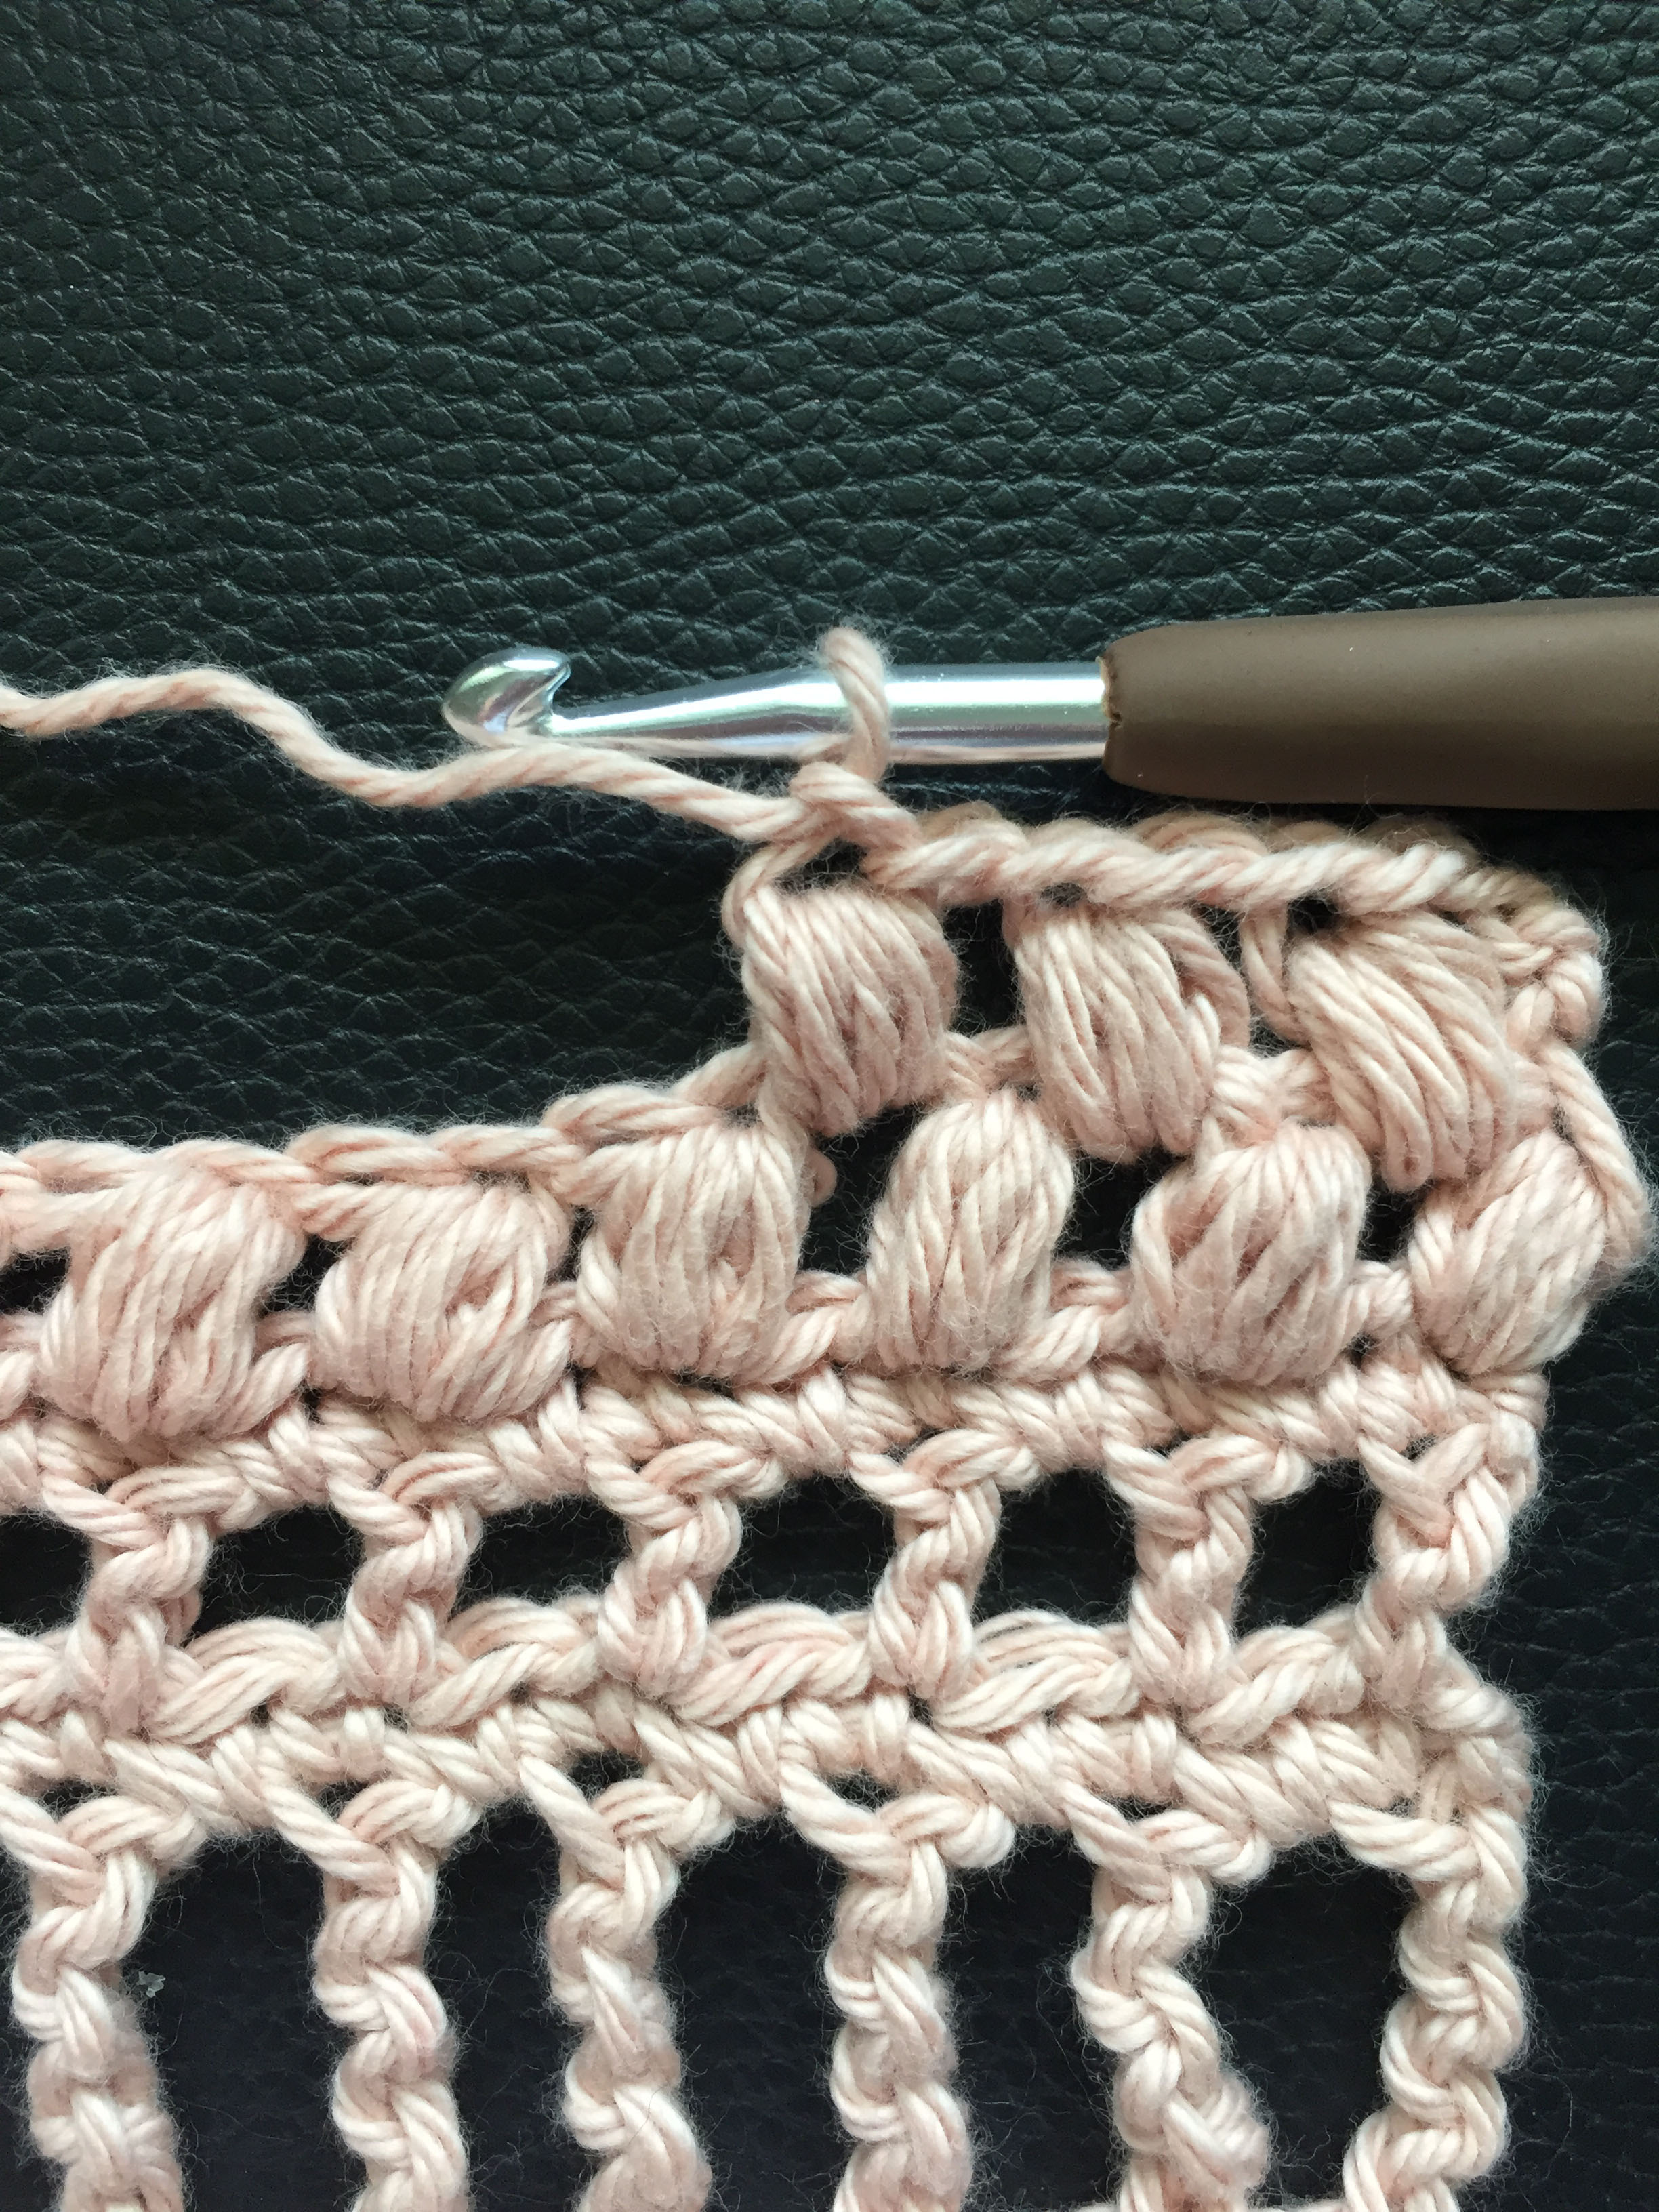
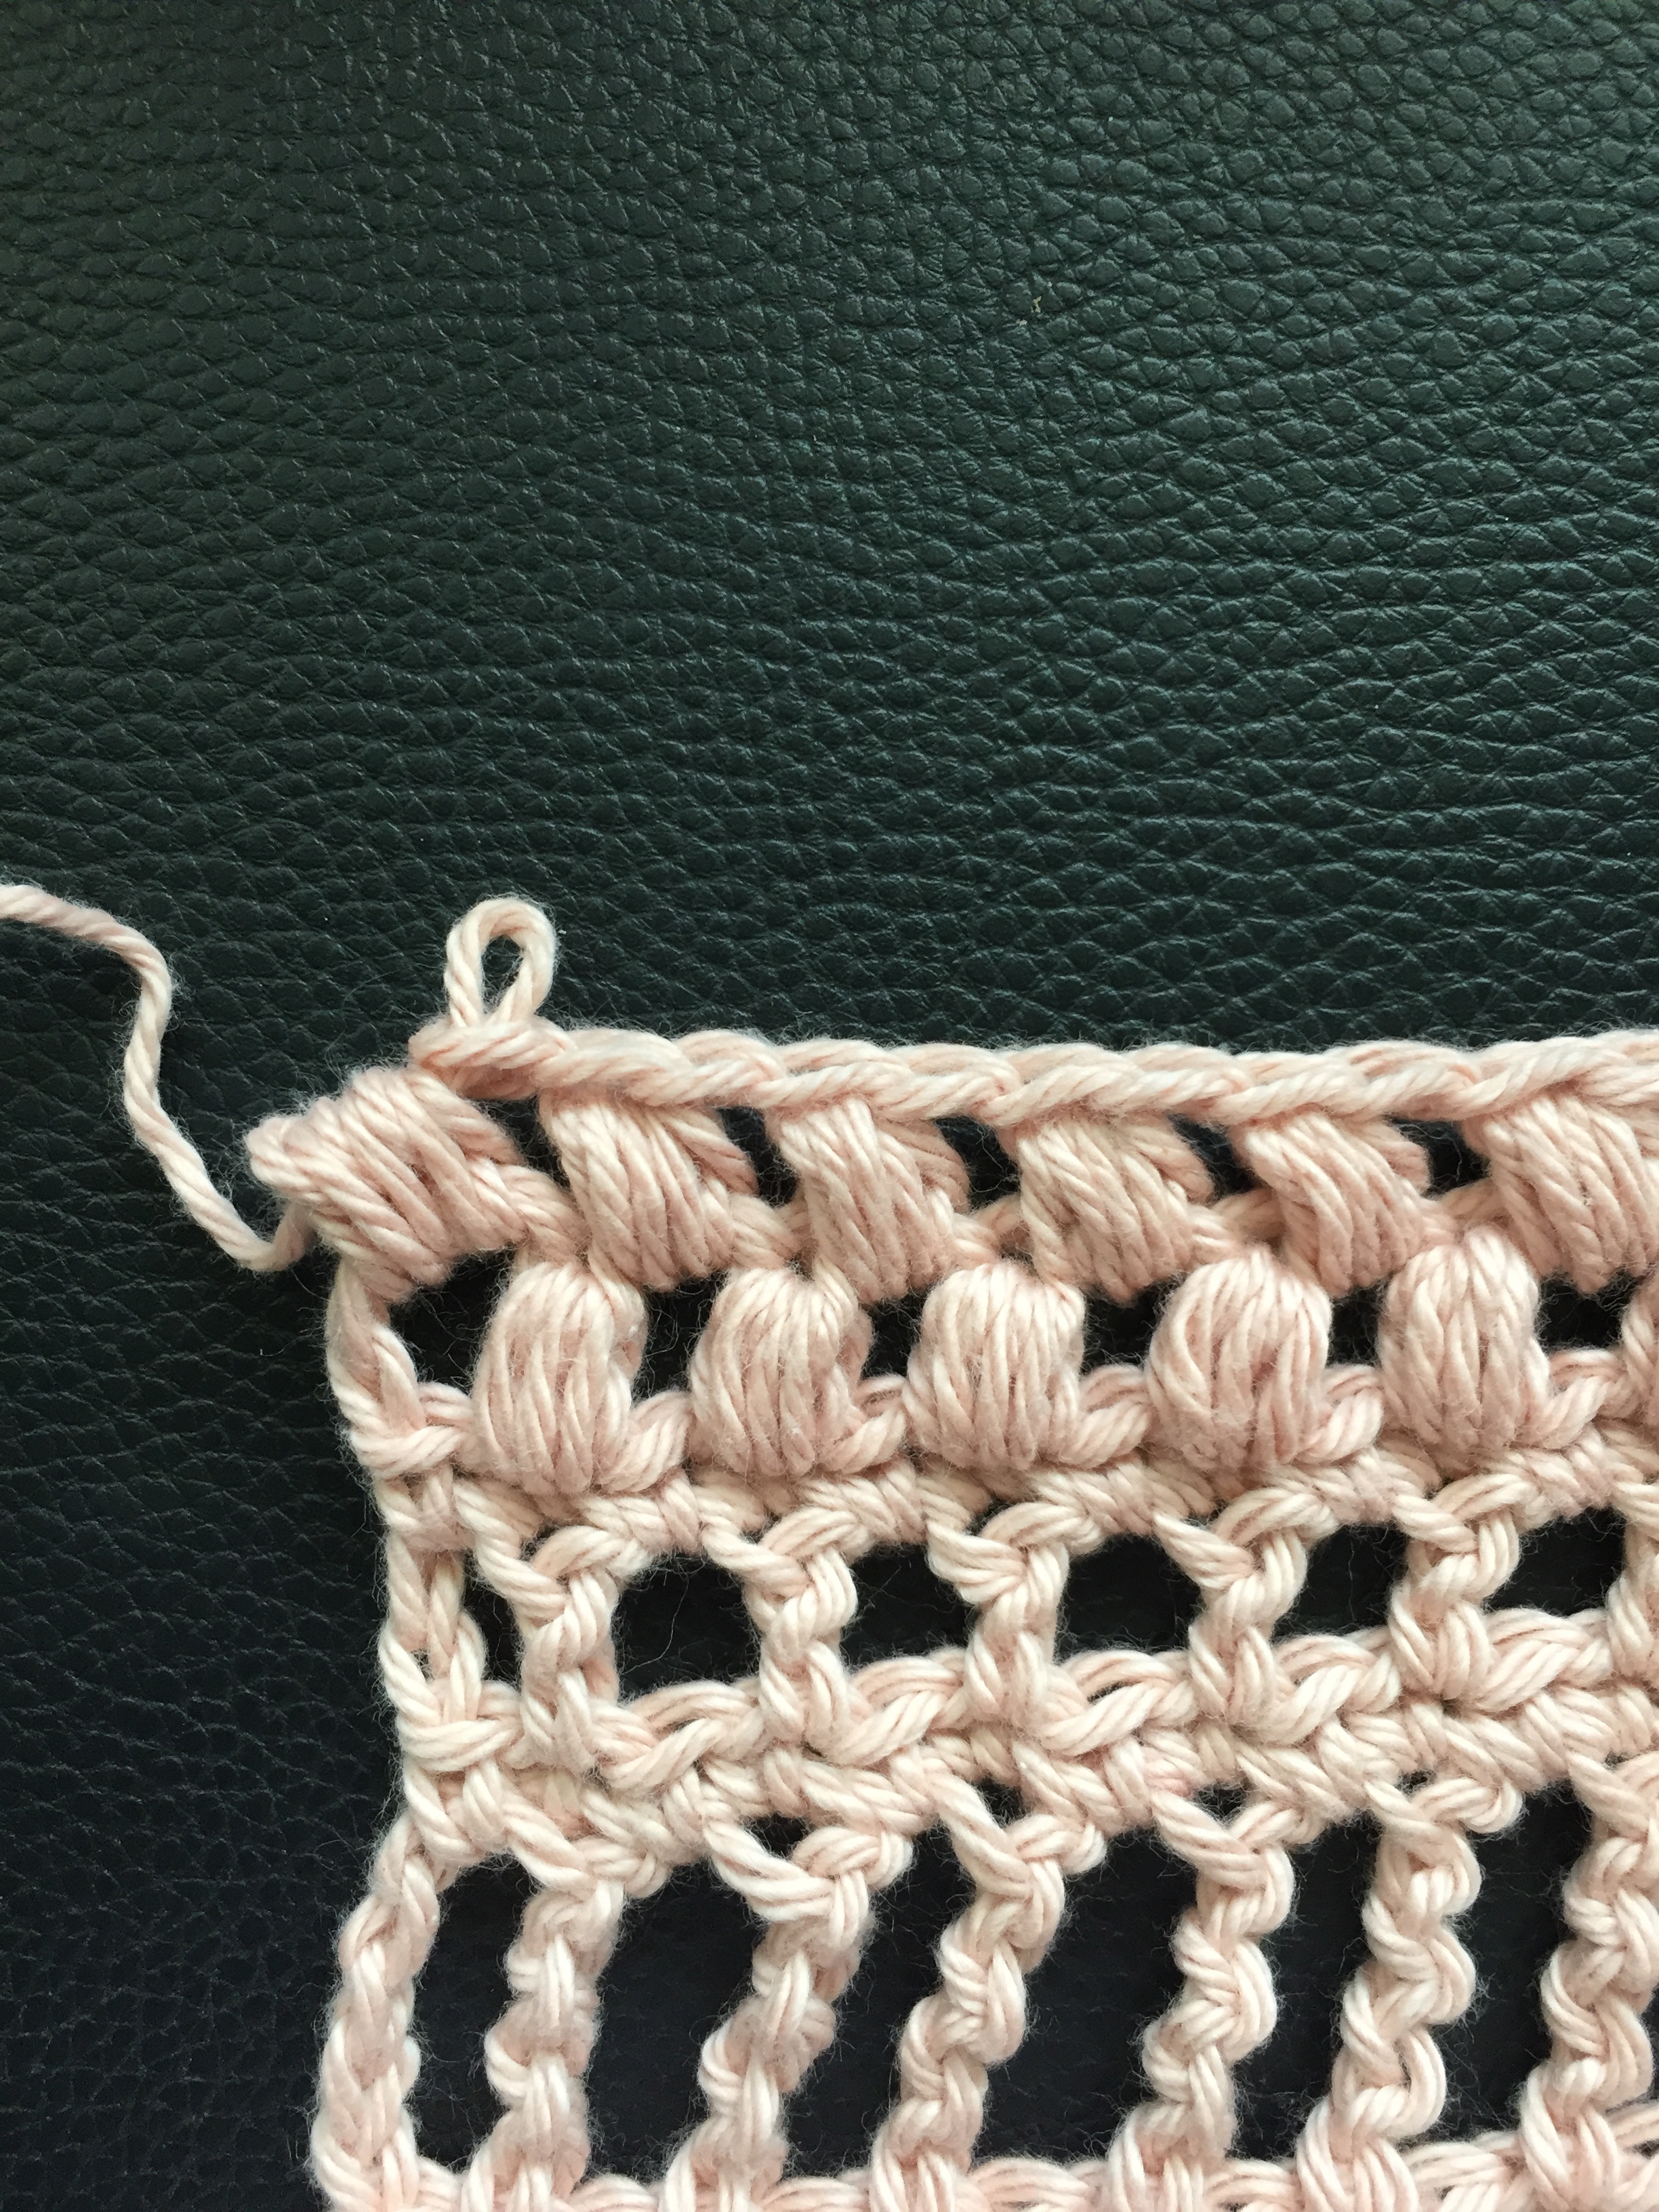
Photo C:
***REVISED!** I changed the photo below on 6/21/18... I realized I pointed out the incorrect stitch to work the first sc into. I am so sorry for the trouble!!

Photo D:

Video E
Pattern:
SMALL/MEDIUM
Row 1) ch 221, sc in 2nd ch from and across row (220 total sts, and for the rest of rows)
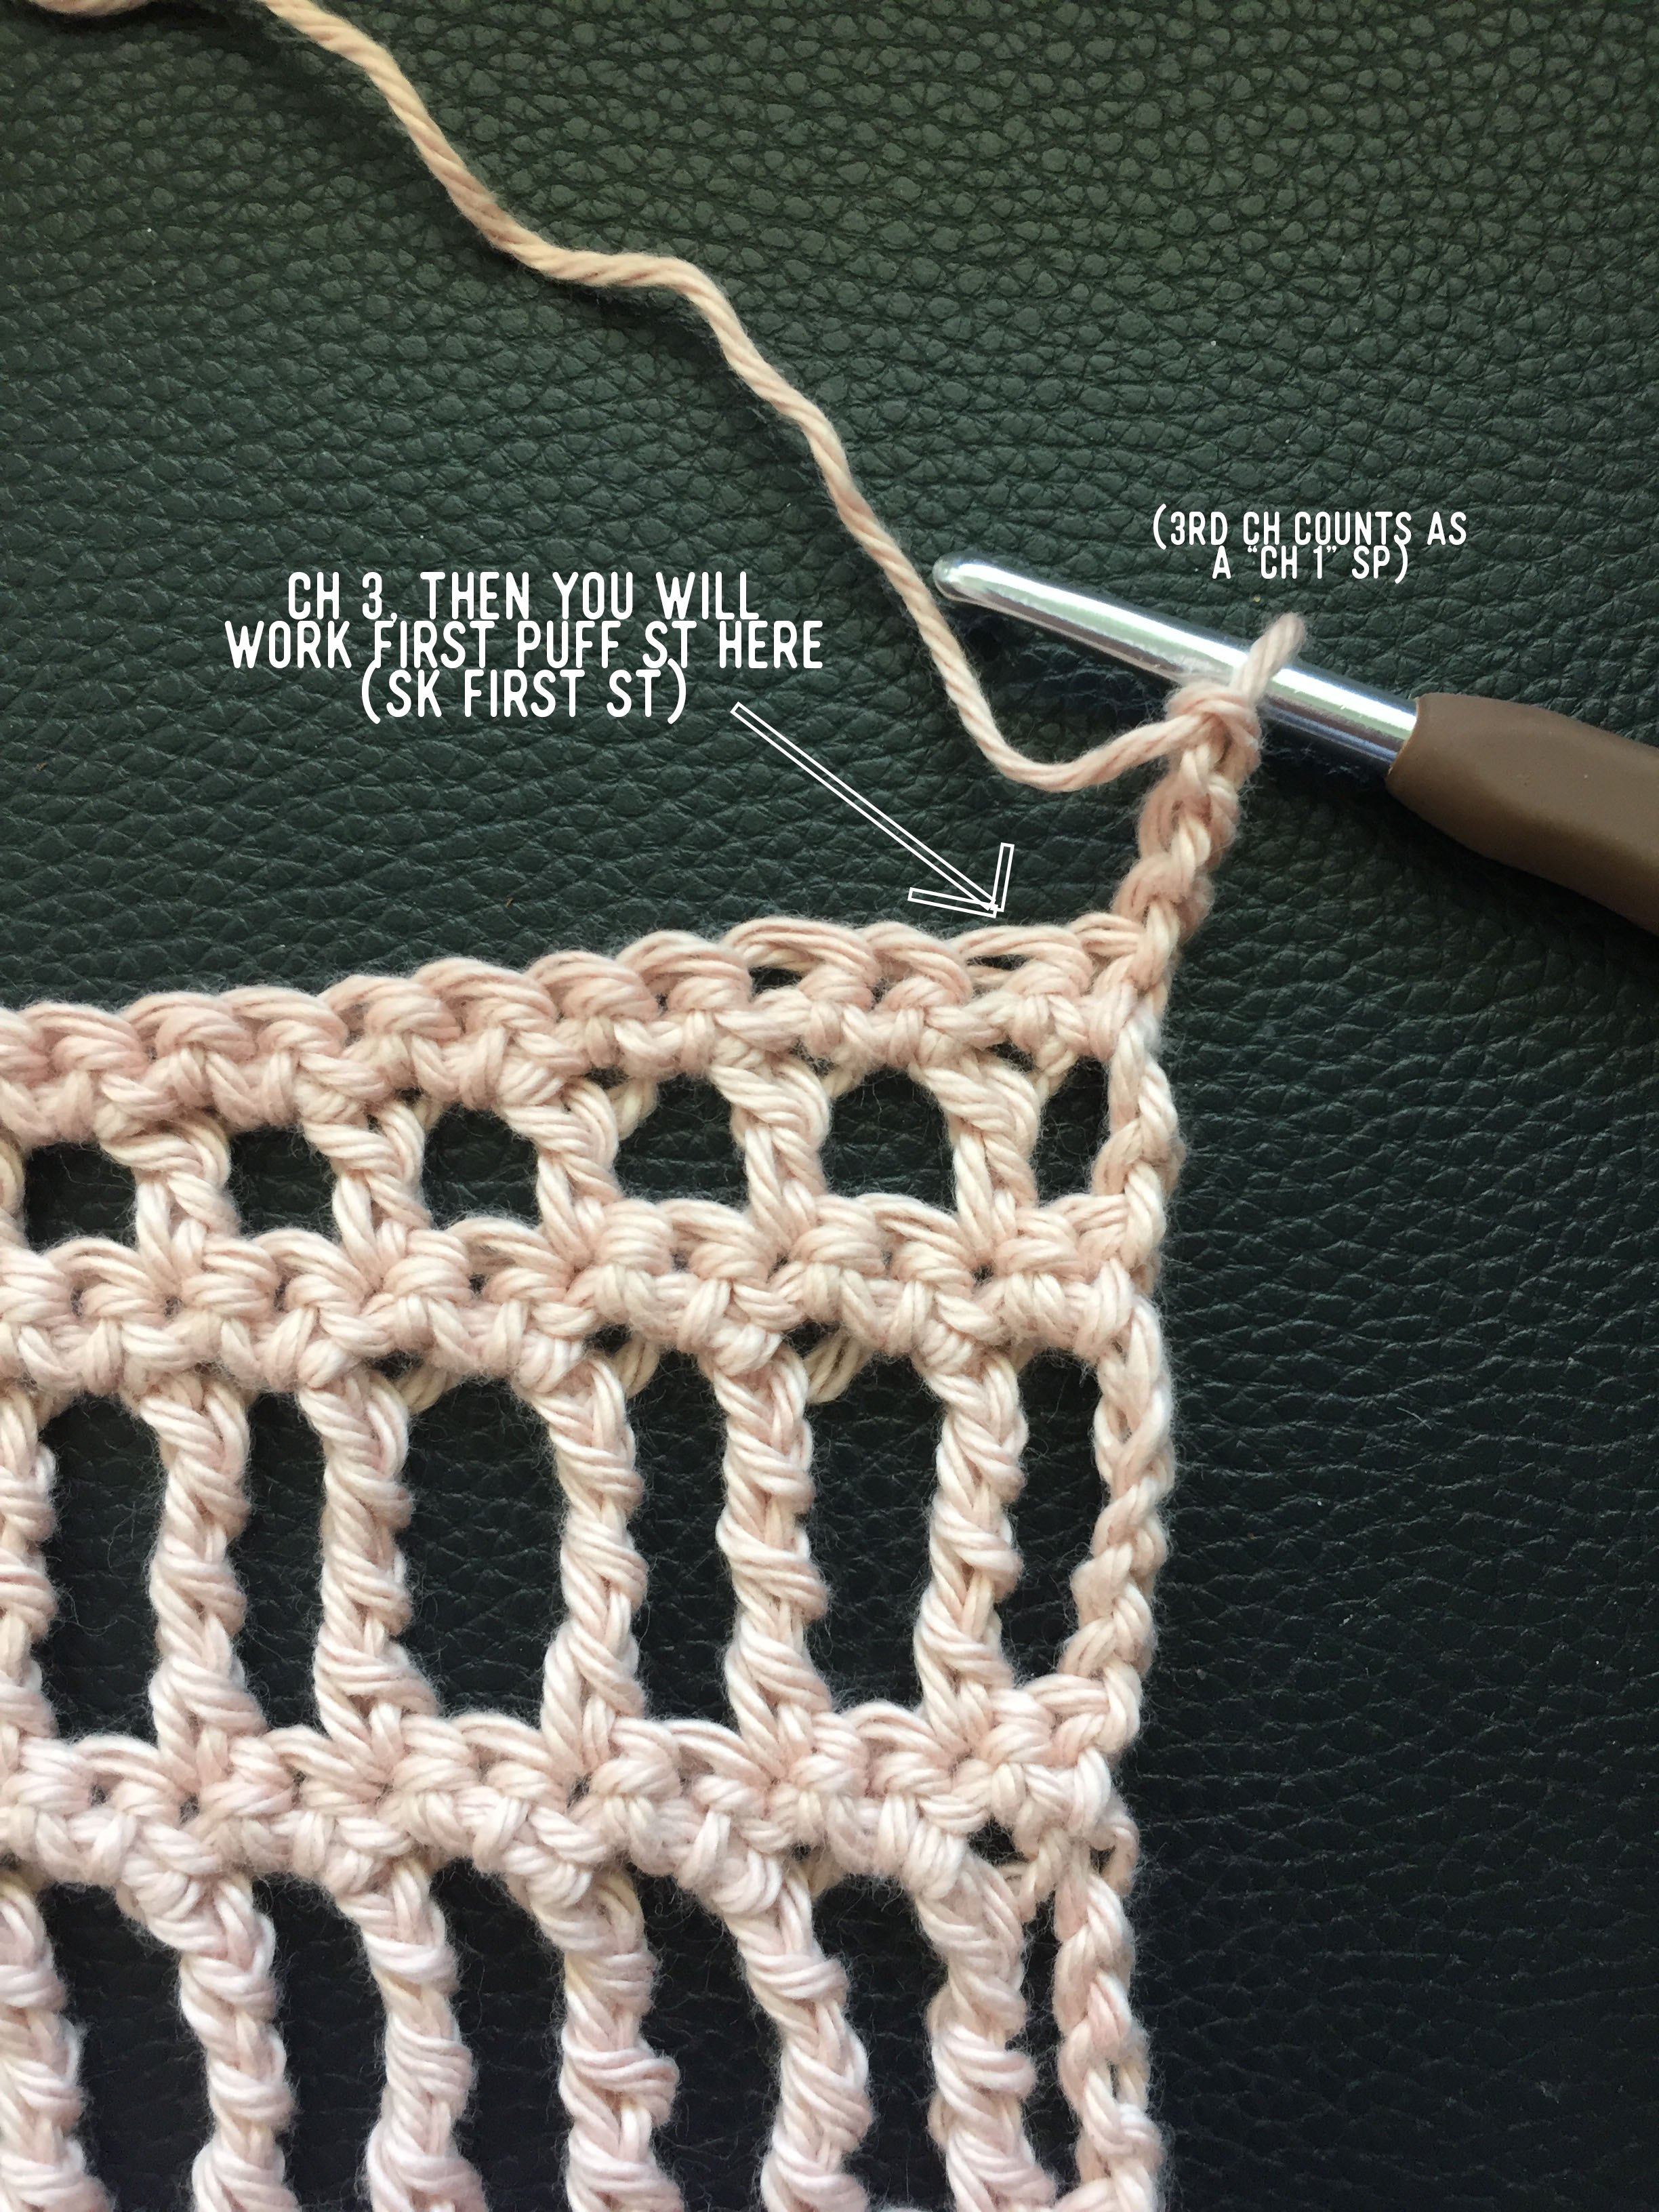
Row 2) ch 3 (3rd ch counts as a "ch 1" sp), turn, sk first st, dc [ch 1, sk st, dc] across row
Row 3) ch 1, turn, sc across row (work last sc into the 3rd ch from beg of previous row)
Row 4) ch 5 (5th ch counts as "ch 1" sp), turn, sk first st, dtr, [ch 1, sk st, dtr] across row
Row 5) ch 1, turn, sc across row (work last sc into the 5th ch from beg of previous row)
Rows 6-7) Repeat rows 4-5
Rows 8-9) Repeat rows 2-3
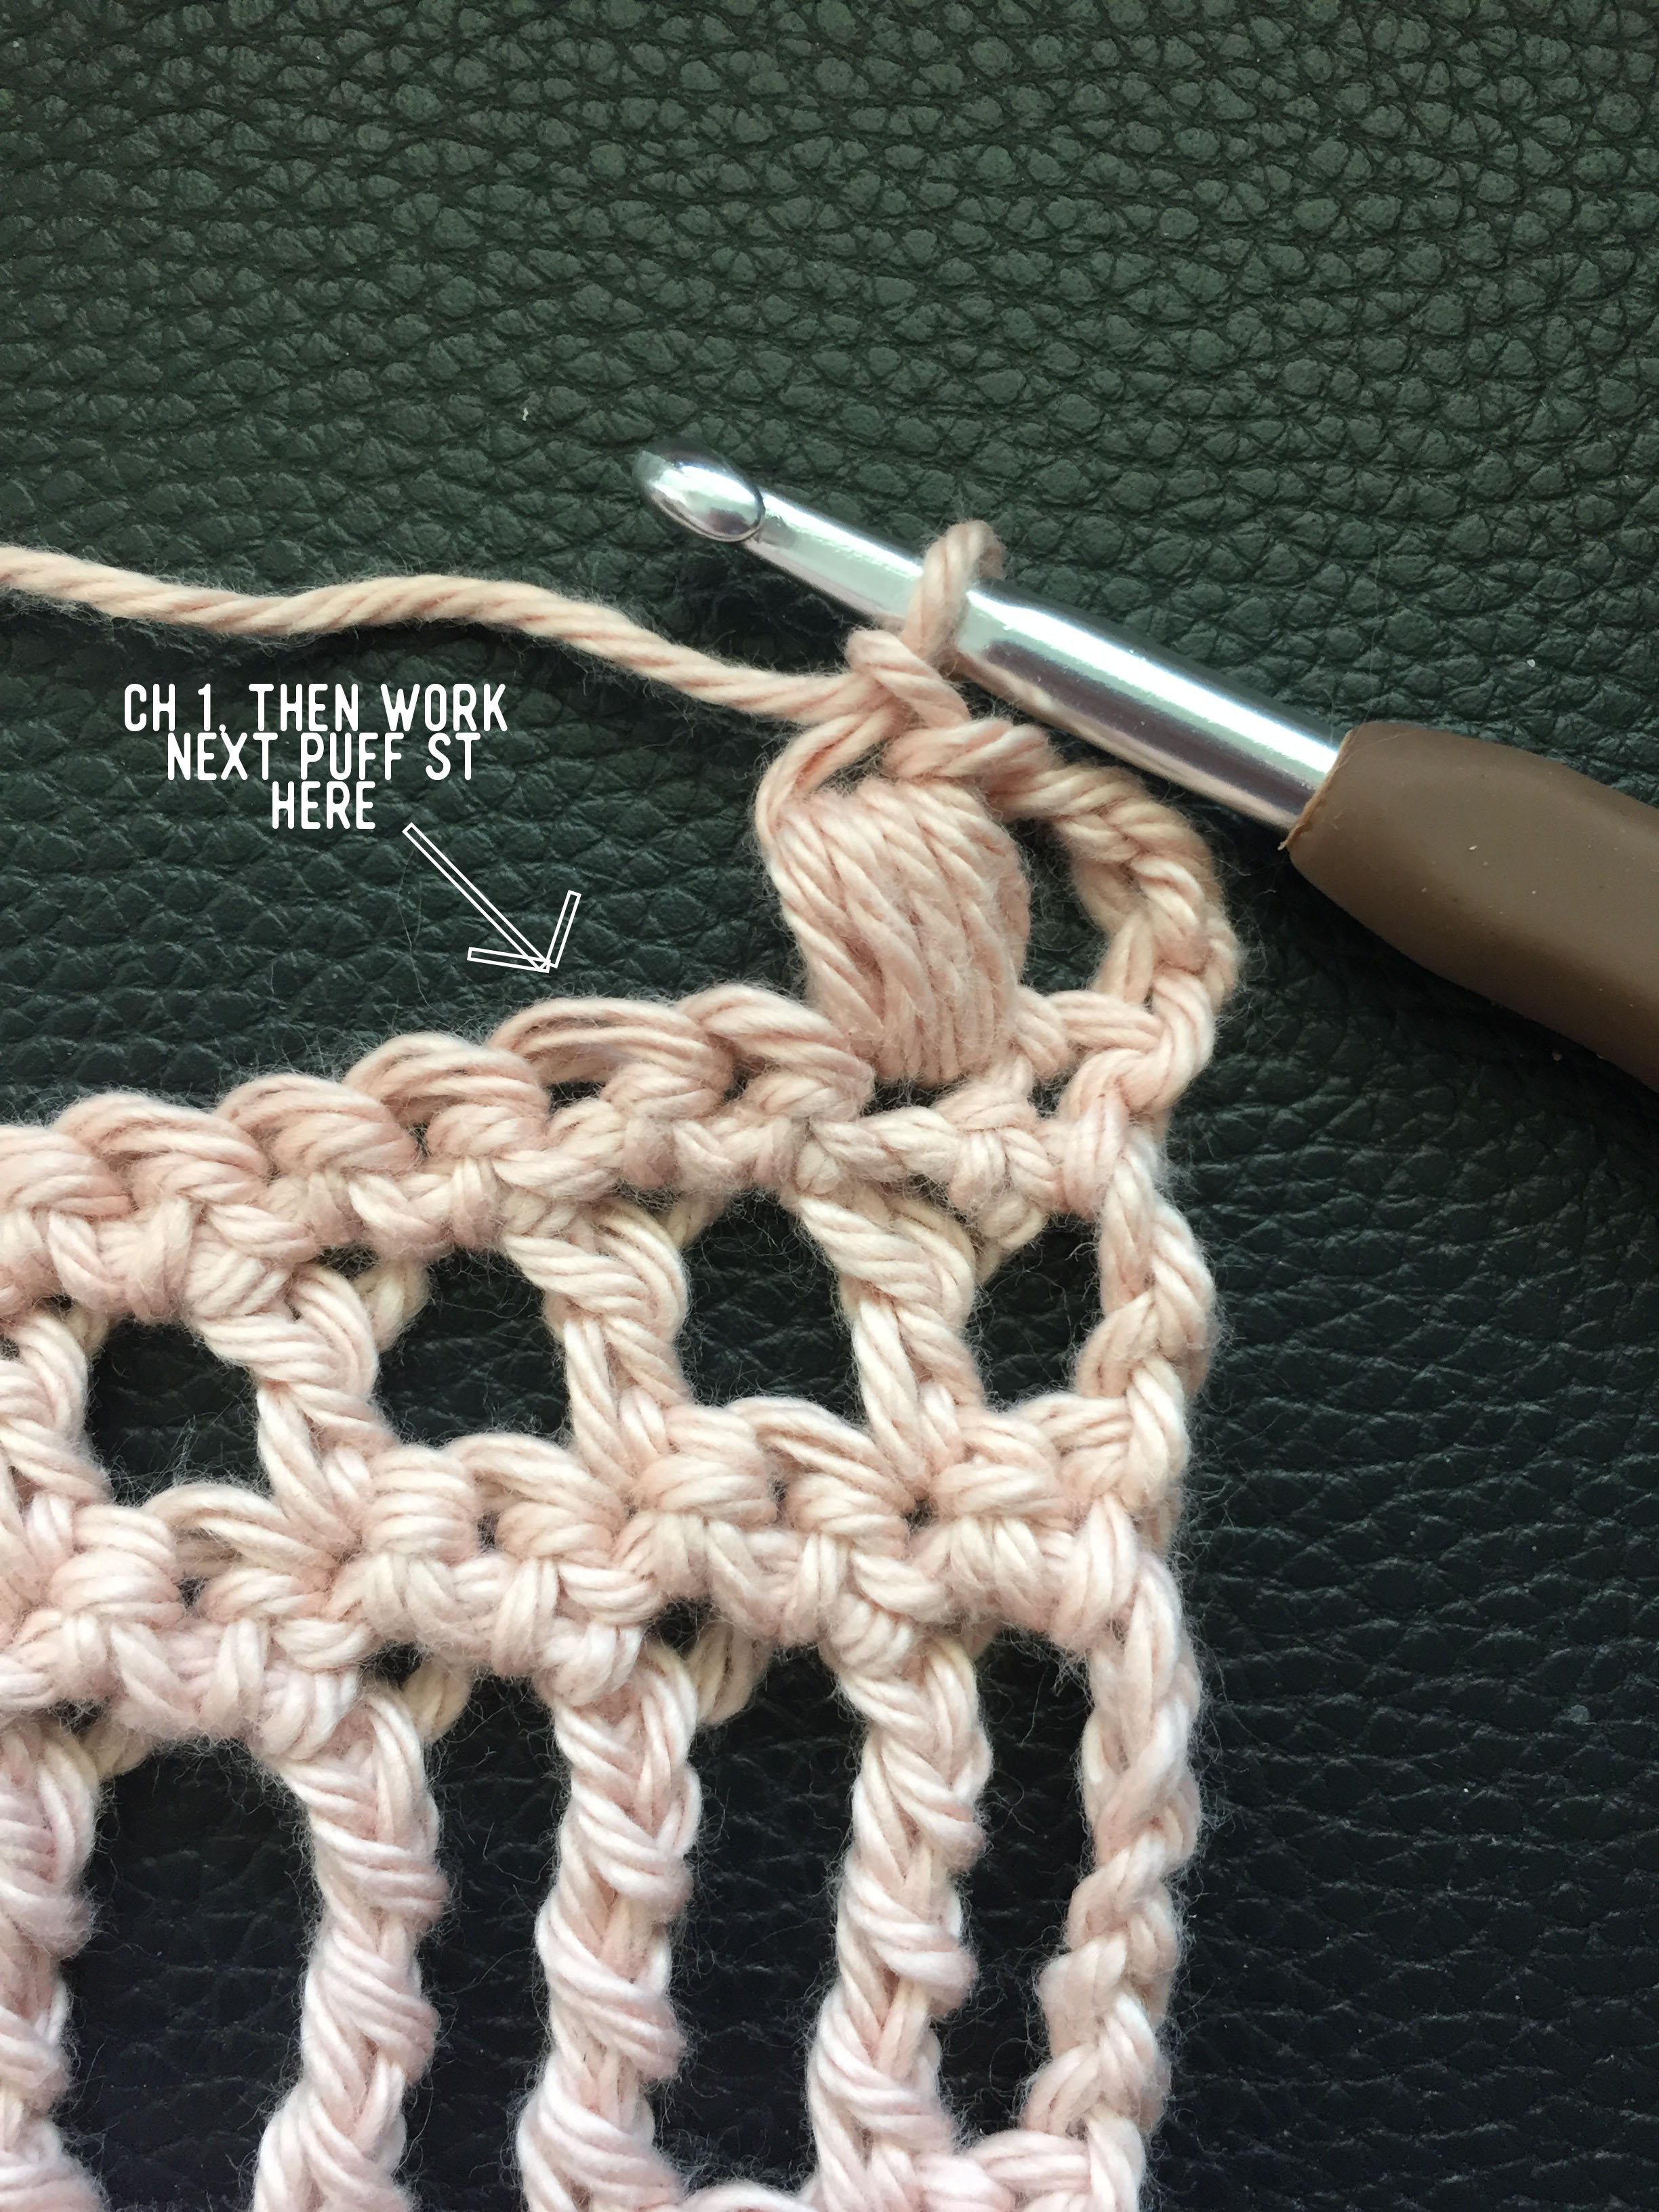
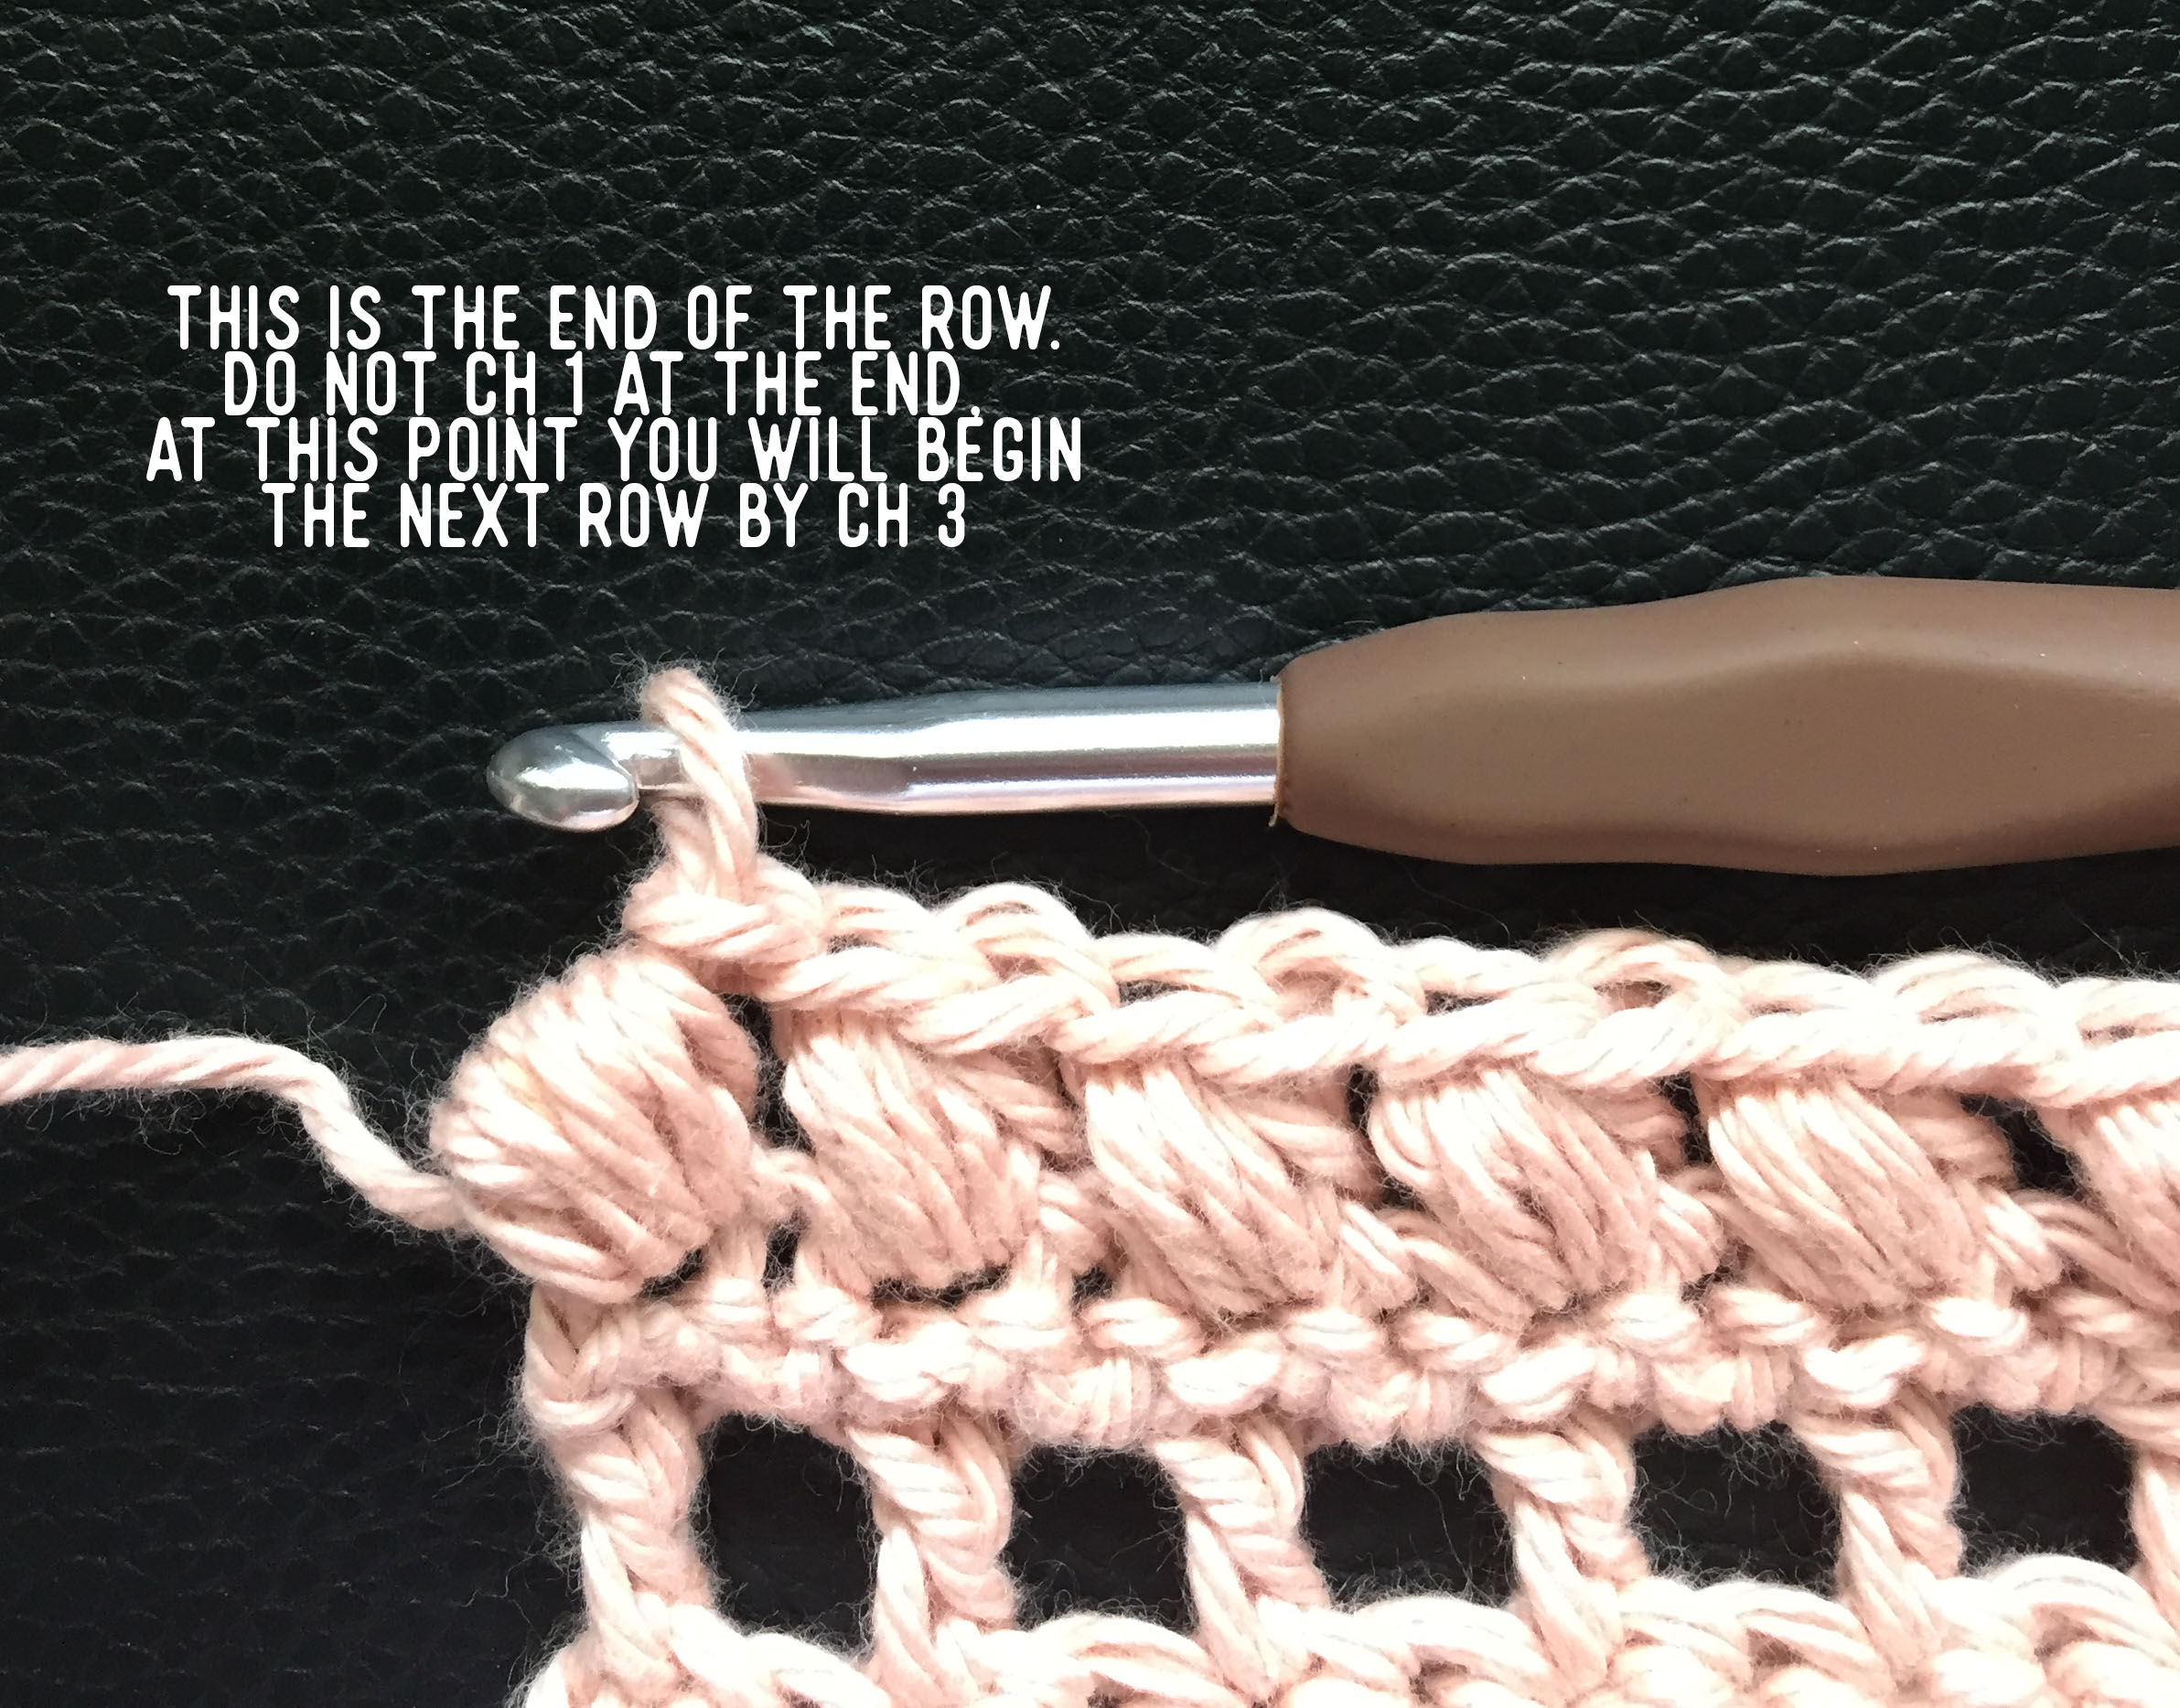
Row 10) ch 3 (3rd ch counts as a "ch 1" sp), turn, sk first st, puff st, [ch 1, sk st, puff st] across row (you won't ch 1 at the end of the row) **see slideshow A in the notes section for visual assistance
Row 11) ch 3 (3rd ch counts as a "ch 1" sp), turn, puff st into next "ch 1" sp, and across **see photo slideshow B in the notes section for where to work puff sts (last puff st is worked into the "ch 1" sp created by the 3rd beg ch from previous row, and don't ch 1 at the end of the row, just like in the previous row)
Row 12) ch 1, turn, sc across row **see Photo C in notes for where to work first sc (work last sc into 3rd ch from beg of previous row)
Rows 13-23) Repeat rows 2-12
Row 24) ch 3 (3rd ch counts as "ch 1" sp), turn, sk first st, dc [ch 1, sk st, dc] 54 times (55 total dc's worked so far), ch 39, sk 39 sts (making sure not to twist ch), dc, [ch 1, sk st, dc] across the remainder of the row (doing [ ] 35 times) **the neck hole will be closer to one side than the other
**just a tip: the second half of the coverup at this point is a mirror image of the first half you just worked. AKA you're working the first half of the coverup, backwards**
Row 25) ch 1, turn, sc across row-- working into the ch's that made the neck hole (work the last sc into the 3rd ch from beg of previous row)
Rows 26-28) Repeat rows 10-12
Rows 29-39) Repeat rows 2-12
Rows 40-47) Repeat rows 2-9
-do not finish off, you are now going to work sc's along the side of your work to make the edge look neater (this will eventually be the bottom of your coverup).
Like Photo D explains in the notes section, you will work sc's along the side of your work from where you left off in row 47. Working the sc's into the very edge.
Once you're finished working sc's down the side, you will finish off. Then you will draw up your yarn on the other unworked side and work sc's all along that side too.
Finish off and weave in all ends.
For the belt/tie you will crochet an i-cord of 54 inches, view Video E in the notes section for how to make an i-cord.
At this point you are ready for assembly....
LARGE/X LARGE
Row 1) ch 229, sc in 2nd ch from and across row (228 total sts, and for the rest of rows)
Row 2) ch 5 (5th ch counts as "ch 1" sp), turn, sk first st, dtr, [ch 1, sk st, dtr] across row
Row 3) ch 1, turn, sc across row (work last sc into the 5th ch from beg of previous row)
Row 4) ch 3 (3rd ch counts as a "ch 1" sp), turn, sk first st, dc [ch 1, sk st, dc] across row
Row 5) ch 1, turn, sc across row (work last sc into the 3rd ch from beg of previous row)
Rows 6-7) Repeat rows 2-3
Rows 8-9) Repeat rows 2-3
Rows 10-11) Repeat rows 4-5
Row 12) ch 3 (3rd ch counts as a "ch 1" sp), turn, sk first st, puff st, [ch 1, sk st, puff st] across row (you won't ch 1 at the end of the row) **see slideshow A in the notes section for visual assistance
Row 13) ch 3 (3rd ch counts as a "ch 1" sp), turn, puff st into next "ch 1" sp, and across **see slideshow B in the notes section for where to work puff sts (last puff st is worked into the "ch 1" sp created by the 3rd beg ch from previous row, and don't ch 1 at the end of the row, just like in the previous row)
Row 14) ch 1, turn, sc across row **see Photo C in notes for where to work first sc
Rows 15-25) Repeat rows 4-14
Row 26) ch 3 (3rd ch counts as "ch 1" sp), turn, sk first st, dc [ch 1, sk st, dc] 55 times (56 total dc's worked so far), ch 43, sk 43 sts (making sure not to twist ch), dc, [ch 1, sk st, dc] across the remainder of the row (doing [ ] 36 times) **the neck hole will be closer to one side than the other
**just a tip: the second half of the coverup at this point is a mirror image of the first half you just worked. AKA you're working the first half of the coverup, backwards**
Row 27) ch 1, turn, sc across row-- working into the ch's that made the neck hole (work the last sc into the 3rd ch from beg of previous row)
Rows 28-30) Repeat rows 12-14
Rows 31-41) Repeat rows 4-14
Rows 42-49) Repeat rows 4-11
Rows 50-51) Repeat rows 2-3
-do not finish off, you are now going to work sc's along the side of your work to make the edge look neater (this will eventually be the bottom of your coverup).
Like Photo D explains in the notes section, you will work sc's along the side of your work from where you left off in row 51. Working the sc's into the very edge-- this is so your edge will have a nicer finish.
Once you're finished working sc's down the side, you will finish off. Then you will draw up your yarn on the other unworked side and work sc's all along that side too.
Finish off and weave in all ends.
For the belt/tie you will crochet an i cord of 58 inches, view Video E in the notes section for how to make an i-cord.
At this point you are ready for assembly....
PLUS SIZE
Row 1) ch 237, sc in 2nd ch from and across row (236 total sts, and for the rest of rows)
Row 2) ch 5 (5th ch counts as "ch 1" sp), turn, sk first st, dtr, [ch 1, sk st, dtr] across row
Row 3) ch 1, turn, sc across row (work last sc into the 5th ch from beg of previous row)
Rows 4-5) Repeat rows 2-3
Row 6) ch 3 (3rd ch counts as a "ch 1" sp), turn, sk first st, dc [ch 1, sk st, dc] across row
Row 7) ch 1, turn, sc across row (work last sc into the 3rd ch from beg of previous row)
Rows 8-13) Repeat rows 2-7
Row 14) ch 3 (3rd ch counts as a "ch 1" sp), turn, sk first st, puff st, [ch 1, sk st, puff st] across row (you won't ch 1 at the end of the row) **see slideshow A in the notes section for visual assistance
Row 15) ch 3 (3rd ch counts as a "ch 1" sp), turn, puff st into next "ch 1" sp, and across **see slideshow B in the notes section for where to work puff sts (last puff st is worked into the "ch 1" sp created by the 3rd beg ch from previous row, and don't ch 1 at the end of the row, just like in the previous row)
Row 16) ch 1, turn, sc across row **see Photo C in notes for where to work first sc
Rows 17-27) Repeat rows 6-16
Row 28) ch 3 (3rd ch counts as "ch 1" sp), turn, sk first st, dc [ch 1, sk st, dc] 56 times (57 total dc's worked so far), ch 47, sk 47 sts (making sure not to twist ch), dc, [ch 1, sk st, dc] across the remainder of the row (doing [ ] 37 times) **the neck hole will be closer to one side than the other
Row 29) ch 1, turn, sc across row-- working into the ch's that made the neck hole (work the last sc into the 3rd ch from beg of previous row)
Rows 30-32) Repeat rows 14-16
Rows 33-43) Repeat rows 6-16
Rows 44-51) Repeat rows 6-13
Rows 52-55) Repeat rows 2-5
-do not finish off, you are now going to work sc's along the side of your work to make the edge look neater (this will eventually be the bottom of your coverup).
Like Photo D explains in the notes section, you will work sc's along the side of your work from where you left off in row 55. Working the sc's into the very edge.
Once you work sc's all the way across to the other side, you will finish off. Then you will draw up your yarn on the other unworked side and work sc's all along that side too.
Finish off and weave in all ends.
For the belt/tie you will crochet an i cord of 62 inches, view Video E in the notes section for how to make an i-cord.
At this point you are ready for assembly....
Assembly:

To begin your assembly, you will fold the piece in half, short sides together. You will make the back side of the coverup six inches longer than the front side (see photo above). You can tell the front and back sides of the coverup apart by how long of a distance there is between the neck and the bottom: the front side has a shorter distance than the back. You could safety pin them together to secure if you'd prefer before sewing.

Now you are ready to sew the sides, grab your needle and long strand of yarn. Line your measuring tape up against the side of your folded coverup, just like in the photo above. The photo indicates where the different sizes will sew according to color...
-for size S/M (RED): you will sew beginning 10 inches from the top of the coverup, and down 10 inches, AKA you are sewing from inches 10 to 20
-for size L/XL (BLUE): you will sew beginning 11 inches from the top of the coverup, and down 10 inches, AKA you are sewing from inches 11 to 21
-for size PLUS (GREEN): you will sew beginning 12 inches from the top of the coverup, and down 10 inches, AKA you are sewing from inches 12 to 22
Do this for both sides of the coverup..
After you're done sewing you'll just weave your i-cord belt in and out of the rows where the coverup hits the small of your waist-- I chose to weave it in about 6 inches from the bottom of the neck opening.
At this point you could either add fringe/tassels if your heart desired. And you may need to iron/block your piece for it to lay nice and flat.

Had to get a pic with a cute baby and a popsicle!
And just like that, you've completed the cutest lil' swim coverup! What a easy and fun project for summer. If you make your own, you've GOTTA share a pic with me over on Instagram! I'd love to swoon over it :) Take care, and happy hookin'!
-Meg