Free Crochet Pattern for a Textured Jute Rug

Free Crochet Pattern for a Textured Jute Rug - Megmade with Love

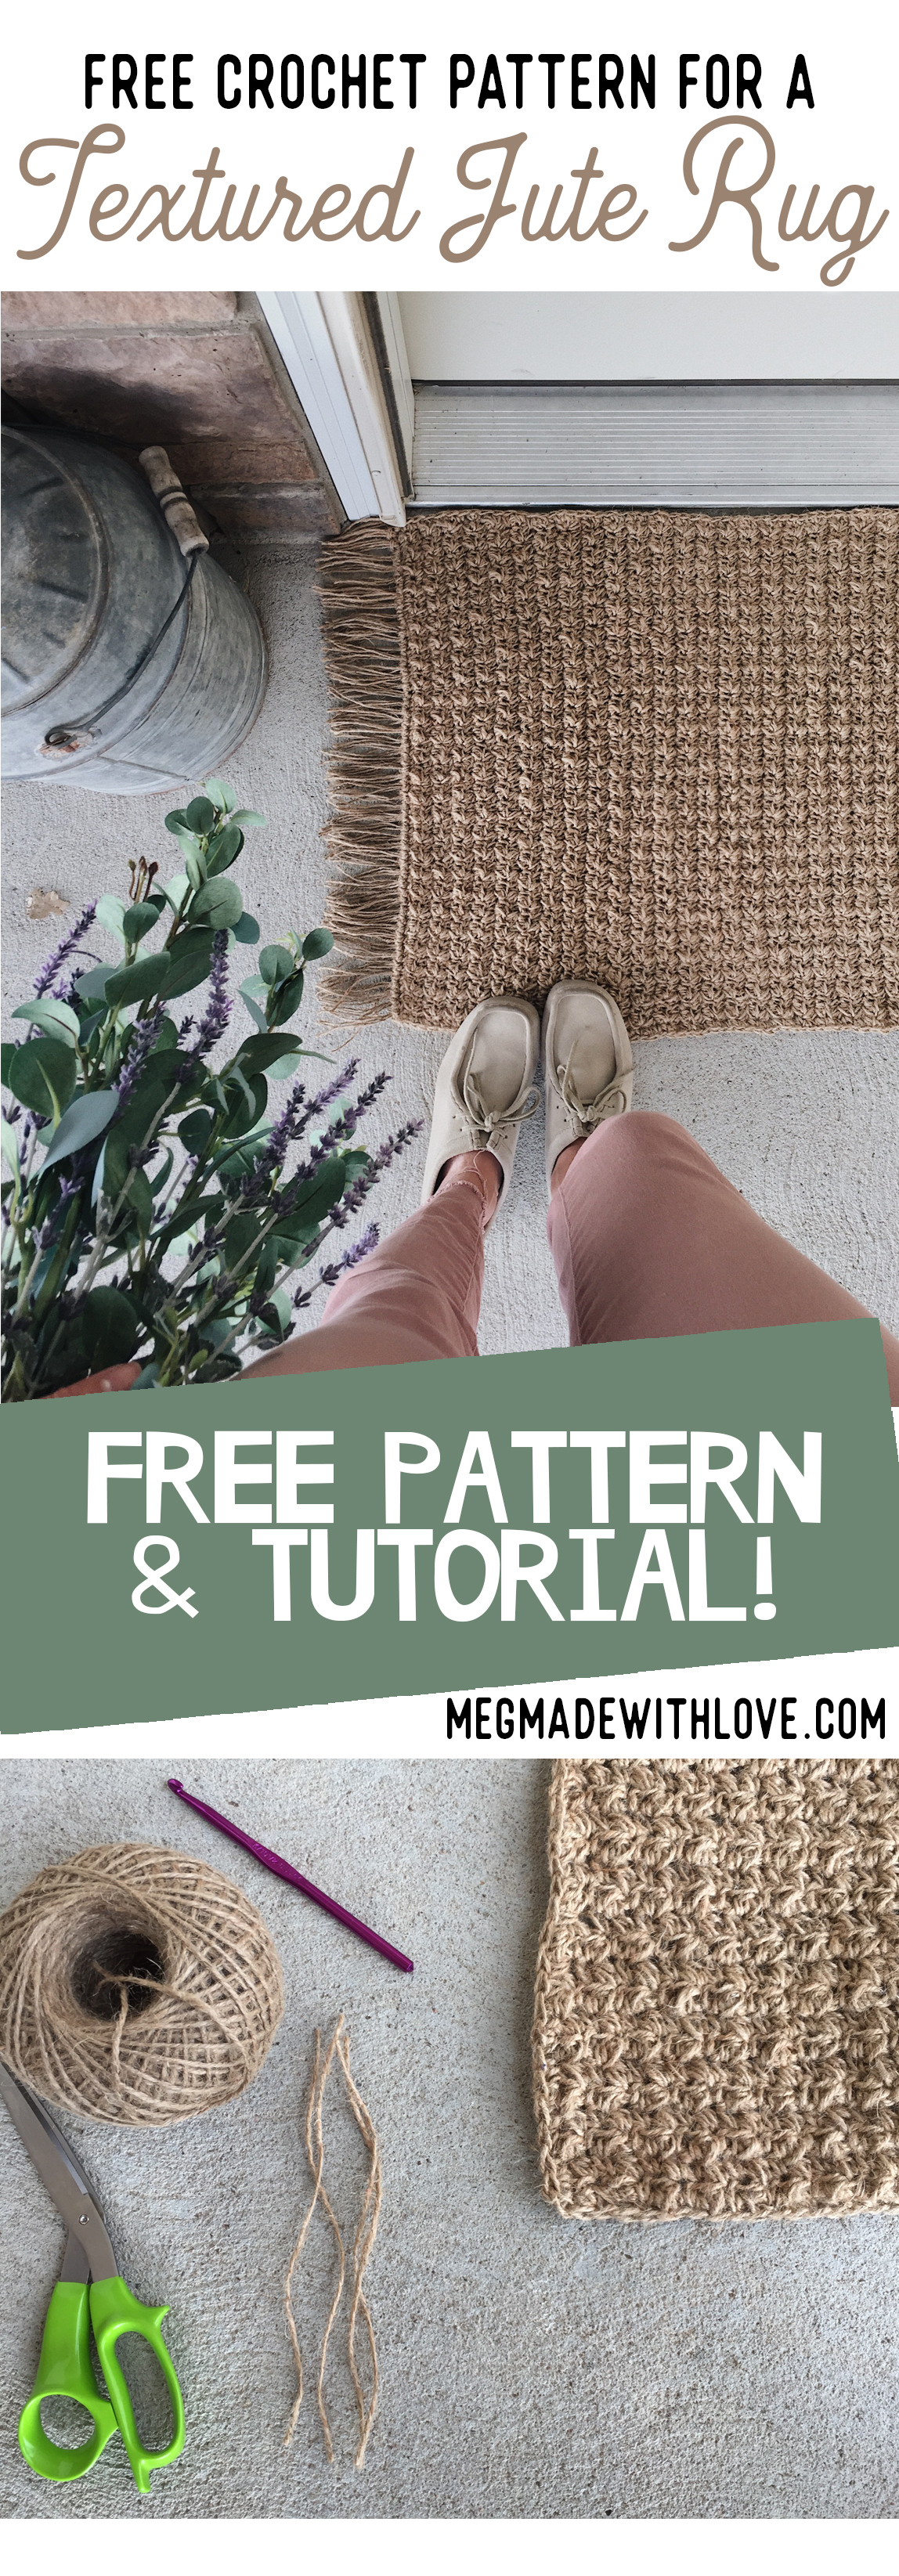
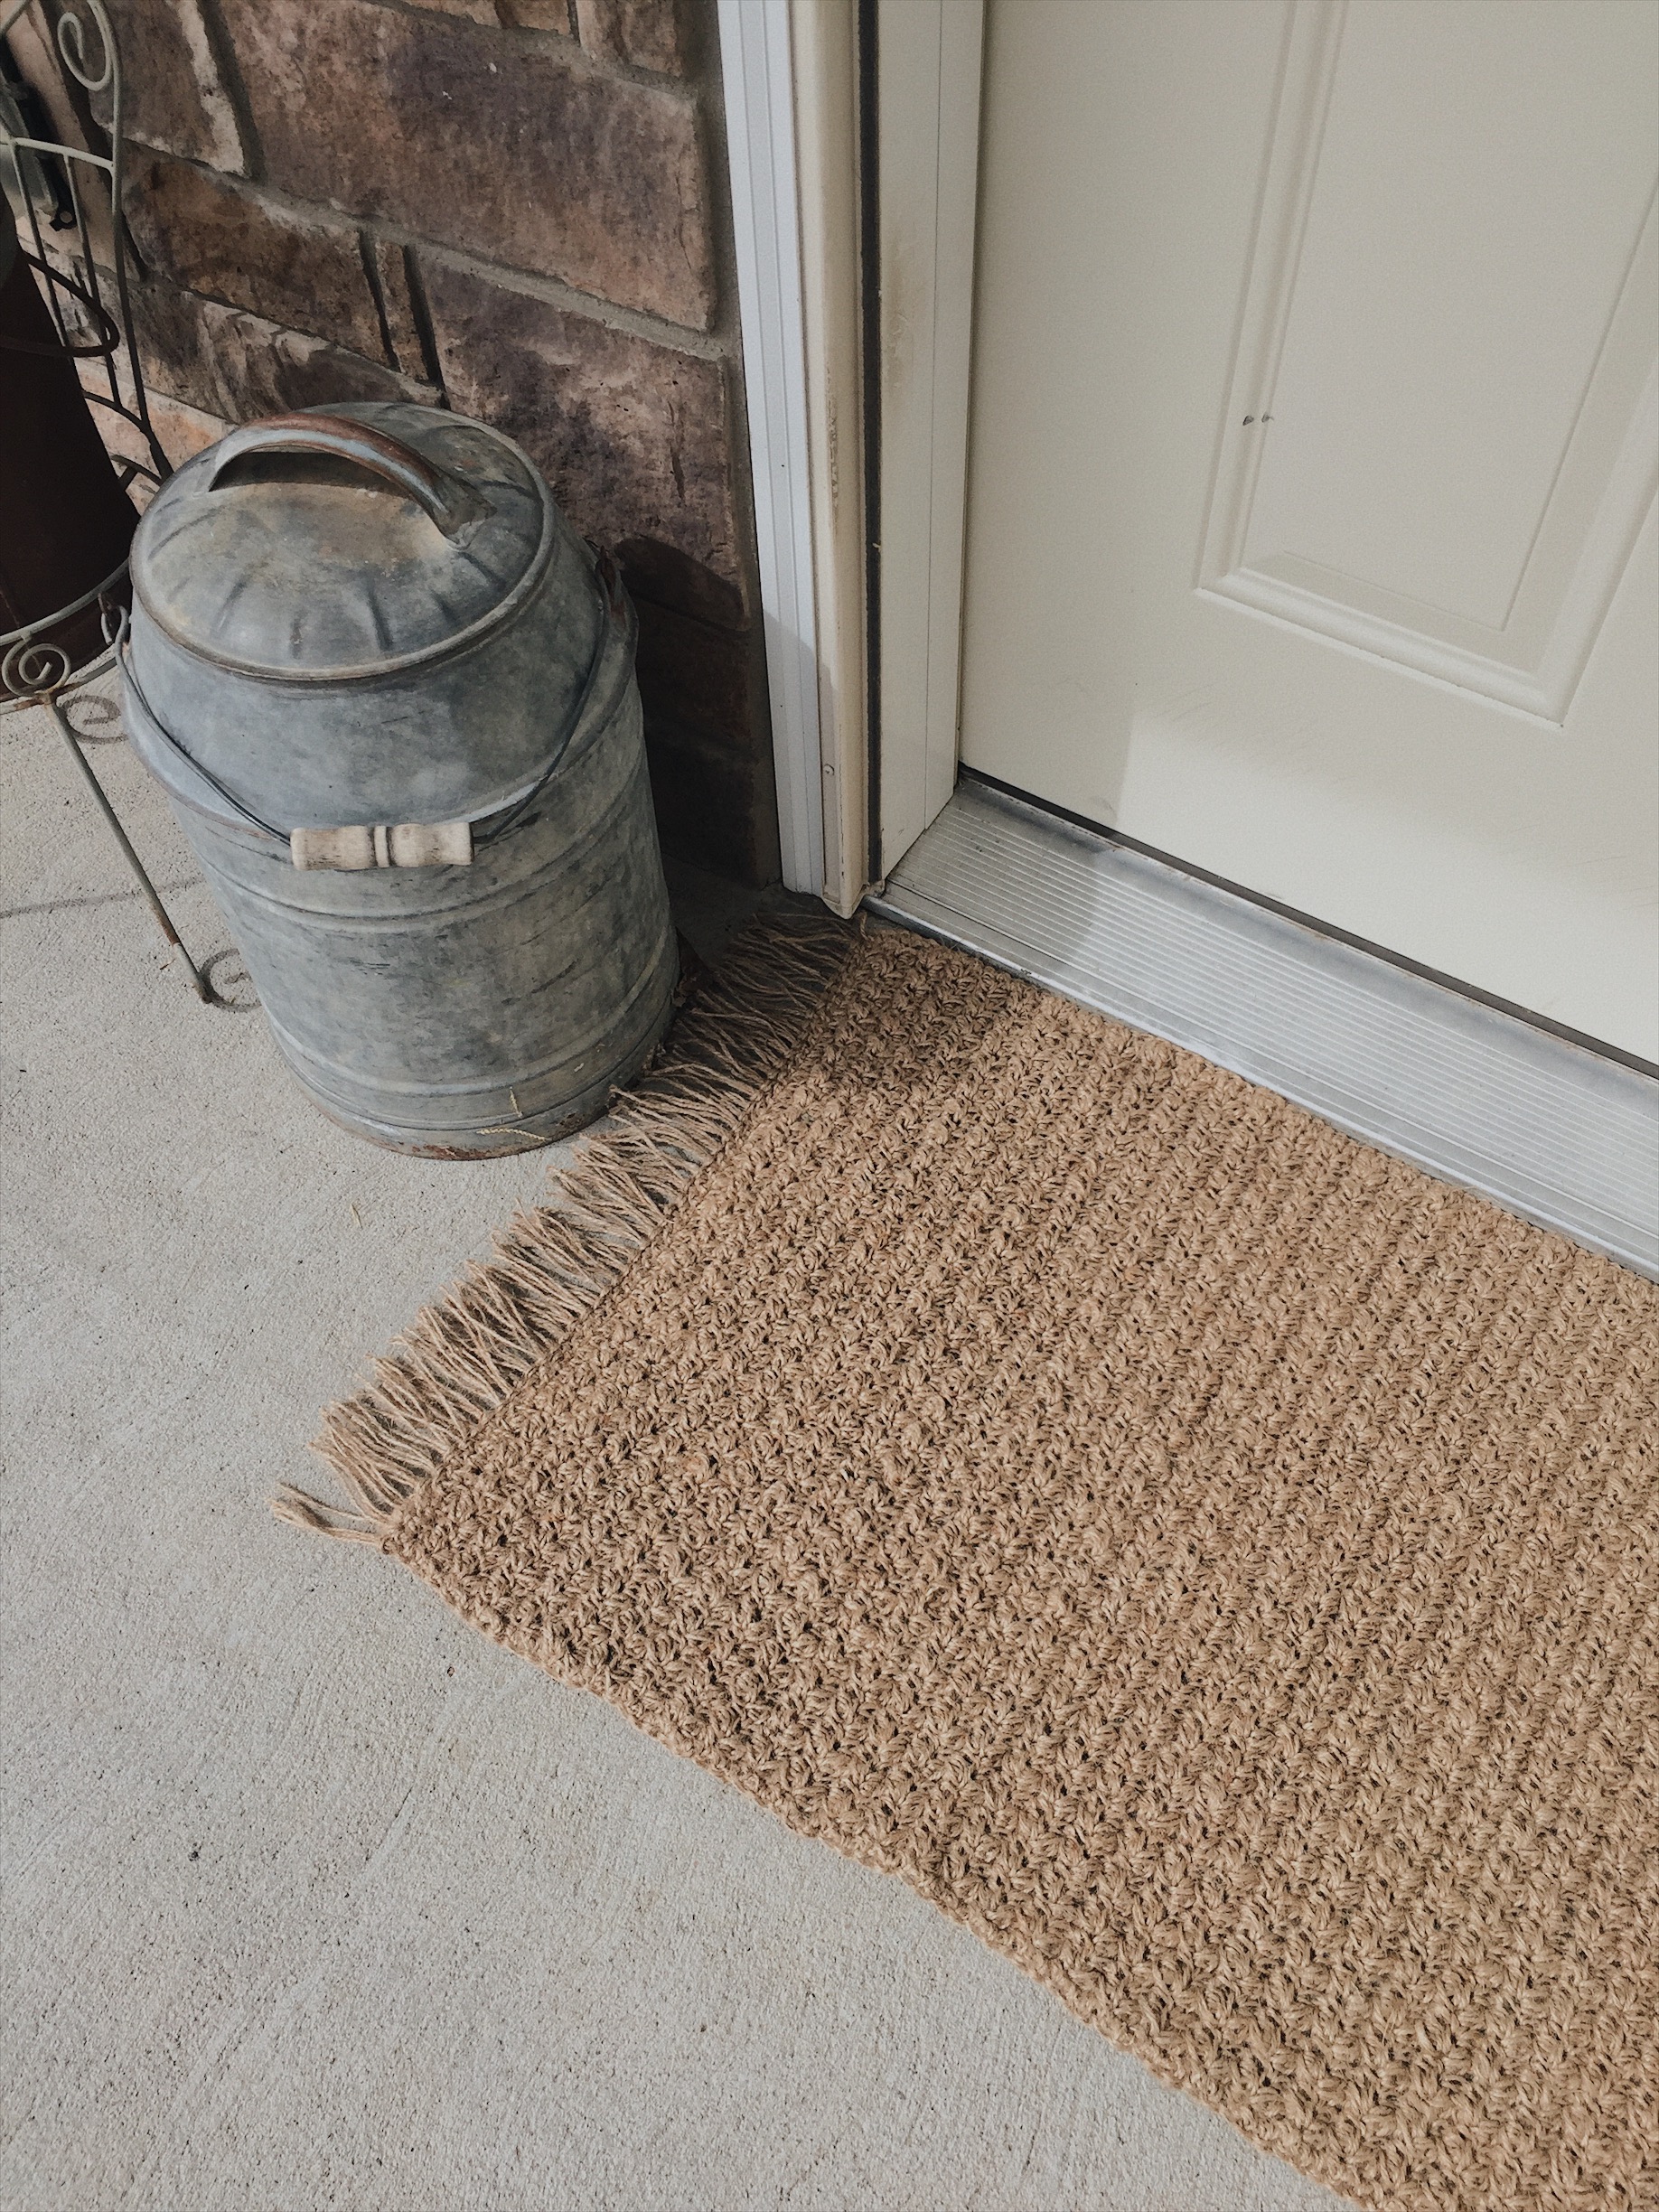
I've got a fun and simple little pattern for you today.. it's a rustic and textured jute rug! It's perfect for your front door or could even be made into a cool runner for your kitchen. 

Free Crochet Pattern for a Texture Jute Rug Doormat - Megmade with Love

Let me tell ya, I am in love with this rug. I think the jute offers such a natural and rustic look- just my kinda style. And while it looks really cool, let me warn you.. it is ROUGH to work with. It rubs on your hands and can wear out your wrists way more than normal yarn. All that said though, I can say today it is worth it because of the end result. I just made sure to listen to my body when my wrists were hurting and took multiple breaks. I also included other ways to make working with jute easier in the notes below.

Free Crochet Pattern for a Texture Jute Rug Doormat - Megmade with Love

And the texture of this rug?! It's the best. I love me some good texture... I use a stitch I called a "mini puff stitch", which is basically half a puff stitch. This stitch also adds some good weight to the rug so it's not to flimsy.
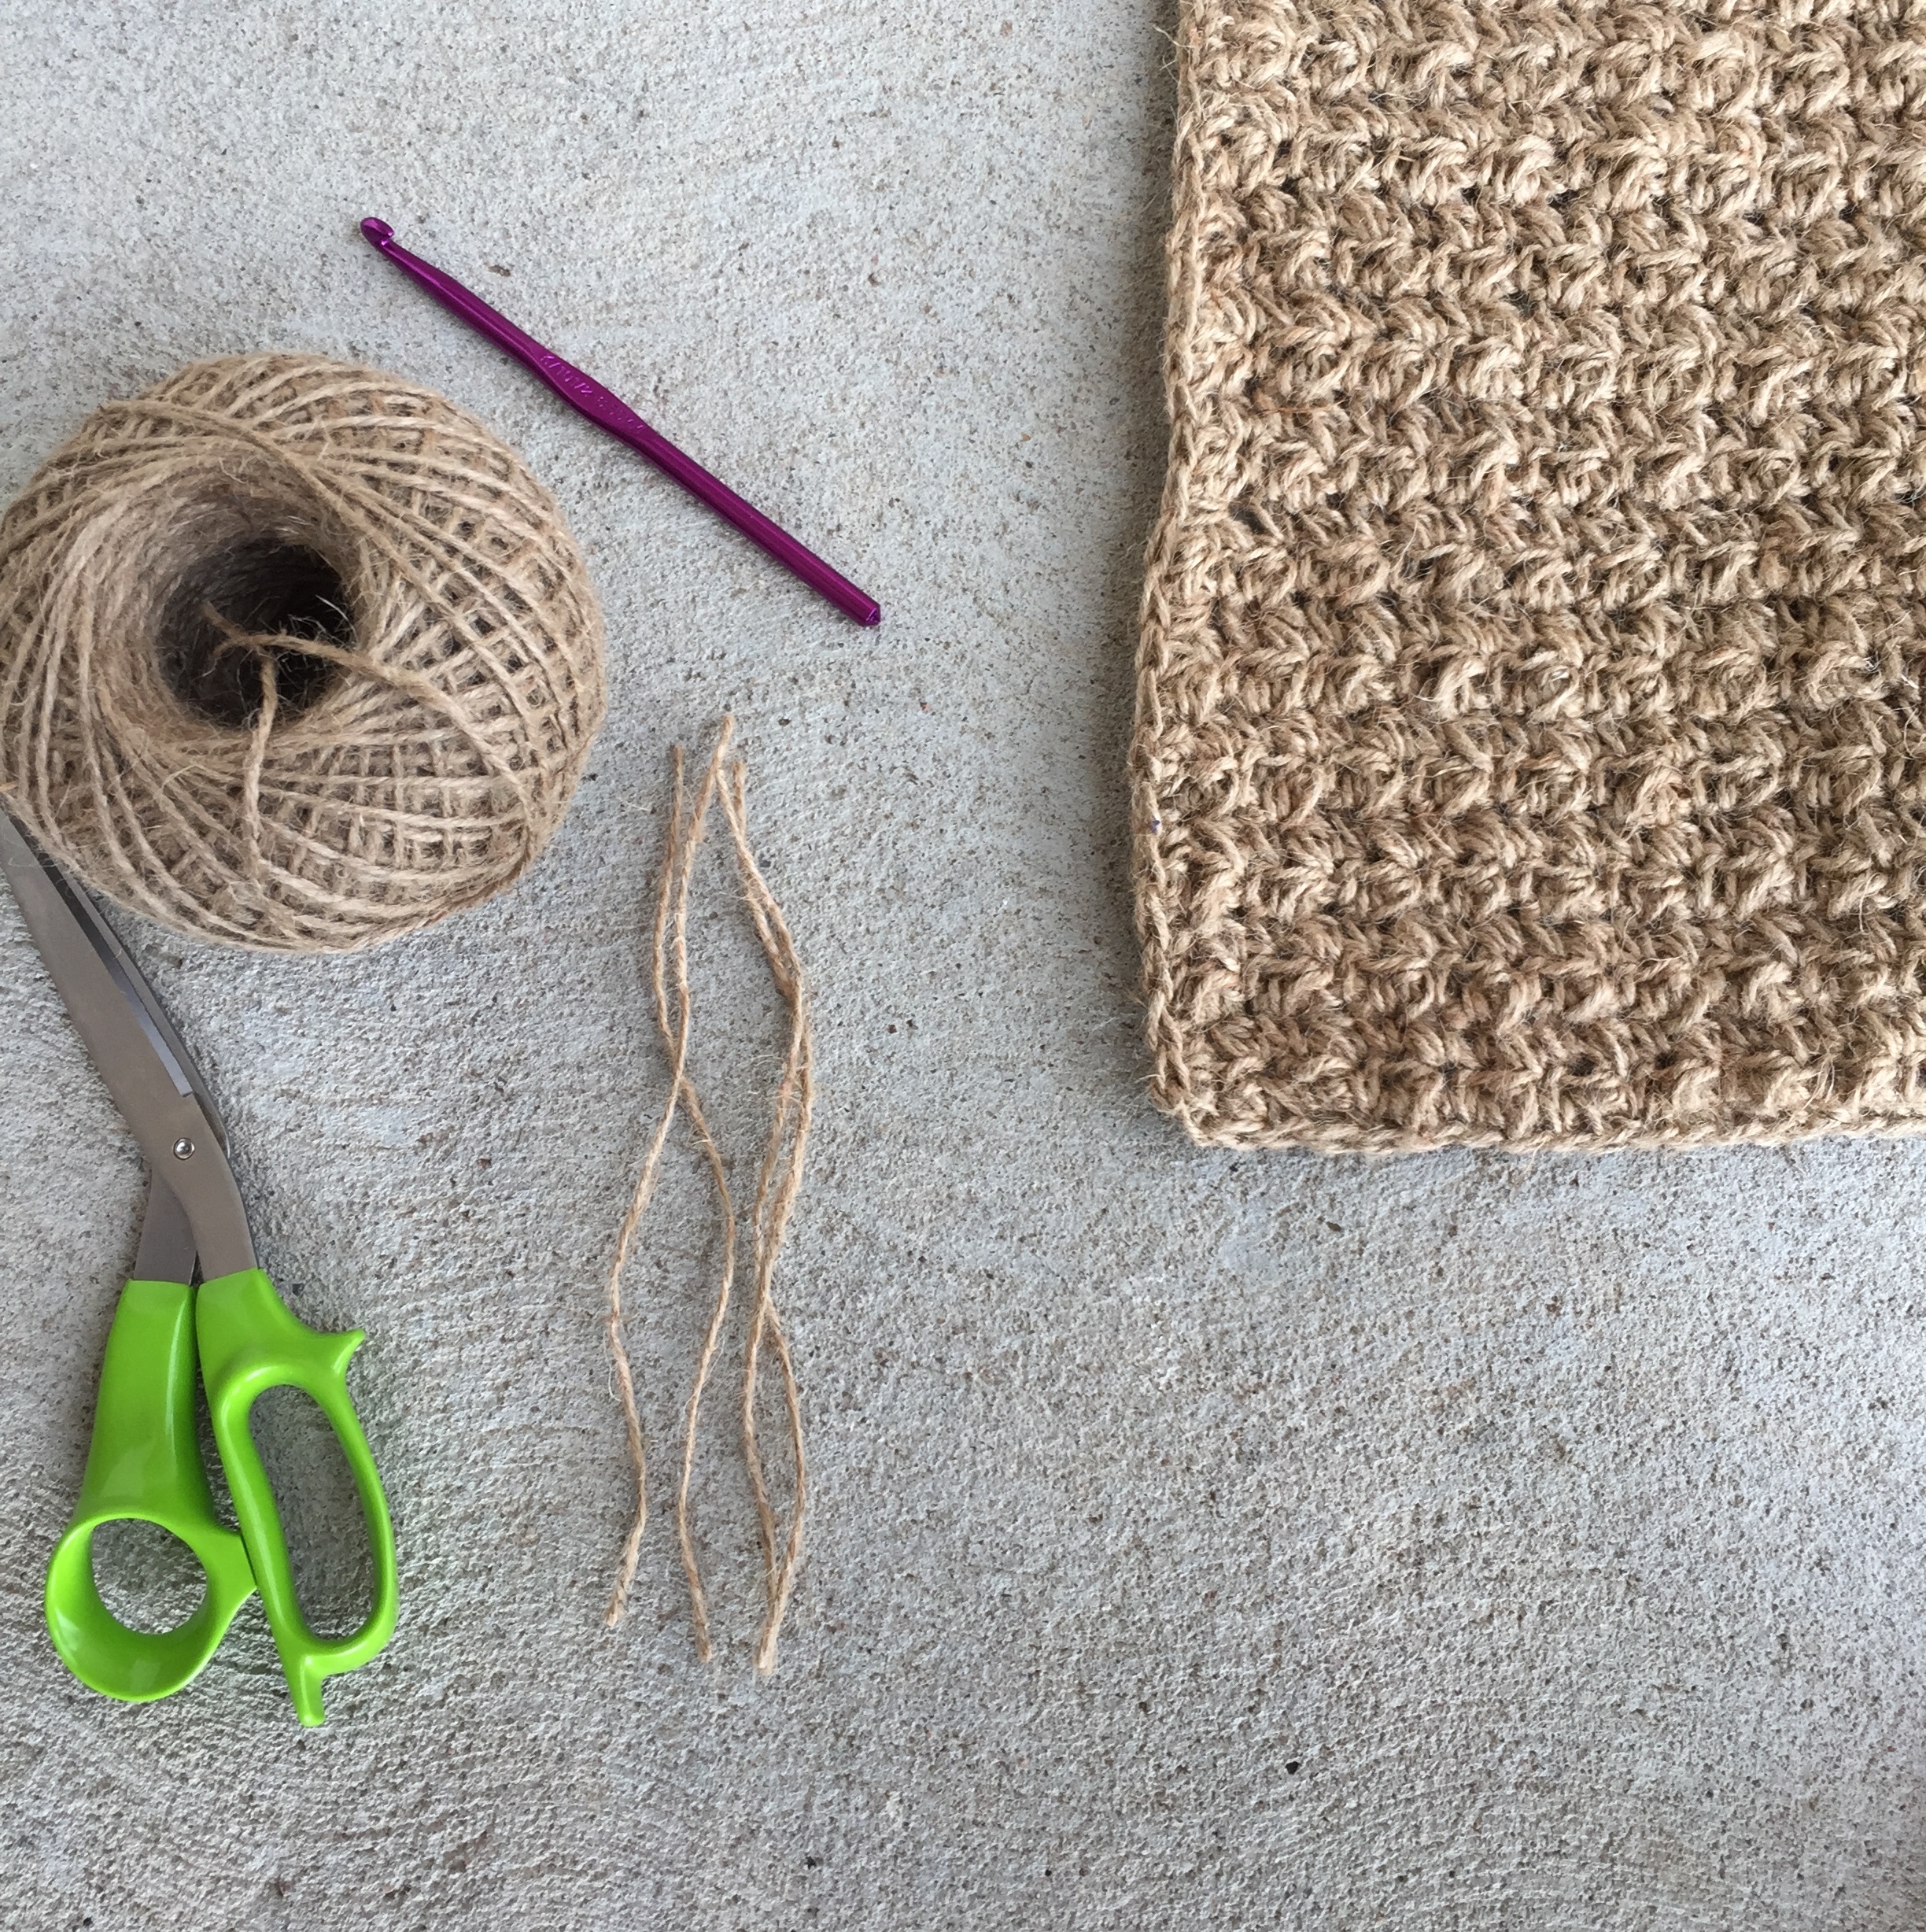
What you'll need:

-1575 feet (525 yards) of jute string that's 2mm wide, the exact jute I used is found at Hobby Lobby (link here -- this does not include yardage for the fringe. Add another 50 yards if you're wanting to add fringe. I used FOUR of these jute balls, barely dipping into the fourth one)
-size k hook (6.5 mm), or size needed to obtain gauge
-yarn needle
-scissors
-optional: some sort of rug backing. I haven't backed mine yet, but I would like to so it doesn't slide around. You could use some of this latex rubber backing that you brush on the back or you could use a rubber pad like this one.

Gauge:

10 stitches of (mps, sc) by 8 rows equals a four inch square

Measurements:

unblocked rug (excluding fringe) measures 21 by 32 inches

Abbreviations:

ch('s)=chain(s), yo=yarn over, sc=single crochet, mps=mini puff stitch (see notes for description), st(s)=stitch(es)

Notes:

-in this pattern I use a stitch I call a "mini puff stitch" (or "mps" in the pattern). It's called mini because you are inserting your hook into the designated stitch half as many times as a normal puff stitch. Below is how to work the mini puff stitch :

mps: yo, insert hook into stitch, yo and draw loop back through, yo, insert hook into same st, yo and draw loop back through, (there should be five loops on your hook at this point) yo and draw through all loops on hook. 

-chains at beginning of rows do not count as a stitch

-working with jute can be hard. It's very rough and can rub on your skin. It can also prove difficult to manage, wearing out your wrists. I took many breaks while working on this rug so I wouldn't over work my hands, and suggest you do the same! Here's a couple of other things that helped me out when working with jute: changing up the way you hold the jute to make it more comfortable... if possible it would be best to have a middle-pull skein/ball of jute to make it easier to work with... @oneofakate suggest putting tape on your hands where the jute rubs-- I thought that was a great idea, I actually tried wearing gloves but it didn't really work out... I just held the jute very loosely in my left hand... You could also use a hook with a rubber grip... 

-you could easily make this rug into a runner by adding rows until the desired length is achieved. You could also customize the width by adding or taking away stitches in multiples of 2.

-you may want to block your rug to make it lay better. You could just spray with water and stretch around to your liking and lay on a flat surface to dry.

-like mentioned above, you could add any sort of rug backing to keep it from shifting around

Pattern

Row 1) ch 51, mps (see notes for how to do this stitch) in second stitch from hook, sc in the next st, [mps, sc] repeat [ ] across the row, ending with a sc (50 total sts - 25 mps + 25 sc)

Rows 2-72) ch 1, turn, [mps, sc] repeat [ ] across row, ending with a sc (50 total sts - 25 mps + 25 sc)

-at this point I decided to sc around the entire outside perimeter of the rug to make more of a neat edge. I just started down the left edge from where I left off in row 72 by chaining one and working sc's all the way around the rug, working 2 sc into the corners. Then once I made it back to that chain one I joined with a slip stitch. 

Fasten off, weave in ends

Fringe:

Free Crochet Pattern for a Textured Jute Rug - Megmade with Love

For the fringe I decided to cut pieces of jute about 8 inches long...

Free Crochet Pattern for a Textured Jute Rug - Megmade with Love

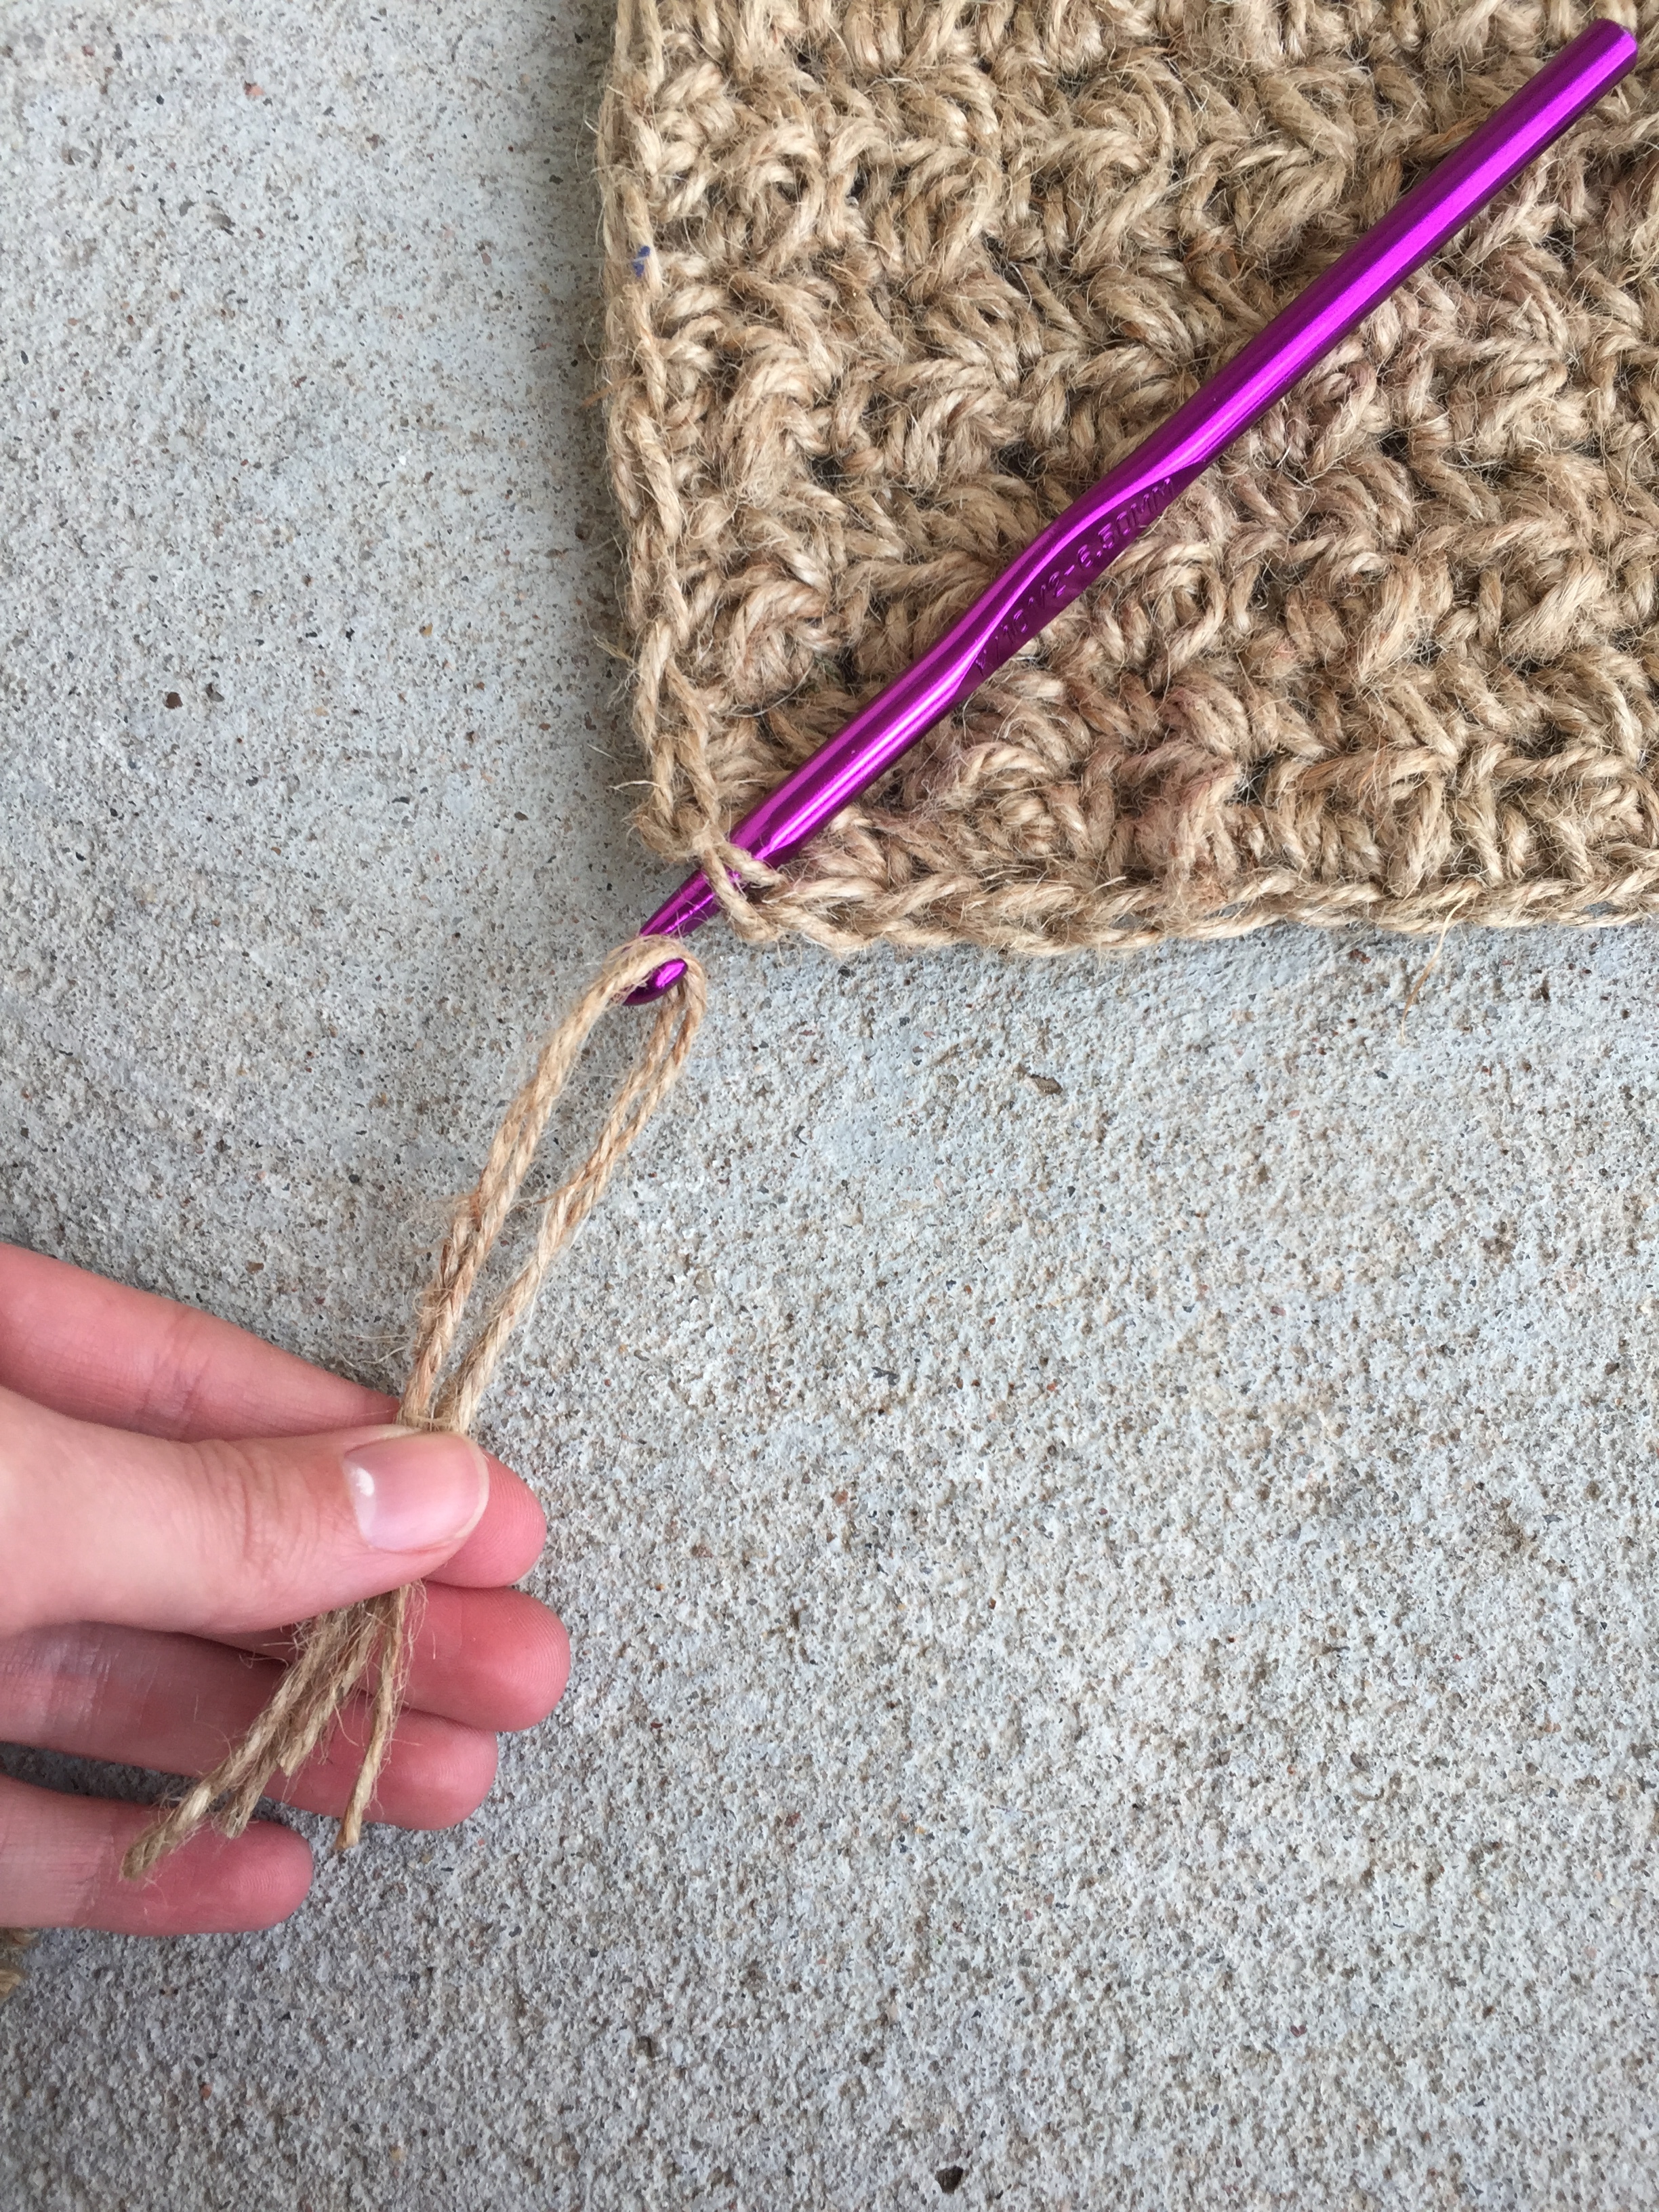
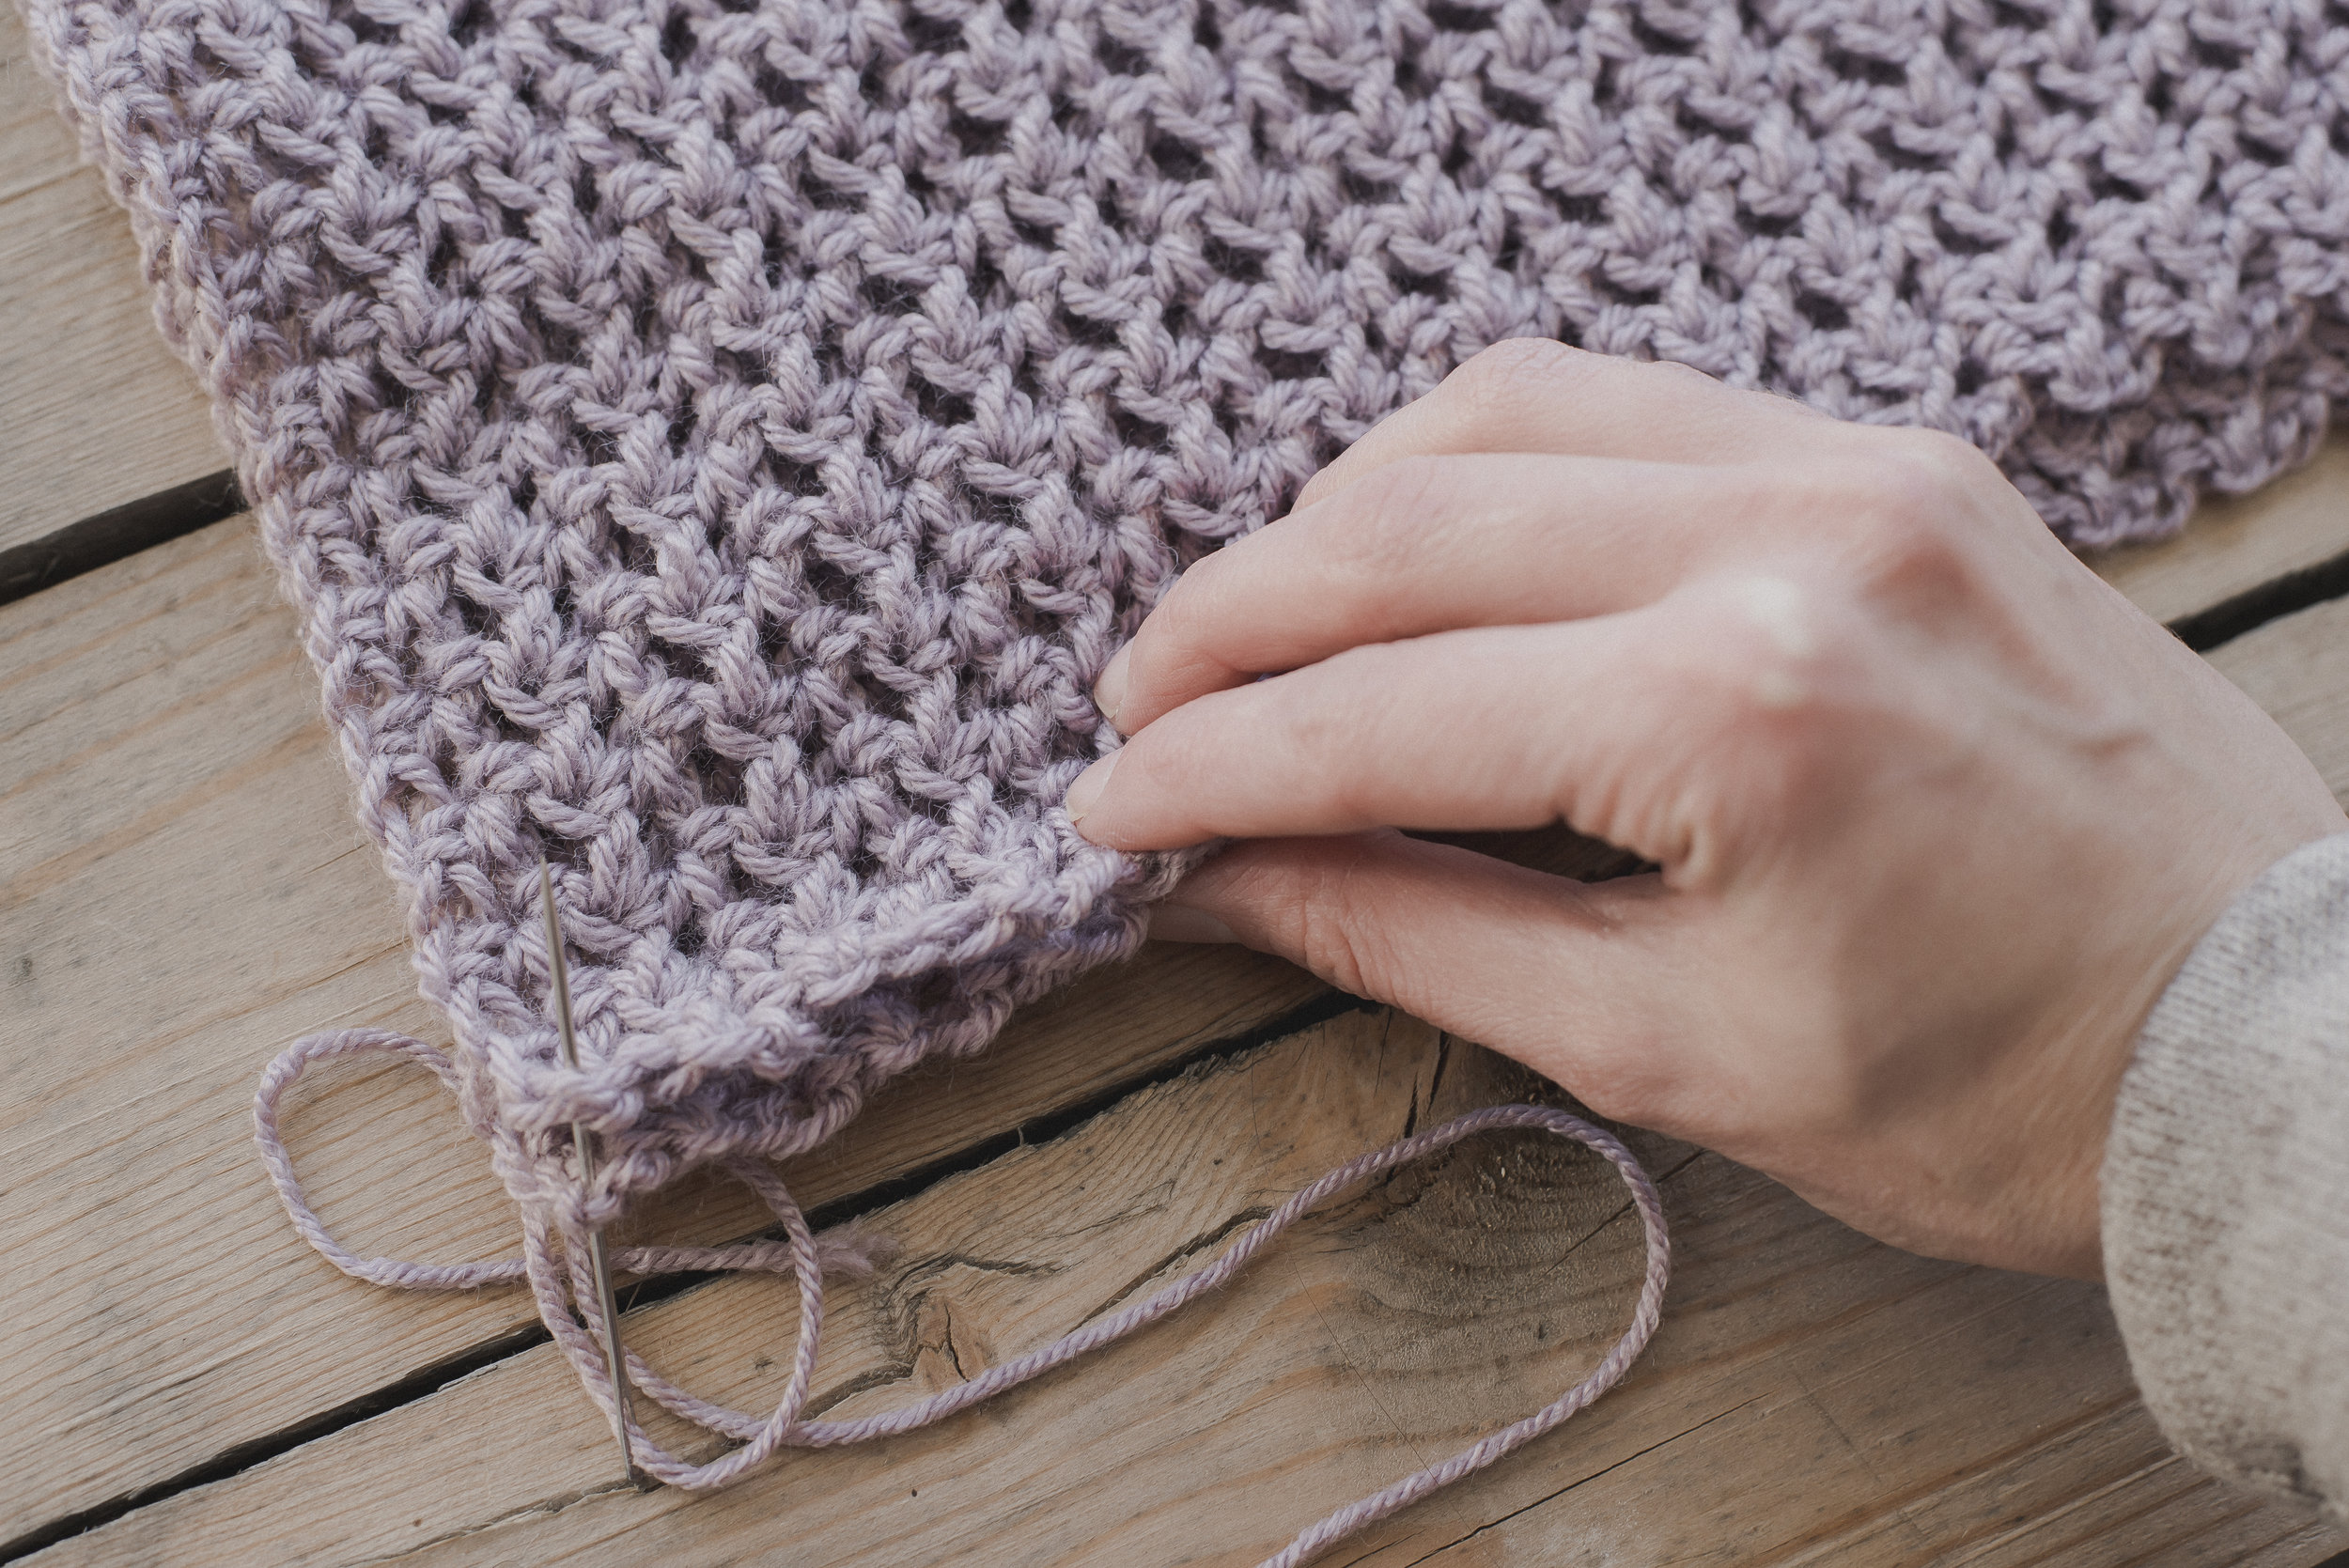
To work the fringe I took two 8-inch pieces and folded them in half. Then I drew those pieces through the stitches on the short ends of the rug with my crochet hook, like shown in the photo above. Don't pull all the way through!

Textured Jute Rug

Then you will pull the ends through those loops you just partially pulled through (shown above). You're essentially just tying them onto the ends.

Textured Jute Rug

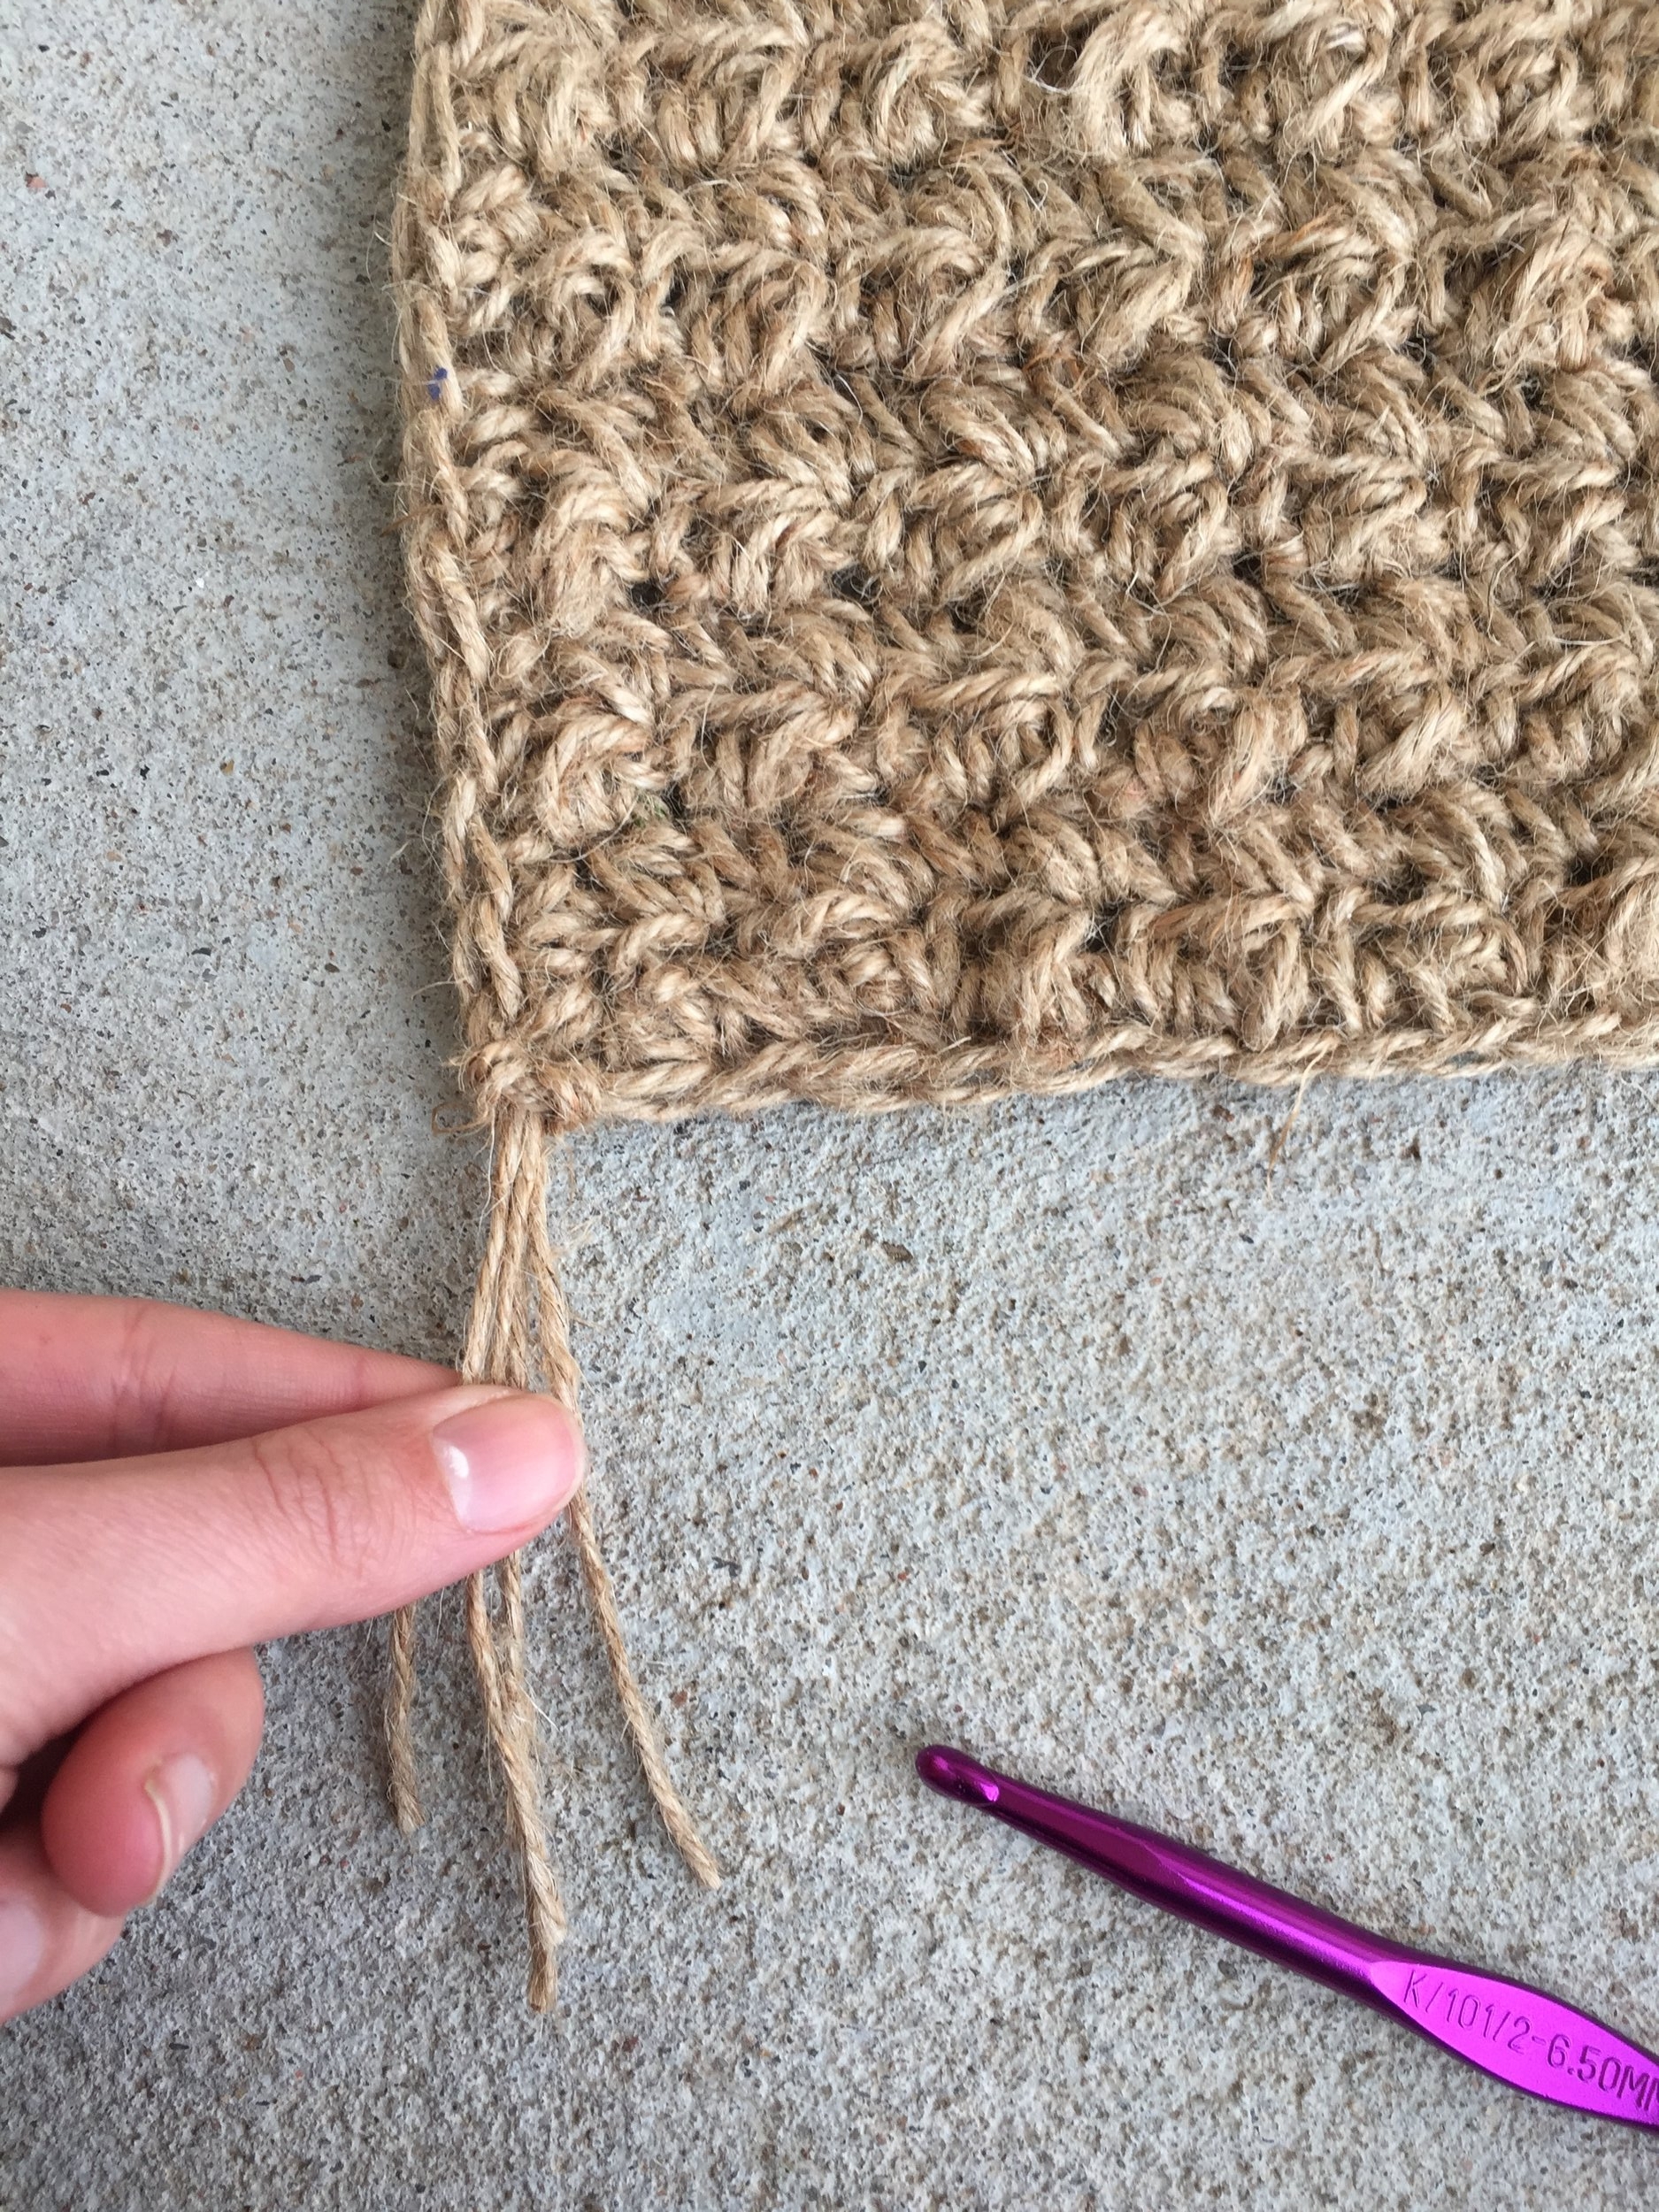
To finish the knot, just pull the ends tightly to secure. Continue doing this all along the short ends of your rug. You may need to snip the ends to even them out.

Once all the fringe is added your rug is complete! You may wish to block your rug so it will lay to your liking. 

Free Crochet Pattern for a Texture Jute Rug Doormat - Megmade with Love

Hope you stuck it out with the jute to make this simple rug! I think the key, for me, was to take breaks to give my hands a break. It really did make a difference.. 

If you end up making your very own jute rug, feel free to tag me over on Instagram-- I'd love to admire it :)

Take care and happy hookin'!!
Meg

Free Crochet Pattern for a Textured Jute Rug Doormat - Megmade with Love

Free Crochet Pattern for The Perfect Spring Sweater

Free Crochet Pattern for the Perfect Spring Sweater - Comfy Cardigan

***To purchase the PDF version of this pattern you can find it in my shop by clicking here. Great for easy printing!***

With Spring amongst us officially, I am so jazzed to bring this new simple, Spring-y cardigan to the blog. It's lightweight and airy-- perfect for those chilly Spring mornings.. 

Free Crochet Pattern for the Perfect Spring Sweater - Comfy Cardigan

The sweater offers a laid-back, oversized feel to it that I love. It looks great dressed down or even thrown on over a dress with a belt too! It's made up of a super simple half double crochet mesh (I wrote a tutorial on how to execute this stitch here), and with zero increases or decreases- it truly is a piece of cake to make. 

Free Crochet Pattern for the Perfect Spring Sweater - Comfy Cardigan

The yarn I used for it was Knit Picks Brava Sport yarn in the color "Seraphim" (see it here) and I'm in l o v e with the color of this yarn-- precisely what I wanted. Another big reason I chose to use it was because I can machine wash and dry it, holla!!! This yarn is a category "2" weight yarn, but truly felt very similar to many "3" weight yarns I've used... I wrote more on this and substituting for this sweater in the notes below.

Free Crochet Pattern for The Perfect Spring Sweater - Oversized Cardigan

Since this design is so simple, it's crazy easy to customize to your specific body type. And it's available in sizes XS-3X! You're gonna love this sweater, I promise :)

What you'll need:

-Sport weight yarn (category “2”, I used Knit Picks Brava Sport yarn in color “Seraphim”, see notes for yardage and more information on substituting for this yarn)
-8 mm hook, or hook needed to obtain gauge
-Yarn needle
-Safety or sewing pins

Gauge:

two ways to assess gauge:
- 12 hdc by 9 rows equals a four inch square
- worked up as pattern calls: 16 sts of (hdc, sk st, ch 1) -- so 8 hdc, 8 ch’s by 10 rows equals a four inch square

Abbreviations:

ch(’s)=chain(s), st(s)=stitch(es), hdc=half double crochet, sk=skip

Notes:

Measurements & yarn yardage for the sweater sizes (approximately):
XS: Bust: 34 inches, Length: 24 inches (Approx 1,000 yards)
S: Bust: 36 inches, Length: 24 inches (Approx 1,050 yards)
M: Bust: 38 inches, Length: 25 inches (Approx 1,100 yards)
L: Bust: 40 inches, Length: 25 inches (Approx 1,150 yards)
XL: Bust: 42 inches, Length: 26 inches (Approx 1,200 yards)
2XL: Bust: 46 inches, Length: 26 inches (Approx 1,250 yards)
3XL: Bust: 50 inches, Length: 26 inches (Approx 1,300 yards)

-pattern is formatted for sizing as follows: xs (s, m, l, xl, 2x, 3x)

**regarding the yarn weight: in my opinion the yarn I used felt exactly like the “category 3 light” yarns I’ve used before so I feel you could use a “3” yarn for this sweater, I just highly suggest checking the gauge and adjusting the hook as necessary.

-For a photo tutorial on how to do the stitch performed in this sweater click here.

-this cardigan is VERY simple, with zero increases or decreases. Very much a beginner-friendly sweater.

-yes, the 8 mm hook is larger than suggested for this weight of yarn. The reason for the larger hook is to make a loose and drape-y material. Although, I HIGHLY RECOMMEND that you check your gauge and adjust the hook accordingly for an accurately-sized sweater.

-when working the hdc’s of each row, you are working into the next stitch, not the ch 1 space from the previous row

-the cardigan is designed to be open, meaning it isn’t meant to be closed around the tummy, and just lays freely at the sides. It’s also designed to be a roomy and relaxed fit.

-I designed the sleeves of this sweater to be a bit longer, which is just a preference of mine. And I wanted to have some to fold over. To shorten them up a bit, you can work less rows on the sleeves.

-I used a whip stitch to sew the pieces together- making sure not to sew too tight!

-the length of the cardigan is very easy to customize, just add or take away rows to your preference

Pattern:

Front Panels (make 2):
Row 1) ch 32 (34, 36, 38, 40, 44, 48), hdc in fourth ch from hook (those first three ch’s you skipped will count as a hdc + “ch 1”), [ch 1, sk st, hdc in the next st] repeat [ ] across to end of row (total sts-- xs:16 hdc & 15 ch’s, s: 17 hdc & 16 ch’s, m: 18 hdc & 17 ch’s, l: 19 hdc & 18 ch’s, xl: 20 hdc & 19 ch’s, 2x: 22 hdc & 21 ch’s, 3x: 24 hdc & 23 ch’s)

Row 2) ch 3 (counts as hdc + ch 1), turn,  sk first st, hdc in next st (work into the stitch, not the “ch 1” space-- same goes for all hdc’s of this sweater), [ch 1, sk st, hdc in next st] repeat [ ] across (total sts-- xs:16 hdc & 15 ch’s, s: 17 hdc & 16 ch’s, m: 18 hdc & 17 ch’s, l: 19 hdc & 18 ch’s, xl: 20 hdc & 19 ch’s, 2x: 22 hdc & 21 ch’s, 3x: 24 hdc & 23 ch’s)

For sizes xs & s: Rows 3-62 - repeat row 2
For sizes m & l: Rows 3-64 - repeat row 2
For sizes xl, 2x & 3x: Rows 3-66 - repeat row 2

Finish off

Back Panel:
Row 1) ch 72 (76, 80, 84, 88, 96, 104), hdc in fourth ch from hook (those first three ch’s you skipped will count as a hdc + “ch 1”), [ch 1, sk st, hdc in the next st] repeat [ ] across to end of row (total sts-- xs:36 hdc & 35 ch’s, s: 38 hdc & 37 ch’s, m: 40 hdc & 39 ch’s, l: 42 hdc & 41 ch’s, xl: 44 hdc & 43 ch’s, 2x: 48 hdc & 47 ch’s, 3x: 52 hdc & 51 ch’s)

Row 2) ch 3 (counts as hdc + ch 1), turn,  sk first st, hdc in next st, [ch 1, sk st, hdc in next st] repeat [ ] across (total sts-- xs: 36 hdc & 35 ch’s, s: 38 hdc & 37 ch’s, m: 40 hdc & 39 ch’s, l: 42 hdc & 41 ch’s, xl: 44 hdc & 43 ch’s, 2x: 48 hdc & 47 ch’s, 3x: 52 hdc & 51 ch’s)

For sizes xs & s: Rows 3-62 - repeat row 2
For sizes m & l: Rows 3-64 - repeat row 2
For sizes xl, 2x & 3x: Rows 3-66 - repeat row 2

Finish off

Sleeves (make 2):
Row 1) ch 52 (56, 60, 64, 64, 72, 72), hdc in fourth ch from hook (those first three ch’s you skipped will count as a hdc + “ch 1”), [ch 1, sk st, hdc in the next st] repeat [ ] across to end of row  (total sts-- xs: 26 hdc & 25 ch’s, s: 28 hdc & 27 ch’s, m: 30 hdc & 29 ch’s, l: 32 hdc & 31 ch’s, xl: 32 hdc & 31ch’s, 2x: 36 hdc & 35 ch’s, 3x: 36 hdc & 35 ch’s)

Row 2) ch 3 (counts as hdc + ch 1), turn,  sk first st, hdc in next st, [ch 1, sk st, hdc in next st] repeat [ ] across (total sts-- xs: 26 hdc & 25 ch’s, s: 28 hdc & 27 ch’s, m: 30 hdc & 29 ch’s, l: 32 hdc & 31 ch’s, xl: 32 hdc & 31ch’s, 2x: 36 hdc & 35 ch’s, 3x: 36 hdc & 35 ch’s)

For all sizes: Rows 3-52 - repeat row 2

Finish off, leaving an extra long tail to sew the seam of the sleeve

Crochet Pattern for The Perfect Spring Sweater - Megmade with Love

To begin assembling the sweater, gather all the panel pieces-- there will be one back panel and two front panels. Then you will arrange the front panels on top of the back panel as shown in the photo above. You will line up the front panels to the very edges of the back panel. It does not matter which side is facing which at this point because they’re all the same.

Crochet Pattern for The Perfect Spring Sweater - Megmade with Love

Then you will get your yarn needle and long piece of yarn to sew. Start with the tops of the sweater (you may wish to pin the pieces together so they don’t move around). Using a loose whip stitch over the very edges, sew the tops to connect both the back and front panels. Since each front panel should be lined up on the sides of the back panel, you will begin sewing on the outside, and sew until you reach the other side (middle) of the top of the front panel. Do this on both sides.

Crochet Pattern for The Perfect Spring Sweater - Megmade with Love

After the tops are sewn, you will start on the side seams. You will begin sewing at the bottom of the sweater using the same technique as the tops. For the sides you will want to make EXTRA sure to align the rows of the front and back panels as you go so you will have an accurate amount of rows remaining in the sleeves...

***Instructions for how far to sew up on the side seams for each size (very important!)
xs= up to row 46 (leaving about 6.5 inches for the sleeve on each side)  
s= up to row 45(leaving about 7 inches for the sleeve on each side)  
m=up to row 44 (leaving about 7.5 inches for the sleeve on each side)
l & xl=up to row 43 (leaving about 8 inches for the sleeve on each side)  
2x & 3x = up to row 41 (leaving about 9 inches for the sleeve on each side)

Free Crochet Pattern for the Perfect Spring Sweater

With the body all sewn up, you’re ready to move onto the sleeves. Take your sleeve piece and fold it over matching up the longest sides as shown in the photo above. You can pin along the edge to keep it from shifting around as you sew.

Free Crochet Pattern for the Perfect Spring Sweater - Megmade with Love

Then you will grab your yarn needle and piece of yarn (or long tail of yarn) and sew along the very edge using a loose whip stitch just like on the body pieces. Sew all the way across, connecting those two long edges to create the sleeve. Do this for both of your sleeves.

** I chose to fold up the sleeves a couple inches on the ends and sew them in a few spots to make the fold stay

Free Crochet Pattern for The Perfect Spring Sweater - Megmade with Love

Once both sleeves are sewn you are ready to connect them to the body. Keeping your body piece WRONG side out and turning your sleeve RIGHT side out, you will insert the sleeve into the armhole of your sweater like shown in the photo above. It doesn’t matter which end you put at top or bottom, both are the same. You will align the seam of the sleeve to the seam of the side of the body (the armpit). You may wish to pin those together to stabilize. 

Free Crochet Pattern for The Perfect Spring Sweater - Megmade with Love

Then you will sew along the very edges of both the sleeve and the body armhole opening with needle and piece of yarn all the way around to connect the sweater. Be sure to sew loosely. Repeat this for both sleeves. After both sleeves are connected, weave in all ends and your Spring sweater is complete!!

Free Crochet Pattern for The Perfect Spring Sweater - Megmade with Love

Hopefully you love this awesome cardigan as much as I do... It truly lives up to it's name, if you ask me. ;)

If you end up making one of these bad boys, go tag me over on Insta so I can admire it!

Happy making!
Meg

Free Crochet Pattern for The Perfect Spring Sweater - Oversized Cardigan Megmade with Love