


Free Crochet Pattern - Retro Stripes Sweater
/
***You can find the PDF version of this pattern by clicking HERE. Great for easy printing! For the free pattern scroll down into the post.***
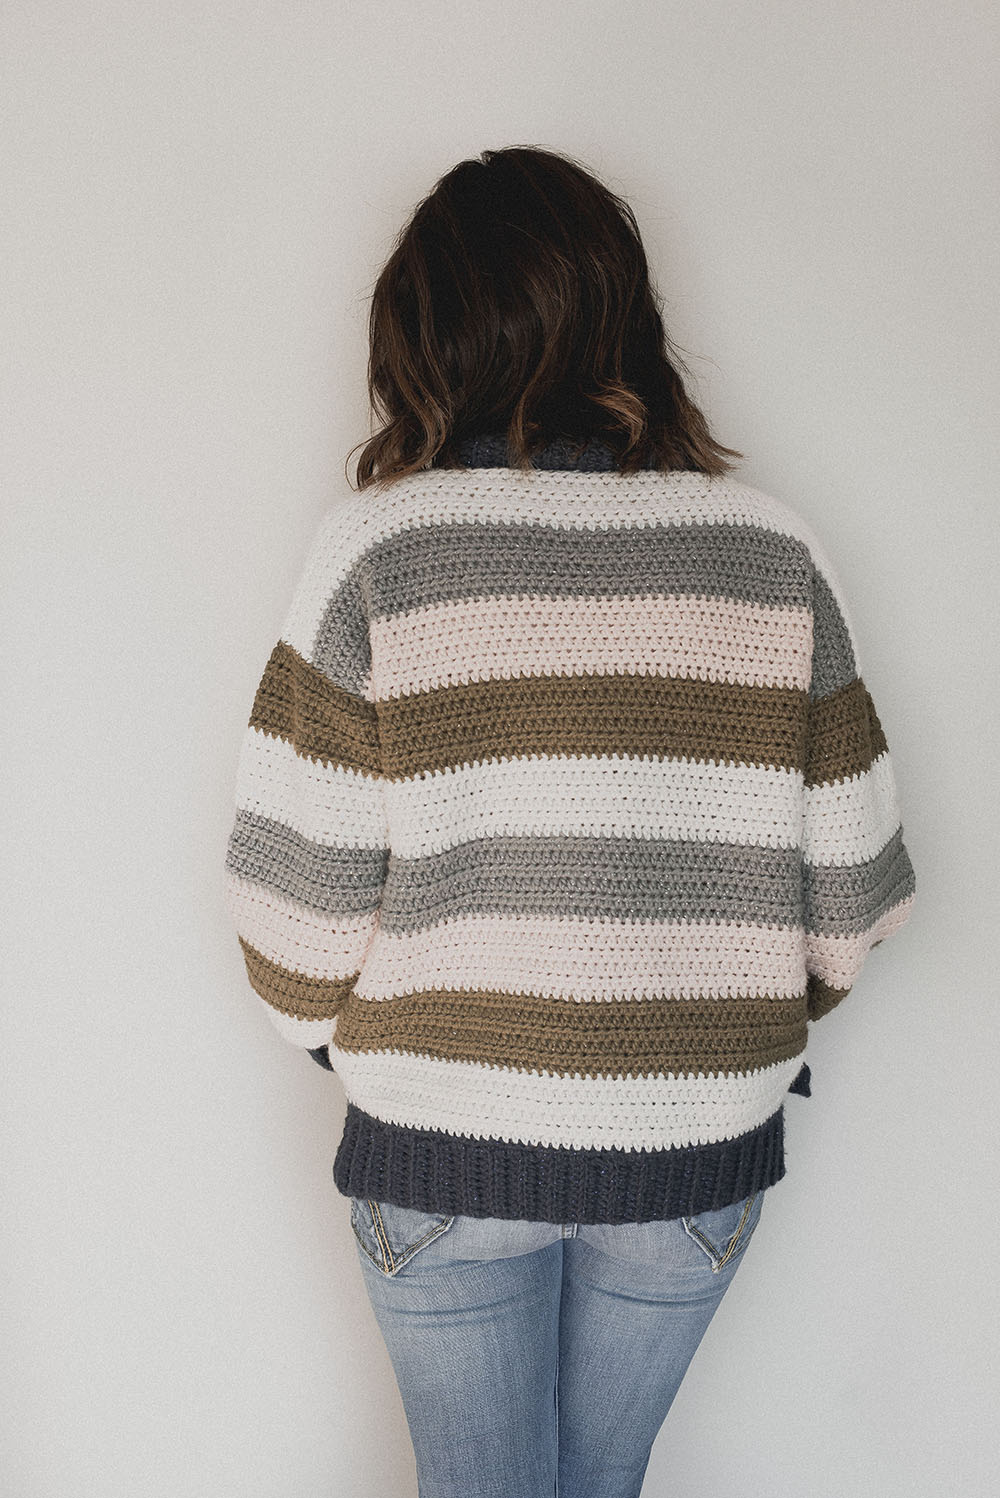
I’m pretty dern happy to bring you the latest sweater pattern! It’s cool, cozy and got all of those fun throwback vibes. It’s definitely a beginner-friendly sweater—body worked up in one piece and completely made up of half double crochets!

I made a medium for myself, and it’s got plenty of room, I designed it to have a bit of an oversized look in both the body and the arms. I also really like the ribbed mock neck collar.


Possibly my favorite part of the sweater is the color combo I decided to go with. I used Red Heart Yarn’s new Hygge Charm yarn. It’s got really cool color options, plus the texture of the yarn is nice! It’s soft and airy, plus it’s got this super subtle sparkle to it. You can see all the colors available below… I think I could have a heyday just dreaming up color schemes with this yarn.

Hope you get to whip up this insanely simple sweater. It’d even look great in one color, color blocked or smaller stripes. Possibilities=endless.
***You can find the PDF version of this pattern by clicking HERE. Great for easy printing! For the free pattern scroll down into the post.***
What you’ll need:
-Worsted weight (4) yarn, for this sweater I used Red Heart Hygge Charm (Click HERE to view) in “Supernova” (COLOR A), “Starlight” (COLOR B), “Falling star” (COLOR C), “Meteor” (COLOR D), and “Shooting Star” (COLOR E) **See notes for yardage information
-size k (6.5mm) hook, or size needed to obtain gauge
-sewing pins
-yarn needle
Gauge:
12 hdc by 10 rows equals a four inch square
Abbreviations:
ch=chain, hdc=half double crochet, BLO=back loop only, st(s)=stitch(es), sk=skip, sl=slip
Notes:
———————————-
**Sizing and yarn yardage information:
SIZE SMALL (40” BUST)
Approximately 1,075 total yards for sweater
SIZE MEDIUM (42” BUST)
Approximately 1,2OO total yards for sweater
SIZE LARGE (44” BUST)
Approximately 1,325 total yards for sweater
SIZE XLARGE (46” BUST)
Approximately 1,450 total yards for sweater
SIZE 2XLARGE (50” BUST)
Approximately 1700 total yards for sweater
———————————-
-sizes are formatted in the pattern as (S, M, L, XL, 2X)
-sweater is designed to be a bit oversized
-ch’s at the beginning of rows do not count as stitches
-body of the sweater is worked in one piece, you’ll start by crocheting the bottom ribbing, then working into the long side of the ribbing you’ll make the body (adding a neck hole in the middle) then adding the other side’s ribbing
-it’s important to note that when sewing at any point during the sweater to do so loosely. Sewing too tightly could cause the seam to look bunched or also make it hard to get the sweater on and off
-size in the photos is size Medium
-Pretty please check your gauge before making this sweater. It’s a whole lotta wasted time if you don’t and find out your sweater is far too large or small.
Pattern:
—-BODY OF SWEATER—-
Bottom ribbing (make 2):
Row 1) *Using COLOR A* ch 10, hdc in 2nd ch from hook and across (9 total sts)
Row 2) ch 1, turn, hdc in BLO across row (9 total sts)
SIZE SMALL: Repeat row 2 until you have 43 total rows of ribbing
SIZE MEDIUM: Repeat row 2 until you have 45 total rows of ribbing
SIZE LARGE: Repeat row 2 until you have 47 total rows of ribbing
SIZE XLARGE: Repeat row 2 until you have 49 total rows of ribbing
SIZE 2XLARGE: Repeat row 2 until you have 53 total rows of ribbing

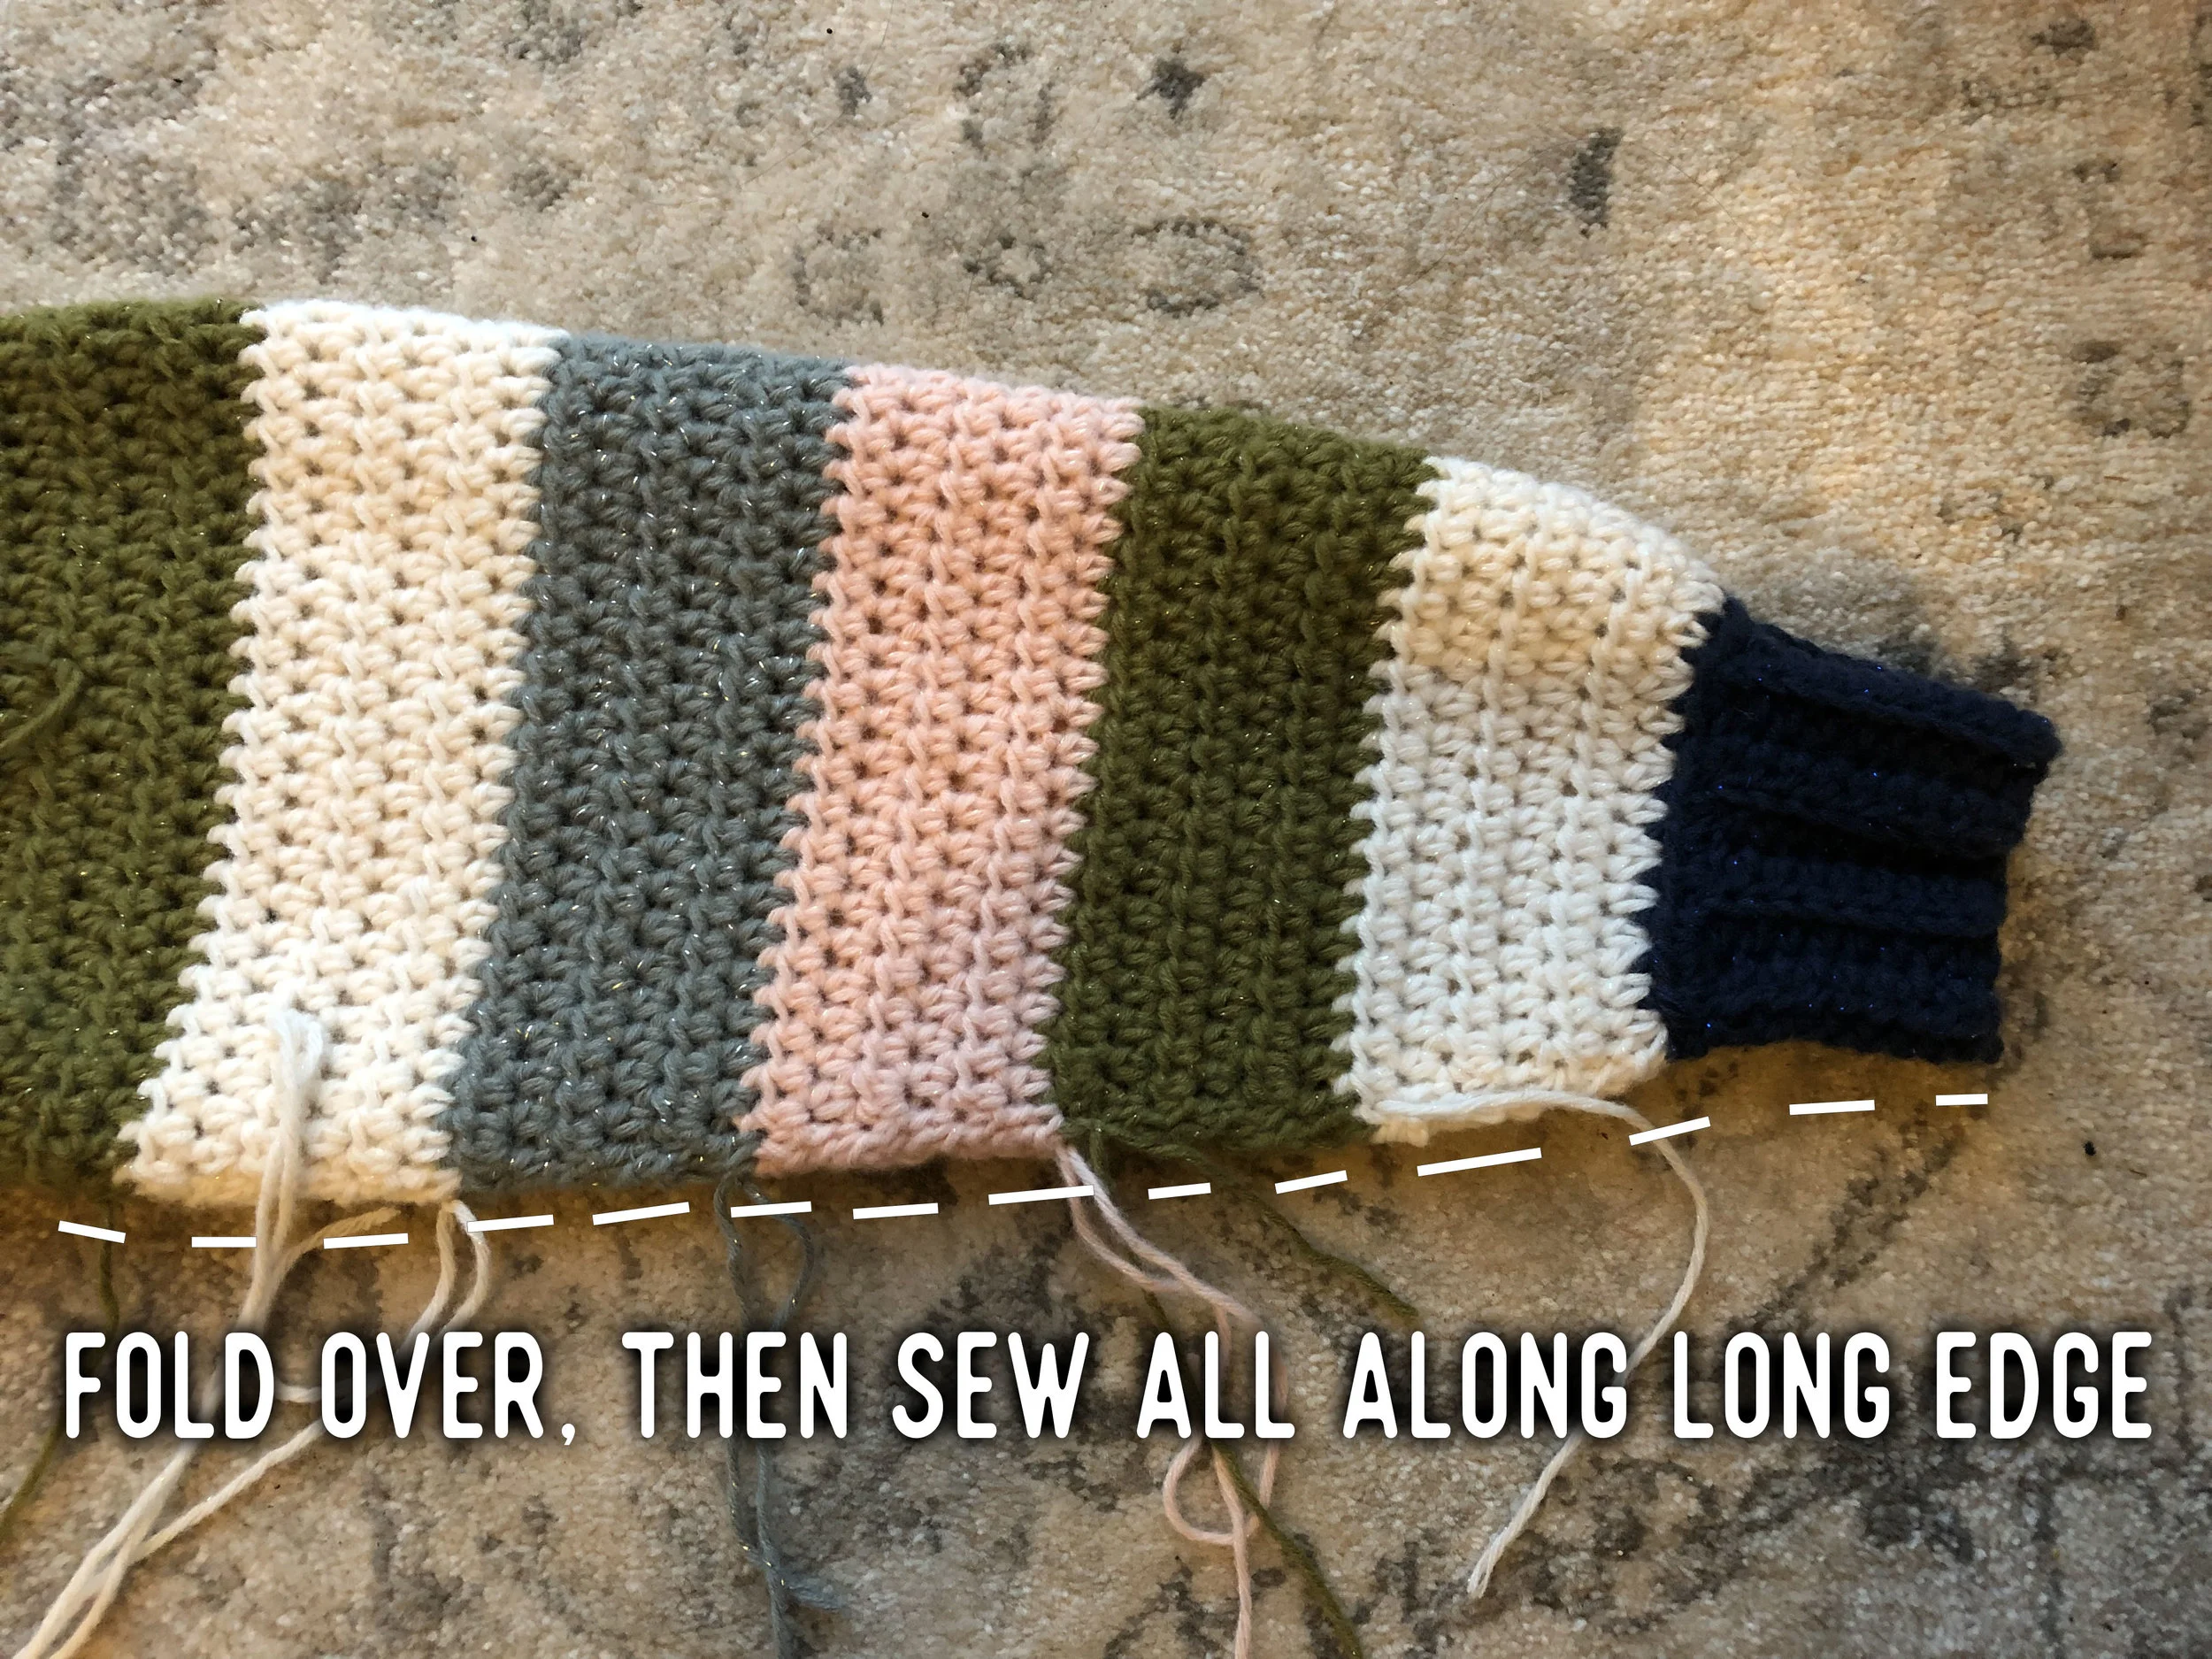
*still using COLOR A* ch 1, then you will work hdc’s into the long edge of the ribbing closest to your hook. You will work a sequence of [1 hdc, 2 hdc] into the very edge of each of the rows of the ribbing. View photo above for assistance. (64, 67, 70, 73, 79 total sts)
-Finish off
Rest of Body:
**grab one of the “bottom ribbings” to work the body of the sweater. You will start where you left off working the [1 hdc, 2hdc] **
Rows 1-54) *changing yarn color after 6 rows each color (starting with COLOR B, C, D, E)* ch 1, turn, hdc across row (64, 67, 70, 73, 79 total sts)
*you will end with COLOR B in row 54*
——————————-
**FOR SIZE SMALL & MEDIUM, FORMATTED (S,M):
Row 55) *still using COLOR B* ch 1, turn, hdc in (19, 20) sts, ch (26, 27) *loosely*, sk (26, 27) sts, then hdc in the remaining (19, 20) sts (64, 67 total sts)
Rows 56-108) *changing yarn color after 6 rows each color (starting with COLOR B, then C, D, E)* ch 1, turn, hdc across row (64, 67 total sts)
**FOR SIZE LARGE & XLARGE, FORMATTED (L, XL):
Rows 55-56) *still using COLOR B* ch 1, turn, hdc across row (70, 73 total sts)
Row 57) *still using COLOR B* ch 1, turn, hdc in (21, 22) sts, ch (28, 29) *loosely*, sk (28, 29) sts, then hdc in the remaining (21, 22) sts (70, 73 total sts)
Rows 58-59) *still using COLOR B* ch 1, turn, hdc across row (70, 73 total sts)
Rows 60-110) *changing yarn color after 6 rows each color (starting with COLOR B, then C, D, E)* ch 1, turn, hdc across row (70, 73 total sts)
**FOR SIZE 2XL:
Rows 55-58) *change to COLOR C* ch 1, turn, hdc across row (79 total sts)
Row 59) *still using COLOR C* ch 1, turn, hdc in 24 sts, ch 31 *loosely*, sk 31 sts, then hdc in the remaining 24 sts (79 total sts)
Rows 60-63) *still using COLOR C* ch 1, turn, hdc across row (79 total sts)
Rows 64-114) *changing yarn color after 6 rows each color (starting with COLOR B, then C, D, E)* ch 1, turn, hdc across row (79 total sts)
———————————-
**To attach the other “bottom ribbing”:
Starting where you left off on the body of the sweater: slip stitch, very loosely (important!!), the last row of the body to the stitches along the long side of ribbing. When slip stitching, insert hook into one loop of each the body and the ribbing (the two loops that are closest to one another) all the way across.
-Finish off
—-SLEEVES (MAKE 2)—-
Ribbing of sleeve:
Row 1) *using COLOR A* ch 10, hdc in 2nd ch from hook and across (9 total sts)
Row 2) ch 1, turn, hdc in BLO across row (9 total sts)
SIZE SMALL & MEDIUM: Repeat row 2 until you have 16 total rows of ribbing
SIZE LARGE & XLARGE: Repeat row 2 until you have 18 total rows of ribbing
SIZE 2XLARGE: Repeat row 2 until you have 20 total rows of ribbing
Rest of Sleeve:
Row 1) Using the same technique as the bottom ribbing of the body (still using COLOR A), you will ch 1, then work [1 hdc, 2 hdc] along the long edge of the sleeve ribbing into the end of each of the ribbing rows (24, 24, 27, 27, 30 total sts)
Row 2) *changing yarn color after 6 rows each color (starting with COLOR B, then C, D, E)* ch 1, turn, work [1 hdc, 2 hdc] across row (36, 36, 40, 40, 45 total sts)
Rows 3-4) ch 1, turn, hdc across row (36, 36, 40, 40, 45 total sts)
Row 5) ch 1, turn, work 2 hdc in first st, hdc across until second to last st, work 2 hdc in last st (38, 38, 42, 42, 47 total sts)
Rows 6-8) ch 1, turn, hdc across row (38, 38, 42, 42, 47 total sts)
Row 9) ch 1, turn, work 2 hdc in first st, hdc across until second to last st, work 2 hdc in last st (40, 40, 44, 44, 49 total sts)
Rows 10-12) ch 1, turn, hdc across row (40, 40, 44, 44, 49 total sts)
Row 13) ch 1, turn, work 2 hdc in first st, hdc across until second to last st, work 2 hdc in last st (42, 42, 46, 46, 51 total sts)
Rows 14-16) ch 1, turn, hdc across row (42, 42, 46, 46, 51 total sts)
Row 17) ch 1, turn, work 2 hdc in first st, hdc across until second to last st, work 2 hdc in last st (44, 44, 48, 48, 53 total sts)
Rows 18-20) ch 1, turn, hdc across row (44, 44, 48, 48, 53 total sts)
Row 21) ch 1, turn, work 2 hdc in first st, hdc across until second to last st, work 2 hdc in last st (46, 46, 50, 50, 55 total sts)
Rows 22-24) ch 1, turn, hdc across row (46, 46, 50, 50, 55 total sts)
Row 25) ch 1, turn, work 2 hdc in first st, hdc across until second to last st, work 2 hdc in last st (48, 48, 52, 52, 57 total sts)
Rows 26-28) ch 1, turn, hdc across row (48, 48, 52, 52, 57 total sts)
Row 29) ch 1, turn, work 2 hdc in first st, hdc across until second to last st, work 2 hdc in last st (50, 50, 54, 54, 59 total sts)
Rows 30-32) ch 1, turn, hdc across row (50, 50, 54, 54, 59 total sts)
Row 33) ch 1, turn, work 2 hdc in first st, hdc across until second to last st, work 2 hdc in last st (52, 52, 56, 56, 61 total sts)
Rows 34-36) ch 1, turn, hdc across row (52, 52, 56, 56, 61 total sts)
Row 37) ch 1, turn, work 2 hdc in first st, hdc across until second to last st, work 2 hdc in last st (54, 54, 58, 58, 63 total sts)
-Finish off, leave extra long tail for sewing sleeve to the body
—-ASSEMBLY OF SWEATER—-
First you will sew the sides of the body. Fold the sweater over in half, right sides together and aligning the two bottom ribbings. You will also want to align all the stripes of the body so that they line up well for a clean look. You may want to use sewing pins or safety pins to hold the two pieces together.
**Side note: rather than sewing the body with one long piece of yarn, I used the color of yarn for each stripe, because I didn’t like how the different colored yarn showed through the seam.
Using your yarn needle and yarn, you will sew (loosely) using a whip stitch over the very edges of the sides of the body. I started sewing at row 1, not sewing the ribbing— but you could start at the very bottom if desired. You will sew up through row 36 (if you did the stripes, it will be through the second use of COLOR C from the bottom), the rows not sewn above row 36 are the sleeve hole. Do this for both sides.
Next you’re ready for the sleeves. You will fold the sleeve in half, long sides together, aligning the stripes and rows just like on the body. Then sew using the same loose whip stitch along the very edge from the bottom of the ribbing to the very end. Do this for both sleeves.

Then you’ll attach your sleeve to the body. With your body still turned wrong side out, insert your sleeve, which is turned right side out, into the sleeve hole of the body (right sides together). With the sleeve inside the body, align the sleeve armpit seam with the seam of the body, and use your sewing pins to hold the two together.

Sew with your long tail from your sleeve, using the same loose whip stitch along the very edge of the sleeve and sleeve hole on the body, all the way around. Do this for both sleeves.
Then you will turn the sweater right side out.
—-RIBBED NECK COLLAR:—-
Row 1) ch 10, hdc in 2nd ch from hook and across (9 total sts)
Row 2) ch 1, turn, hdc in BLO across row (9 total sts)
All sizes:
Repeat row 2 until you have made a ribbing that is about 2 inches shorter than the entire neck hole opening of your sweater (this is so it will be stretched a bit to fit the neck hole).
-Finish off, leave extra long tail to sew to the body of the sweater

To attach the collar, you will stretch it to fit the neck hole, and secure the two together with sewing pins. You will put the collar around the outside of the right side of the sweater.
Using your long tail of the collar, sew around the entire neck hole using the loose whip stitch (making extra sure to make loose stitches, because you won’t be able to put it over your head if they’re too tight, yikes!).
Once all sewing is complete, and the million little different colored yarn ends are woven in, your Retro Stripes Sweater is doneeeee!

Then it’s time to sport your fun Retro Sweater. If you do, take a pic and tag me over on Instagram. I’d love to admire your rendition! Hope you like this design as much as I!
Happy hookin’
Meg


