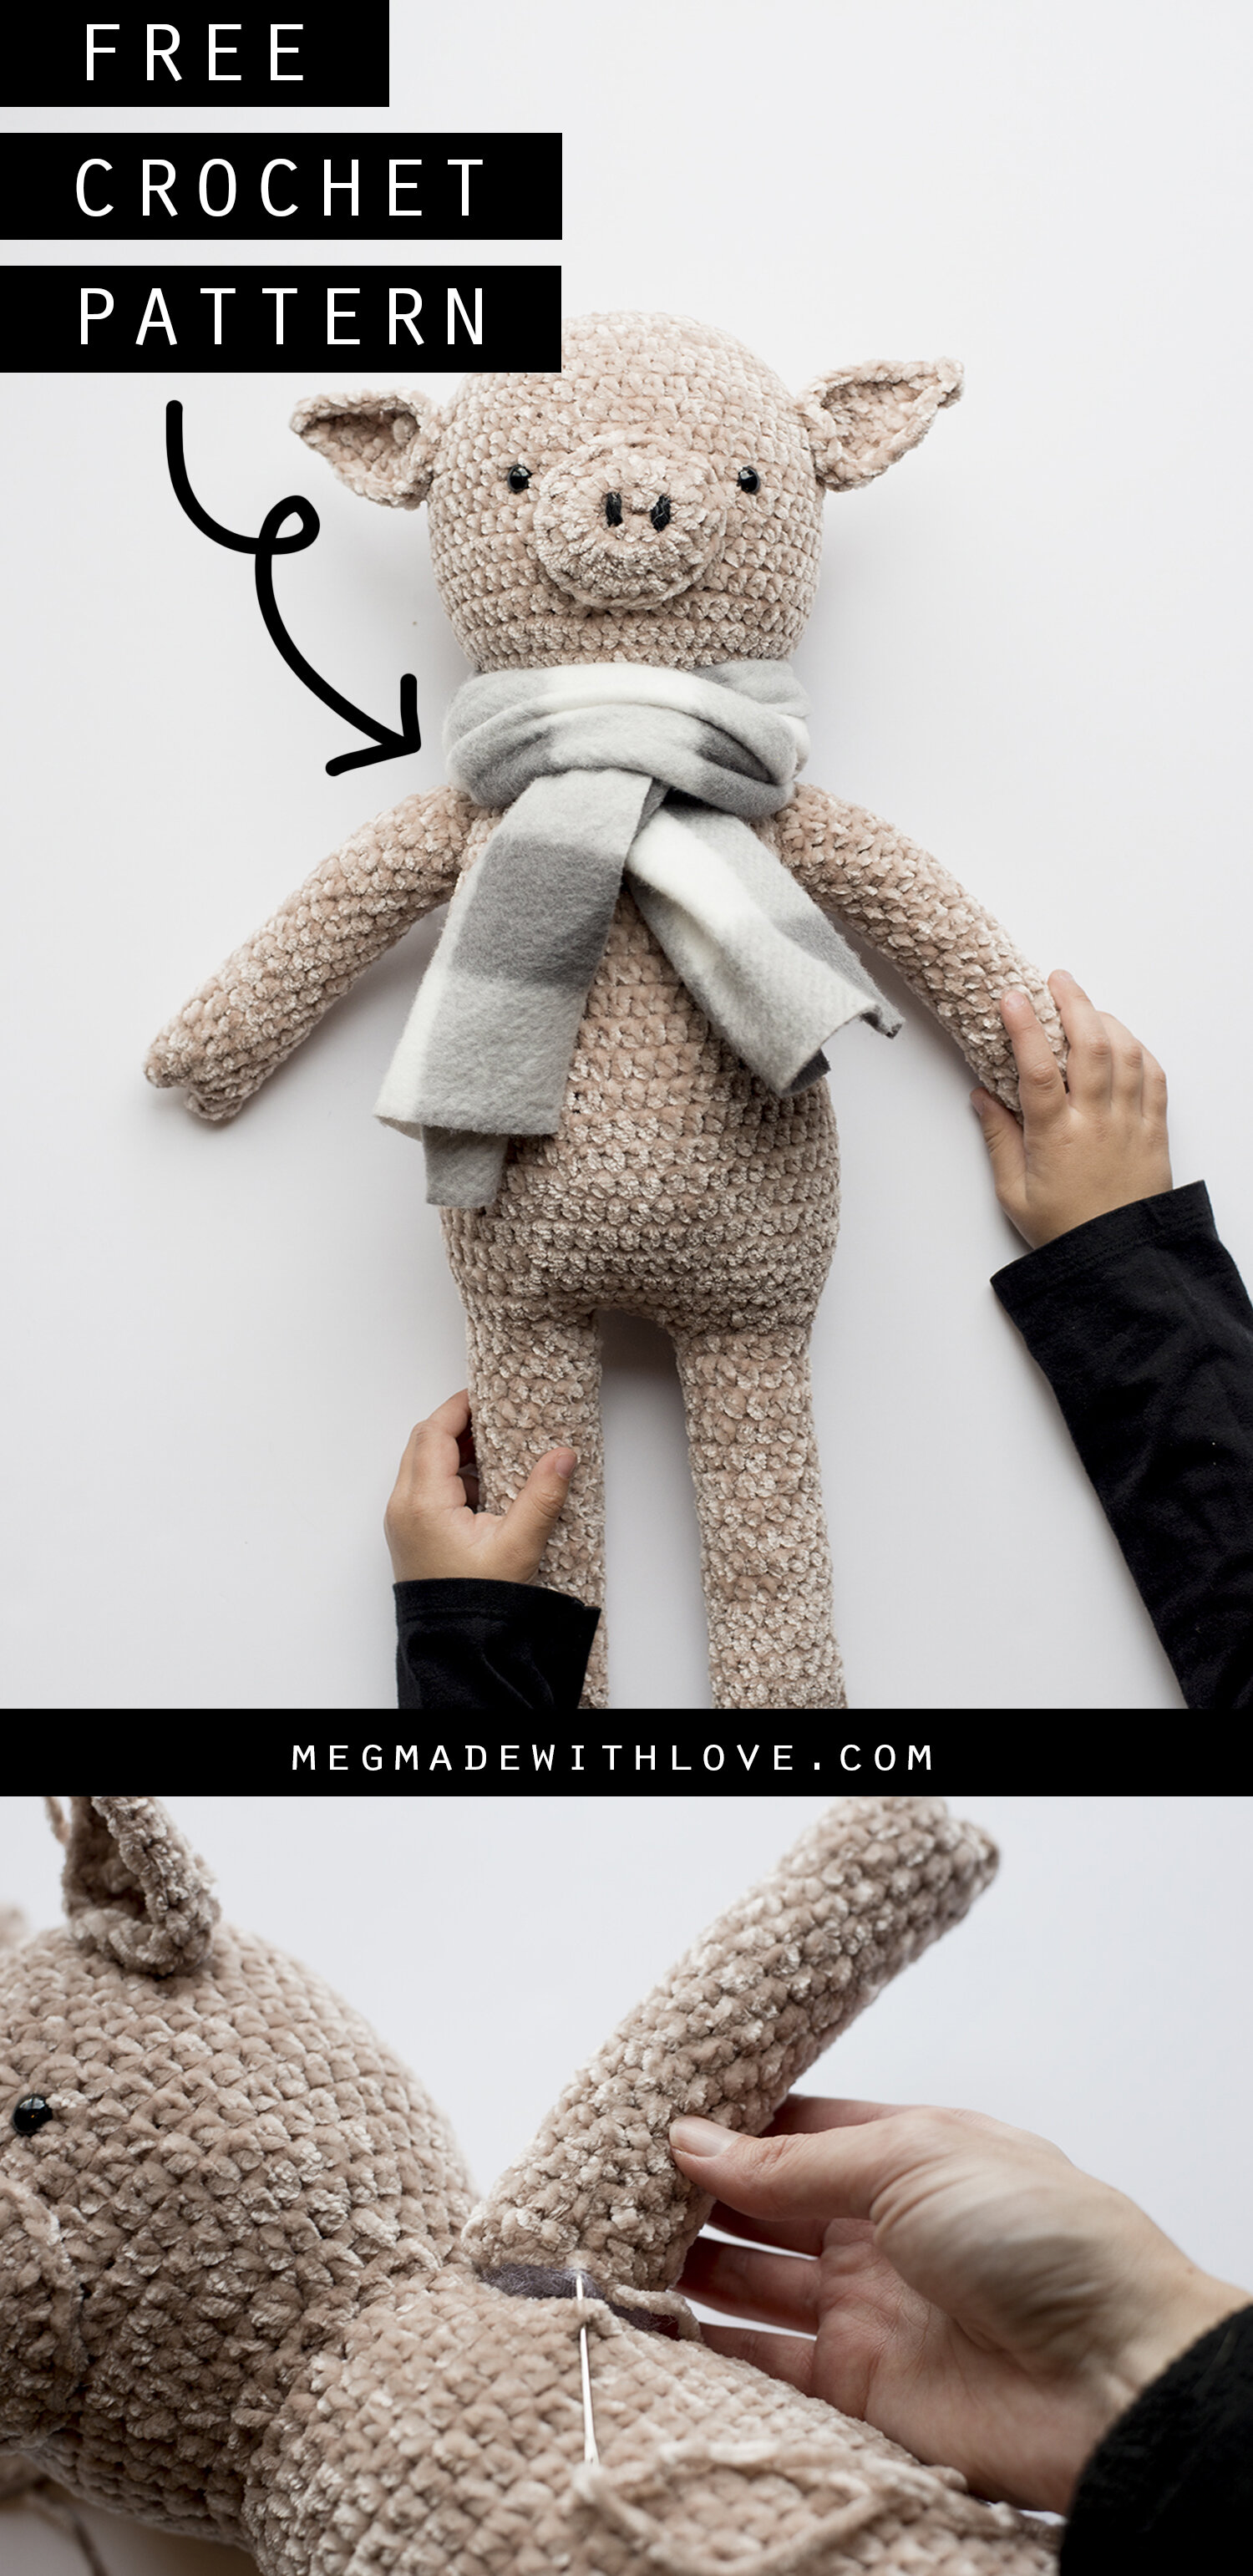
Baby Pig Crochet Toy - Free Crochet Pattern

Free Crochet Pattern for Baby Pig Toy - Amigurumi - Megmade with Love

***You can find the PDF version of this pattern by clicking HERE. Ad-free, and printer-friendly! For the free version, scroll down within this post.***

Woohoo! I am so pleased to bring you a little piggy pattern here on the blog today! This has got to be the cuddliest lil’ toy you could ever make (made with velvet yarn), plusssss I made this one for my one-year-old niece this Christmas, and I’m not exaggerating when I say there was squealing, clapping and extensive hugging involved.

Free Crochet Pattern - Pig Toy - Megmade with Love

I am so happy this piggy toy turned out as imagined (actually based of a rough sketch on a scratch piece of paper during dinner one night!). I think it’s just simply cute. And if you know me at all simple and cute are two of my favorite things!

Free Crochet Pattern - Pig Toy - Megmade with Love

The pattern for lil’ piggy includes lots of pics for assistance on the assembly, in hopes to make your life easier! And I actually think it works up fairly quickly because of the bulkiness of the yarn.

Free Crochet Pattern - Pig Toy - Megmade with Love

It’s made with the buttery-soft Bernat Baby Velvet yarn, which by the way when I saw it in the store, I knew it had to be used for this project. It’s unreal how soft it is.

Free Crochet Pattern - Pig Toy - Megmade with Love

Most important of all, I think this pig made the perfect gift. I hope the child (or adult?!) in your life gets some joy out of this gem if you make it for them.

Baby Pig Crochet Toy Pattern

***You can find the PDF version of this pattern by clicking HERE. Ad-free, and printer-friendly! For the free version, scroll down.***

What you’ll need:

-Approximately 250 yards of a velvety worsted weight (category 4) yarn, I used Bernat Baby Velvet in color “Bunny Brown”... online this color looks light beige, but the skein I picked up in my local Joann’s was rose colored, so not sure if this is normal or not

-4mm (G) hook, or size needed to obtain gauge

-12 oz bag of polyester fiberfill

-safety eyes

-yarn needle

-any black yarn to make the nostrils

-fleece fabric for scarf or any other accessories you may want

-safety pins

Gauge:

16 hdc by 12 rows = four inch square

Abbreviations:

ch=chain, hdc=half double crochet, st(s)=stitch(es), hdc2tog=half double crochet two together, sl=slip, dc=double crochet, tr=treble crochet, BLO=back loop only

Notes:

-the measurements for the pig are approximately 18” from top to toe, and body is about 6” wide

-pattern is for an intermediate crocheter

-chains at beginning of rounds do not count as stitches

-I found that by skipping the first st of each round and working the last st into the space where the previous row’s sl st to join, made the seam a little more inconspicuous

Pattern:

——HEAD & BODY——
(worked from top of the head-down)

Round 1) make magic circle, ch 1, work 10 hdc into circle, join to 1st st with sl st, pull yarn tail to close up the circle (10 total sts)

Round 2) ch 1, work 2 hdc into each st around, join to 1st st with sl st (20 total sts)

Round 3) ch 1, [2 hdc, hdc in next st] around, join to 1st st with sl st (30 total sts)

Round 4) ch 1, [2 hdc, hdc in next two sts] around, join to 1st st with sl st (40 total sts)

Round 5) ch 1, [2 hdc, hdc in next three sts] around, join to 1st st with sl st (50 total sts)

Rounds 6-17) ch 1, hdc around, join to 1st st with sl st (50 total sts)

Round 18) ch 1, [hdc2tog, hdc in next three sts] around, join to 1st st with sl st (40 total sts)

Round 19) ch 1, [hdc2tog, hdc in next two sts] around, join to 1st st with sl st (30 total sts)

Round 20) ch 1, [hdc2tog, hdc in next st] around, join to 1st st with sl st (20 total sts)

Round 21) repeat round 3

Round 22) repeat round 4

Rounds 23-26) ch 1, hdc around, join to 1st st with sl st (40 total sts)

Round 27) repeat round 5

Rounds 28-41) ch 1, hdc around join to 1st st with sl st (50 total sts)

Round 42) repeat round 18

Round 43) repeat round 19

finish off, and you can leave an extra long tail to sew on the legs

——LEGS (make two)——
(worked from top to toe)

Round 1) ch 16, join to 1st ch with sl st to form circle, hdc in same ch you sl st into and around, join to 1st st with sl st (16 total sts)

Rounds 2-16) ch 1, hdc around, join to 1st st with sl st (16 total sts)

Round 17) ch 1, [sl st, hdc, dc, tr, tr, dc, hdc, sl st] work [ ] two times, join to 1st st with sl st (16 total sts)

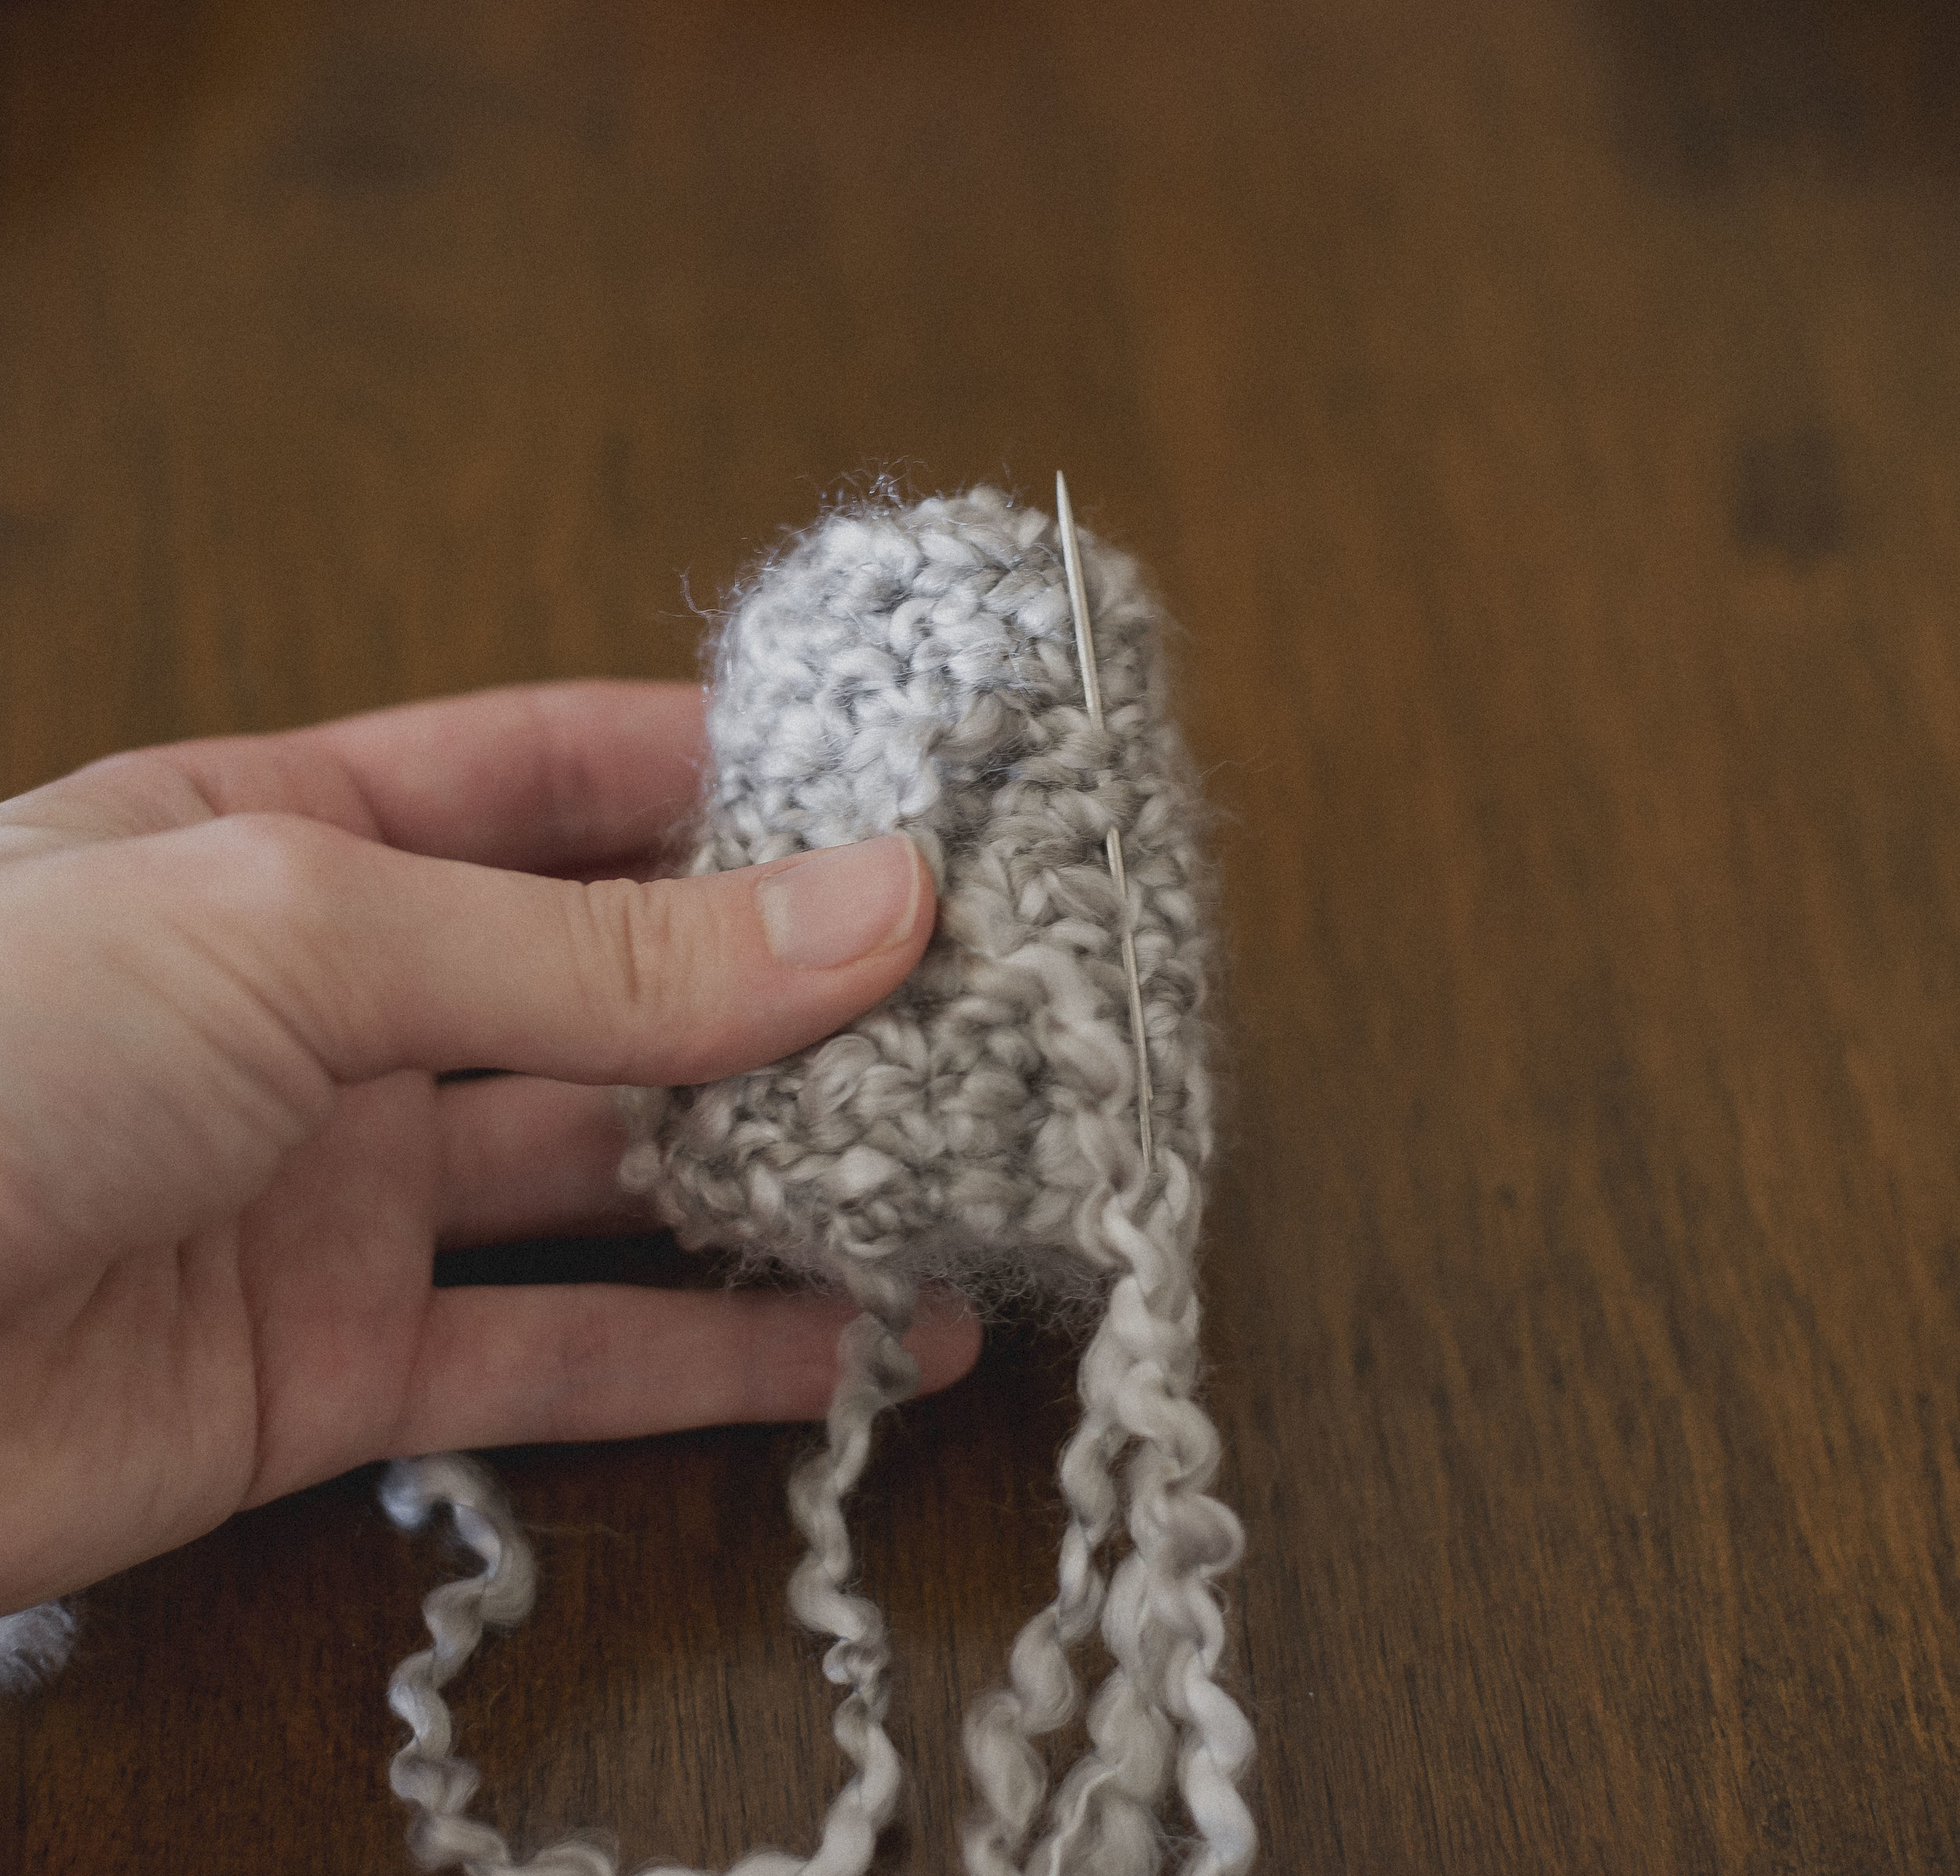
finish off, and leave long strand to sew the end shut. Pinch the end of the legs closed, and sew with yarn needle along the edges with a whip stitch, I also chose to run my needle in between the taller stitches from round 17 so there wouldn’t be any gaps.

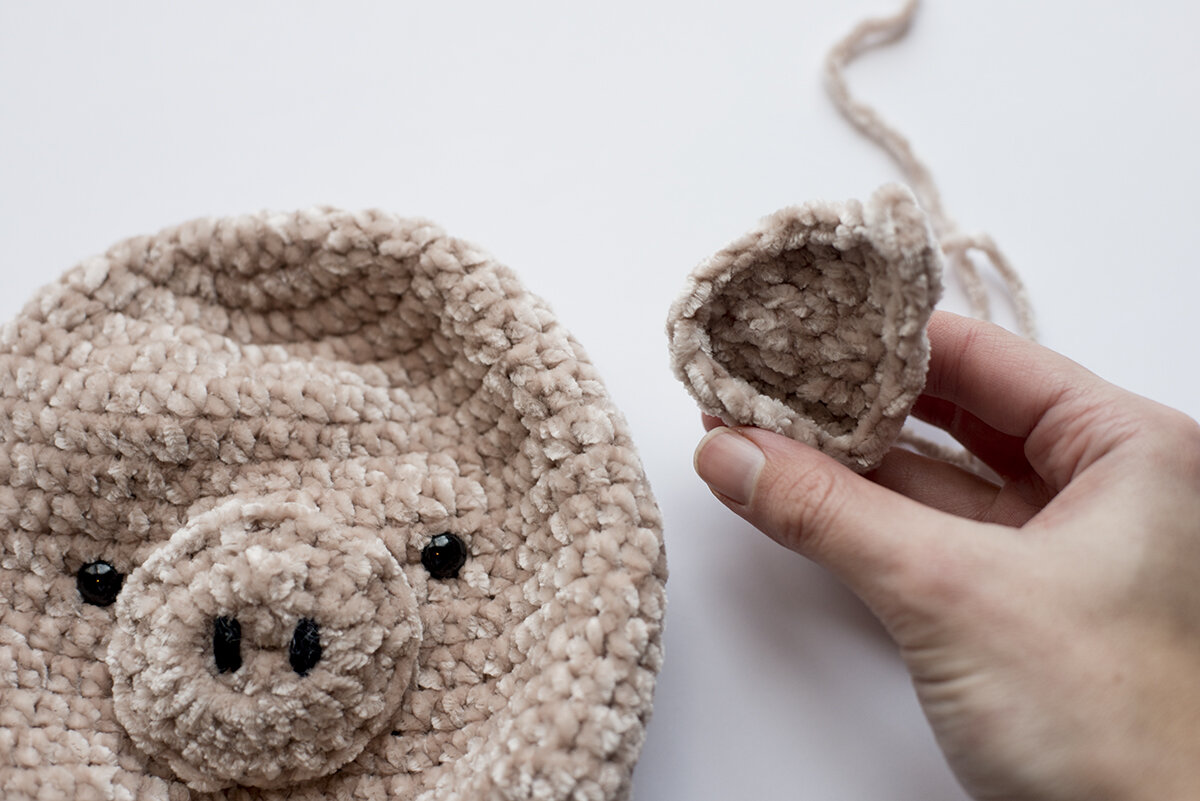
——ARMS (make two) ——
(worked from top to end of hoof)

Round 1) ch 13, join to 1st ch with sl st to form circle, hdc in same ch you sl st into, and hdc into next 2 ch, dc in next two sts, tr in next 3 sts, dc in next 2 sts, hdc in last 3 sts (13 total sts)

Rounds 2-16) ch 1, hdc around, join to 1st st with sl st (13 total sts)

Round 17) ch 1, sl st, hdc, tr, tr, hdc, sl st in next 3 sts, hdc, tr, tr, hdc, sl st, join to 1st st with sl st (13 total sts)

finish off, and leave long strand to sew the end shut. Pinch the end of the arms closed, and sew with yarn needle along the edges with a whip stitch, I also chose to run my needle in between the taller stitches from round 17 so there wouldn’t be any gaps.

——SNOUT——

Round 1) make magic circle, ch 1, work 10 hdc into circle, join to 1st st with sl st, pull yarn tail to close up the circle (10 total sts)

Round 2) ch 1, work 2 hdc into each st around, join to 1st st with sl st (20 total sts)

Round 3) ch 1, [2 hdc, hdc in next st] around, join to 1st st with sl st (30 total sts)

finish off, and leave long tail to sew the snout onto the head

——EARS (make two)——
(you can refer to the diagram below for assistance)

ch 11,

WORKING INTO BLO OF CH’S: sl st in 2nd ch from hook, sl st into next two ch, hdc into next two ch, dc into next two ch, tr into next two ch, in last ch work: tr, dc dc

FROM THERE YOU WILL BE WORKING INTO THE OTHER SIDE OF THE CH’S (the loops unworked, starting with the ch closest to your hook): work dc, dc, tr into the first ch, tr into the next two ch, dc into the next two ch, hdc into the next two ch, and sl st into the last 3 ch, join to 1st sl st with sl st

finish off

Pig Ear Crochet Diagram

Assembly:

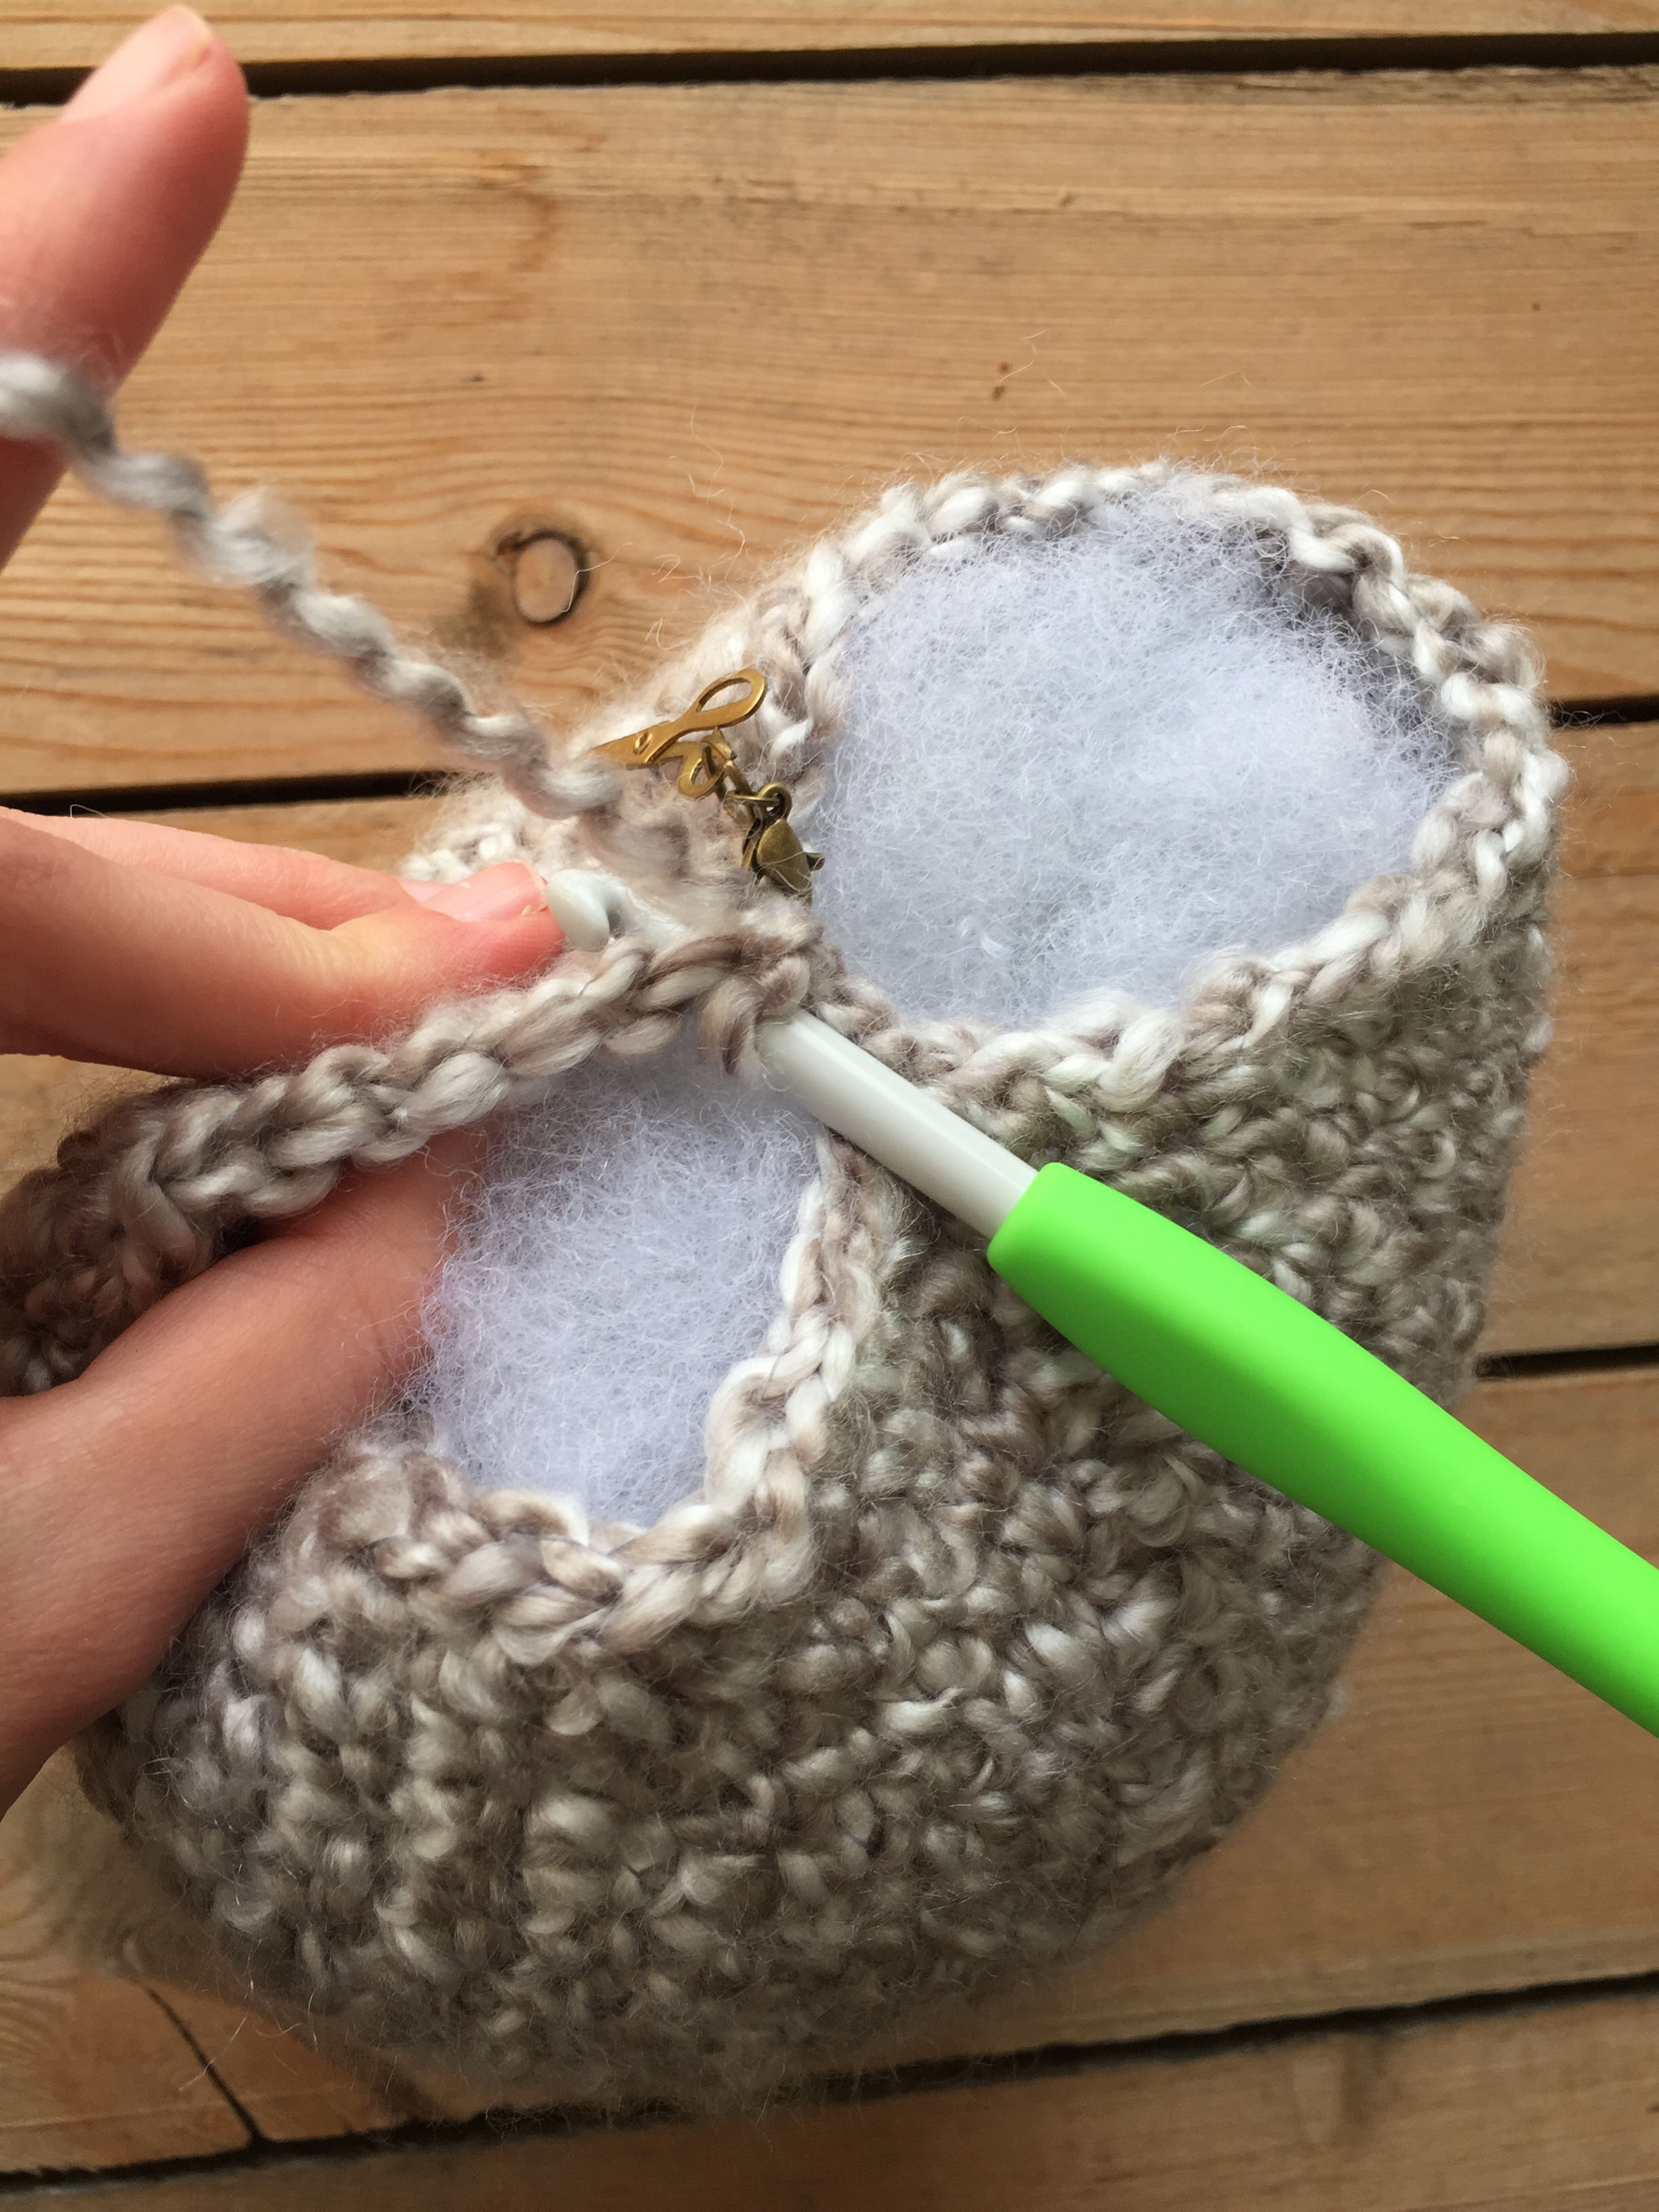
to begin the assembly of the pig you will grab your head/body piece and snout.

Free Crochet Pig Pattern - Megmade with Love

To attach the snout to the head, you’ll figure out where you’d like it placed on the head and begin sewing along the outer edge of the snout, inserting your needle like in the photo above (into both the snout and the head). I didn’t sew over the edge of the snout because I wanted it to be more defined. Before you make it all the way around, stuff a bit of polyfill into the snout to make it stick out a bit, then finish sewing around.

Free Crochet Pig Pattern - Megmade with Love

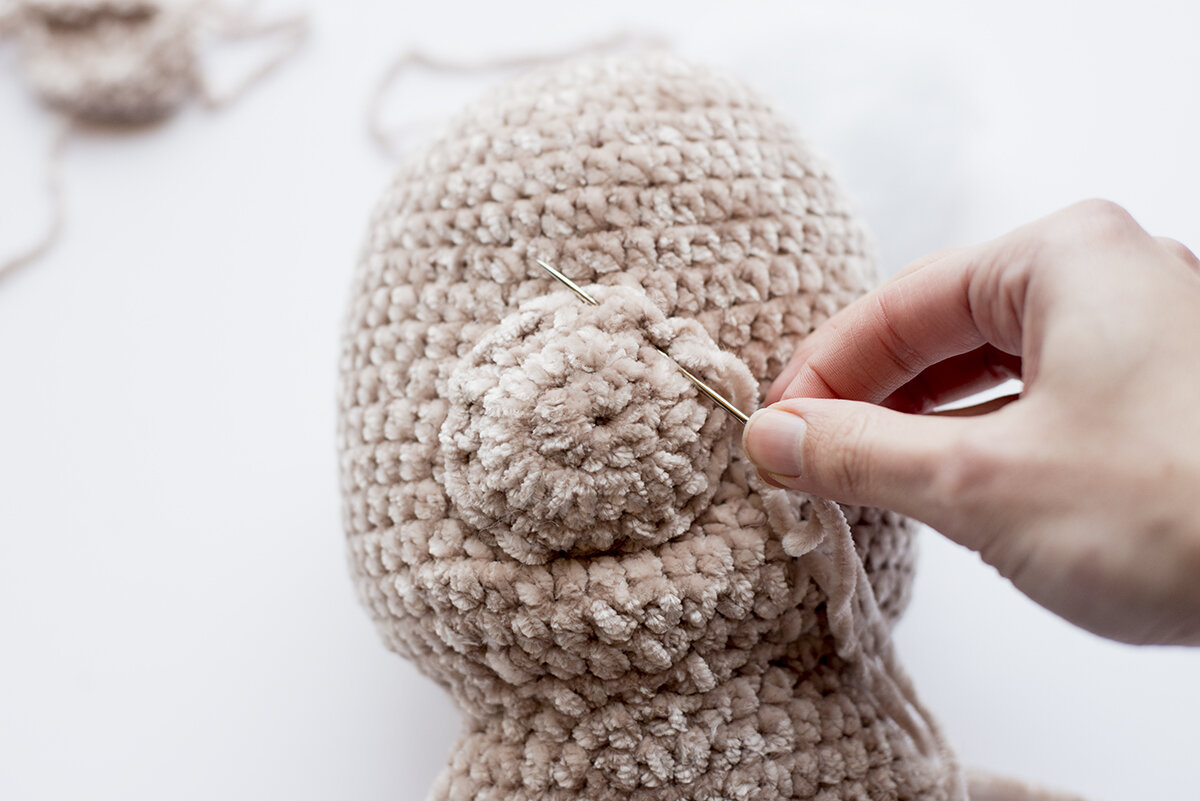
To add the nostrils grab a long strand of black yarn, plus yarn needle and make a line spanning the length of the 1st round of the snout (a little less than an inch), keep drawing your yarn through until it’s the thickness you’d like. Make two nostrils about 1/2 inch apart.

Free Crochet Pig Pattern - Megmade with Love

Then you can add your eyes, I placed mine to the side of the top of the snout about 1/2 inch. Then you will add on the ears. To attach the ears, first fold up the rounded, wider side of the ear like in the photo above. You’ll be sewing this bottom folded part to your head.

Free Crochet Pig Pattern - Megmade with Love

Place the ear at your desired location, I chose to the top of the ear about round 6 (you could pin the ear on to help you stabilize it while sewing). Then using a long strand of yarn and needle, sew the folded part of the ear to the head. I just sewed all around, making sure it was extra secure, because ya know… kids. Do this for both ears.

Free Crochet Pig Pattern - Megmade with Love

Next you’ll stuff the head/body piece plum full of fiberfill, I found it helpful to take small pieces of the fiberfill and spread it apart with my fingers a bit then stuff it in, so the pig wouldn’t get lumpy. At this point you will also stuff both legs and arms full of fiberfill also (you can use a wooden dowel to put the fiberfill in the arms and legs).

Free Crochet Pig Pattern - Megmade with Love

Now you’ll attach the legs. Take the body piece and pin the middle closed about an inch and a half (making holes on both sides big enough for the legs to be sewn onto).

Free Crochet Pig Pattern - Megmade with Love

Then using needle and yarn tail, you can sew each leg on. I inserted my needle like in the photo above, doing a whip stitch along the edges of the leg and the body. I went all the way around the leg, multiple times, making extra sure it was secure, and looked nice and seamless.

Free Crochet Pig Pattern - Megmade with Love

Once done with the first leg, sew your way down the middle portion you pinned on the body, and sew the other leg on, going around multiple times.

Free Crochet Pig Pattern - Megmade with Love

Next up is the arms. You will be attaching them with the longer side-up (see above photo). This is so the arms lay down a bit, not just straight out.

Free Crochet Pig Pattern - Megmade with Love

You will be attaching the arms just like the legs, whip stitching over the arm and into the body then back into the arm. Go around as many times as needed to be secure and look seamless.

After both arms are sewn on, and ends woven in, add a scarf (or maybe a cute dress, hat or bow tie?!) and you’ve got yourself one love-able little piggy!

Free Crochet Pattern for Pig Toy - Megmade with Love

Hope this piggy gets to bring whoever receives it lots of joy! Even if that person is you! Teehee. Feel free to share your version with me over on Instagram, I’d love to admire.

Take care and happy hooking!
Meg

Free Crochet Pattern for Edgar the Elephant

Free Pattern for a Crochet Elephant - Megmade with Love

***You can purchase the PDF version of this free pattern in my shop by clicking HERE. Great for easy printing!***

Boy, oh boy, do I have the cutest pattern for you today! It's dear little Edgar the Elephant... a soft, squishy and lovable crochet toy, perfect for your little one. I designed this pattern to be super simple, made up of mostly single crochets with minimal decreases. I took lots of pictures along the way, so this should be a piece of cake for you to whip up for a weekend project!

ele15.jpg

He's made with one skein of Lion Brand Homespun Yarn, a super soft and textured yarn. I love the look it offers for this toy, plus it makes for a good snuggle. :)

I decided to put a precious plaid bow on Edgar, which gives him a great finish. You could even make Edgar a "she" and put a little bow on top of it's head.

ele02.jpg

My son, Sawyer absolutely approves of Edgar.. holding onto him as he watches a movie in his mini-recliner--ha!! (At this point I was playing around with the idea of putting a tie on Edgar, hehe)

What you'll need:

-One skein of Lion Brand Homespun Yarn (I used color "Clouds")
-Size K hook (6.5 mm)
-poly fill
-stitch marker
-yarn needle
-safety eyes or buttons
-optional, fabric for a bow tie

Gauge:

11 sc by 12 rows equals a four inch square

Notes:

-ch's at the beginning of rounds/rows do not count as a stitch

-I chose to join each round instead of working continuous rounds for the body because with this yarn you can't really see the seam. You could always do continuous rounds if you'd prefer!

Pattern:

Body of the elephant:

Round 1) make a magic circle, ch 1, and work 10 sc into the circle, join to first st with sl st (10 total sts)
Round 2) ch 1, work 2 sc into each st around, join to first st with sl st (20 total sts)
Round 3) ch 1, sc around, join to first st with sl st (20 total sts) 
Round 4) ch 1, [work 2 sc, sc] around, join to first st with sl st (30 total sts)
Round 5) ch 1, sc around, join to first st with sl st (30 total sts)
Round 6) ch 1, [work 2 sc, sc, sc] around, join to first st with sl st (40 total sts)
Rounds 7 - 26) ch 1, sc around, join to first st with sl st (40 total sts)

At this point, you're ready to begin working on the legs, do not finish off.

But before you move onto the legs, if you are using safety eyes, you will need to place them on the elephant. Because the legs will close off the inside and you won't be able to later put them on. And it may be helpful for you to make the trunk at this time if you'd like to decide where to align the eyes in relation to the trunk.

ele12.jpg

I used little flat black buttons for eyes and sewed them on about at row 10 of the body with about 4 single crochet stitches in between them. I made the rookie mistake of waiting to sew my eyes on after I stuffed the elephant... sigh. Still got er done though!

Legs of the elephant

Before you begin on the legs, you'll want to weave in your beginning yarn end and stuff the body of the elephant full of poly fill. 

ele20.jpg

First you will count to the 20th st of the last round of the body of the elephant, and will put a stitch marker in that 20th st. With your hook where you left off at on the body, you will sl st across the opening into that 20th st you put a st marker in. You can see this being done in the above photo.  You are creating the two different leg openings.

Round 1 of leg) After working that sl st you will ch 1, and sc into the same st you sl st into-- the one with the st marker in it. And then you will sc around in all the sts of that left leg opening, then join to the first sc made of the leg with a sl st (20 total sts) **Leave the st marker there for the other leg**

Rounds 2 - 6 of leg) ch 1, sc around, join to first sc with sl st (20 total sts)

**At this point you will want to stuff the leg worked with poly fill

Round 7 of leg) ch 1, sc2tog around, join to first st with sl st (10 total sts)

Round 8 of leg) ch 1, sc2tog around, join to first st with sl st (5 total sts)

Pinch the end together closed, and sl st across the last few sts to seal the bottom of the leg. 

Finish off and weave in ends

To start the next leg, you will draw up your yarn like depicted in the photo above. You will insert your hook into those two sts you sl st into for the other leg-- the first st of the last round of the body and the st that has the st marker in it.

Round 1, second leg) Draw up your yarn through those sts specified above, and ch 1, then work a sc into that st with the st marker in it, and around the right leg opening, sl st to the first sc to join (20 total sts)

Rounds 2-8, second leg) follow the same instructions for the first leg worked

Finish off, and weave in ends

Ears of the elephant (make 2):

Row 1) ch 13, sc in 2nd ch from hook, and across (12 total sts)

Rows 2-7) ch 1, turn, sc across (12 total sts)

Row 8) ch 2, turn, dc in first four sts, sc, sl st, sl st, sc, dc in the last four sts (12 total sts)

ele23 copy.jpg

To finish the ear, you will sc around the outside of the ear beginning on the side closest to where your hook left off in row 8 of the ear. Sc around the edge until you get back to the other side of row 8. See above photo for assistance.

ele06.jpg

To attach the ears, place them where you'd like on the body (I put the top of the ear on about row 6 of the body). You can pin the ear to the body if you'd like. Then using needle and yarn, sew your ears on using a whip stitch along the straight edge and the body. 

ele07.jpg

I sewed all the way down the ear, then back up. On the way back up, I sewed into a row higher on the ear-- I found this made the ear more sturdy and less floppy. You can see in the photo above where I was putting my needle. 

Repeat this process for both ears.

Trunk of the elephant:

Round 1) ch 12, sl st into the first ch to form a circle (be sure not to twist the ch's before the sl st). Sc in the same st you sl st into and around, join to first sc with sl st (12 total sts)

Rounds 2-5) ch 1, sc around, join to first sc with sl st (12 total sts)

Round 6) ch 1, sc2tog, sc in remaining 10 sts, join to first st with sl st (11 total sts)

Round 7) ch 1, sc around, join to first sc with sl st (11 total sts)

Round 8) ch 1, sc2tog, sc in remaining 9 sts, join to first st with sl st (10 total sts)

Round 9) ch 1, sc around, join to first sc with sl st (10 total sts)

Round 10) ch 1, sc2tog around, join to first st with sl st (5 total sts)

Pinch the end together closed, and sl st across the last few sts to seal the bottom of the trunk.

Finish off

ele08.jpg

Something I did to make the trunk have more of a pronounced curve at the end was to sew it. I just inserted my needle and yarn over a span of a couple of rows (where the sc2tog's were worked, see above) and pulled tight, repeating until I liked how curved it looked. 

ele09.jpg

Essentially you are gathering one side of the trunk and sewing it, to make it shorter than the other side, this makes it curve up more. Above you can see the trunk after I sewed it. 

After the trunk is sewn, you will fill it with poly fill.

ele10.jpg

Next you'll sew on your trunk in between your ears. The top of my trunk was about at row 12 of the body. 

ele11.jpg

I used a whip stitch along the bottom opening of the trunk and into the body. In the above photo you can see how I inserted my needle.

ele13.jpg

If you haven't yet, you'll add on your eyes above your trunk.

ele17.jpg

After Edgar was done, I thought he needed some sort of accessory to make him complete. Many folks over on Instagram suggested a bow tie, and I loved that idea! So I cut a piece of fabric that was 3"x 2" big, along with a little piece that was .5" x 1.5" for the middle of the bow. In the photo above I also included another option-- a i cord bow, which would totally be cute also. You can see a video on how to make an i cord HERE.

ele19.jpg

To make the bow, I just wrapped the smaller middle piece of fabric around the middle of the larger rectangle piece (cinching it), and then with needle and thread I sewed through the middle until it was secure. 

ele16.jpg

Then I sewed his bow a few rows below his trunk. You could easily make this elephant into a girl by putting the bow up on top by the ear. 

And that completes the cute crochet elephant pattern! What a pleasure to be able to make this toy.. I love making stuff for my kid, and I hope you get to make one for the kid in your life as well!

If you make an Edgar of your own, you should totally share with me over on Instagram.. I'd love to admire. :)

Happy hooking my friends,
Meg

Pattern for a Crochet Elephant - Megmade with Love