Free Crochet Pattern for the Daydreamer Crochet Vest
/
****You can find the PDF version of this free pattern in my shop by clicking HERE. Great for easy printing!***
Today I bring you a brand-spankin' new pattern! An easy-going, airy vest that seriously looks great paired with any outfit. It features two stripes on the bottom for added detail, and is basically only made up of chains and double crochets, woot woot! 👏🎉
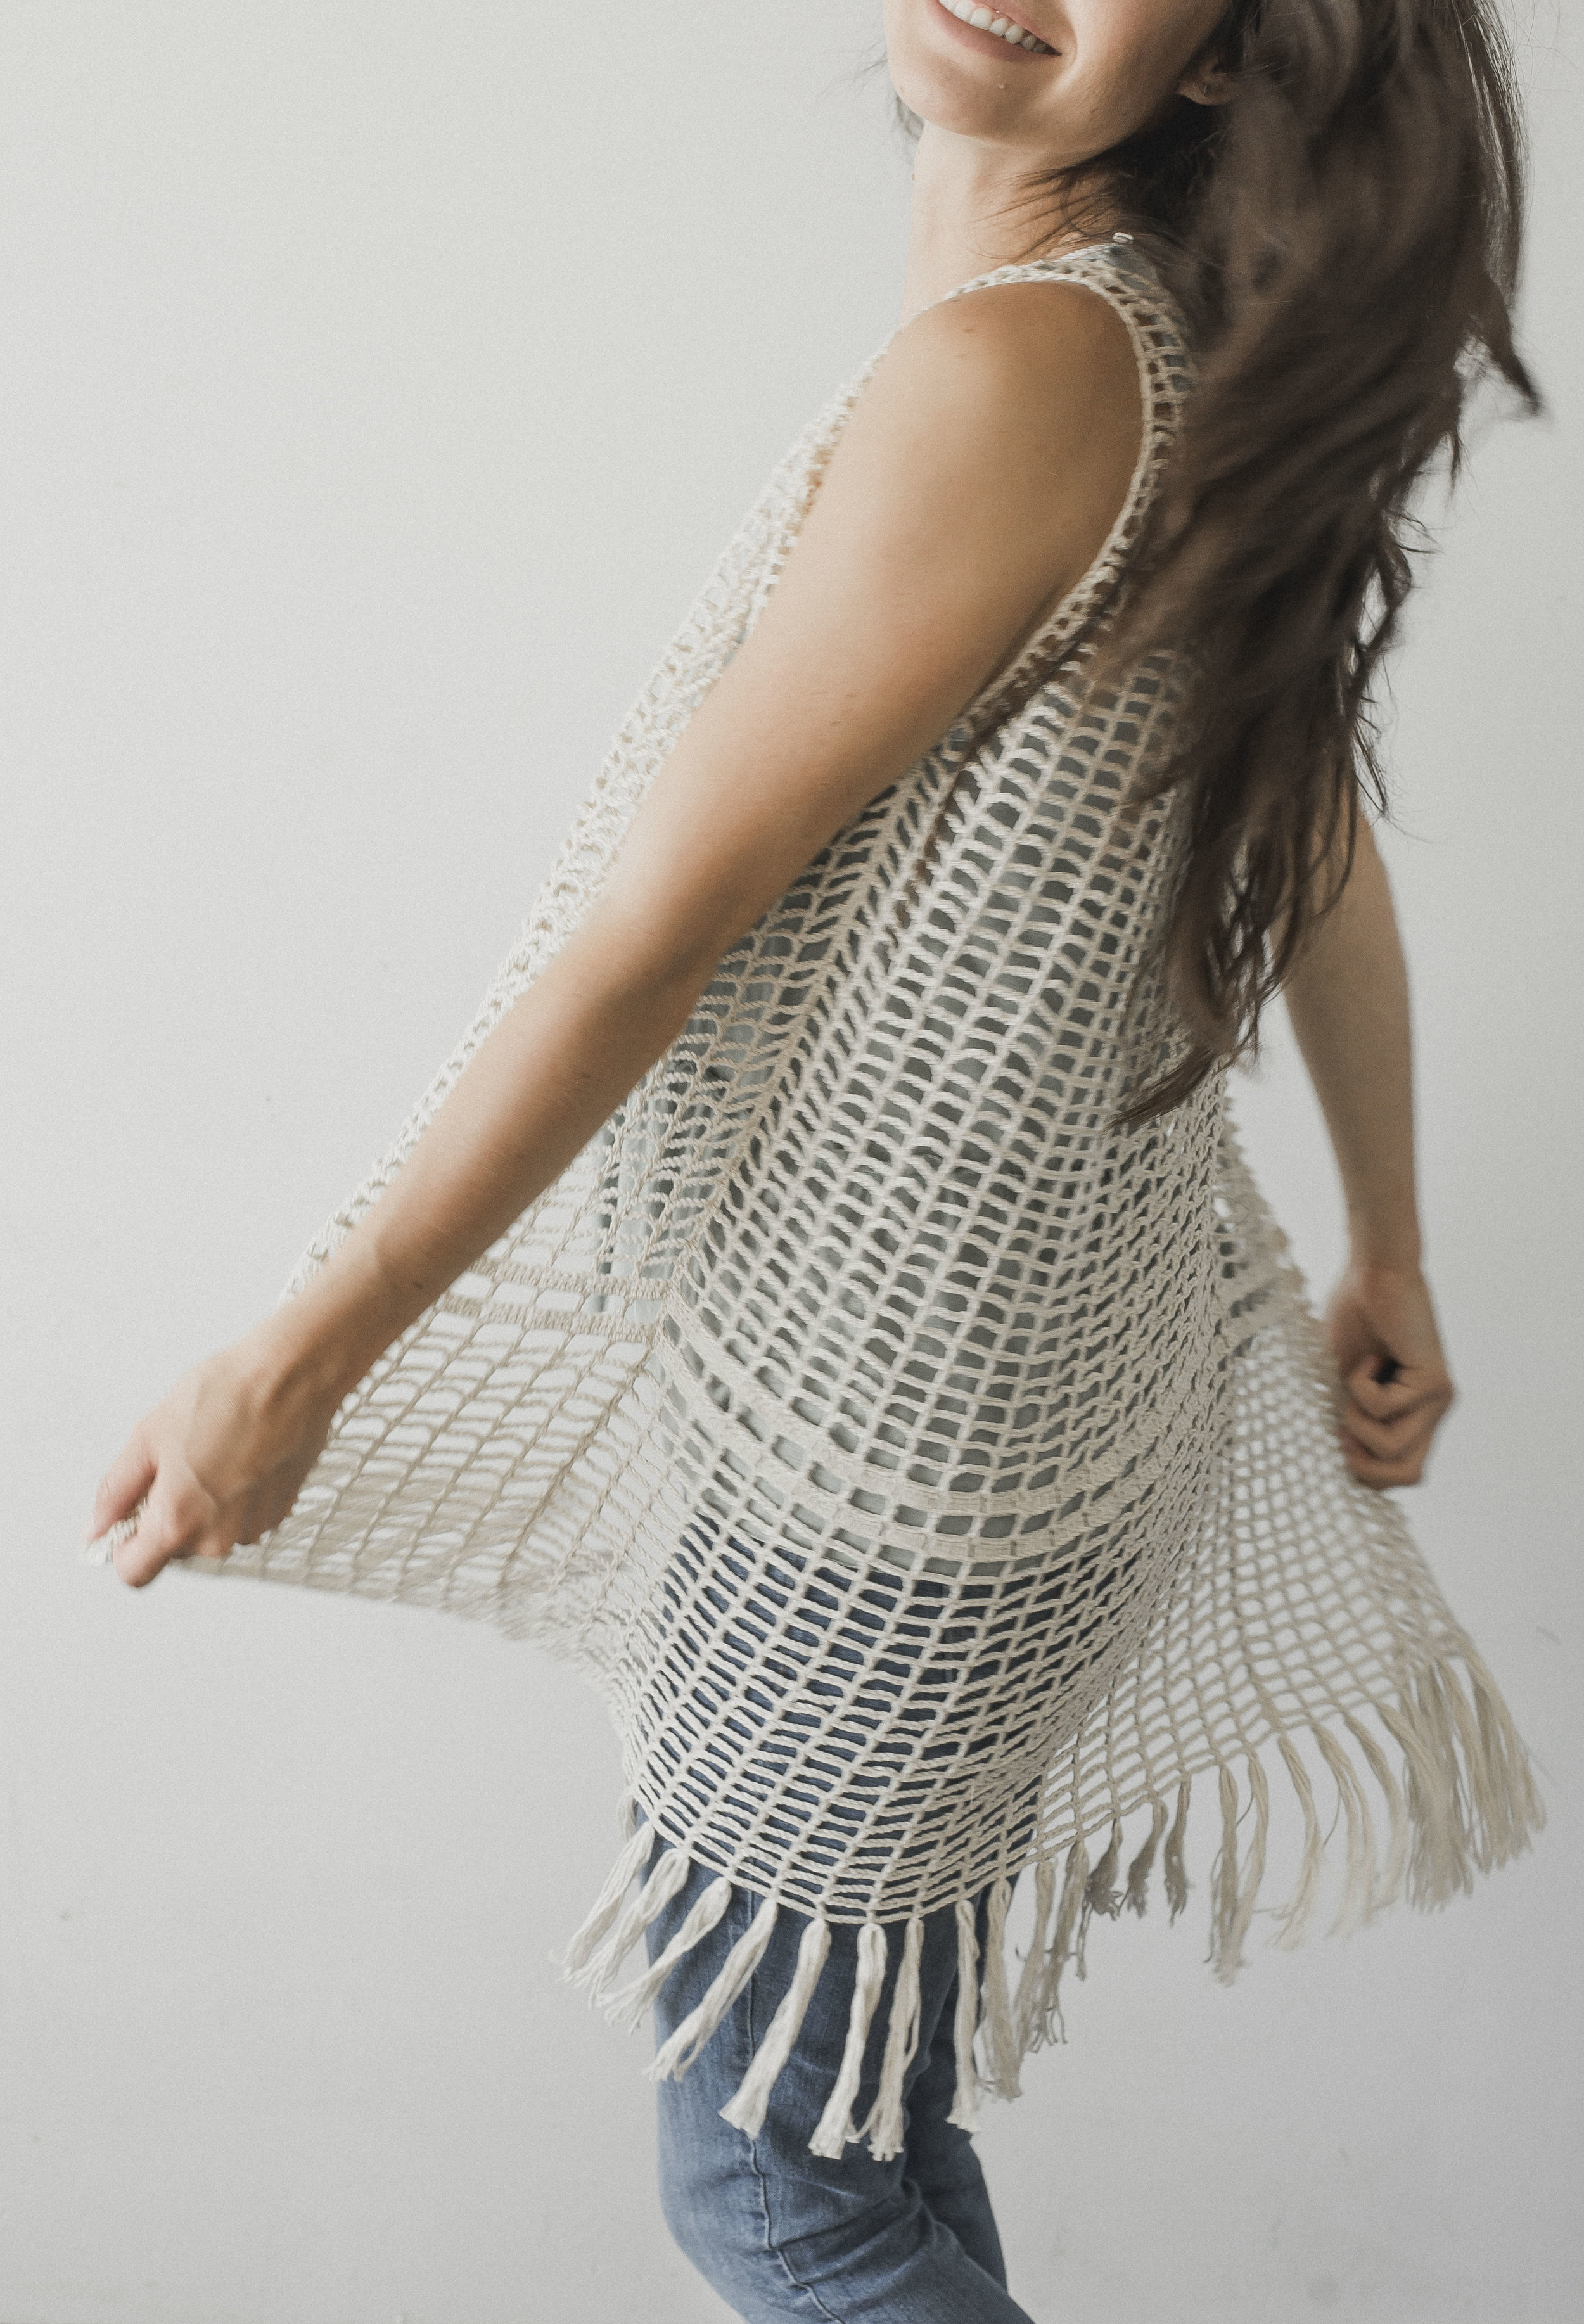
This vest was actually very much inspired by one I saw at Target awhile back, lol (thanks Target for being the best, always! 😂). I think what makes it so great to me, is the simplicity of it. I'm a no-frills kinda gal, which makes it right up my alley. And the fringe is the perfect finishing touch if ya ask me.


Like I said, this vest pairs well with so many things. I plan on wearing it a lot over basic outfits like the one I'm pictured in. But it'd also be incredibly cute paired with a flowy dress.
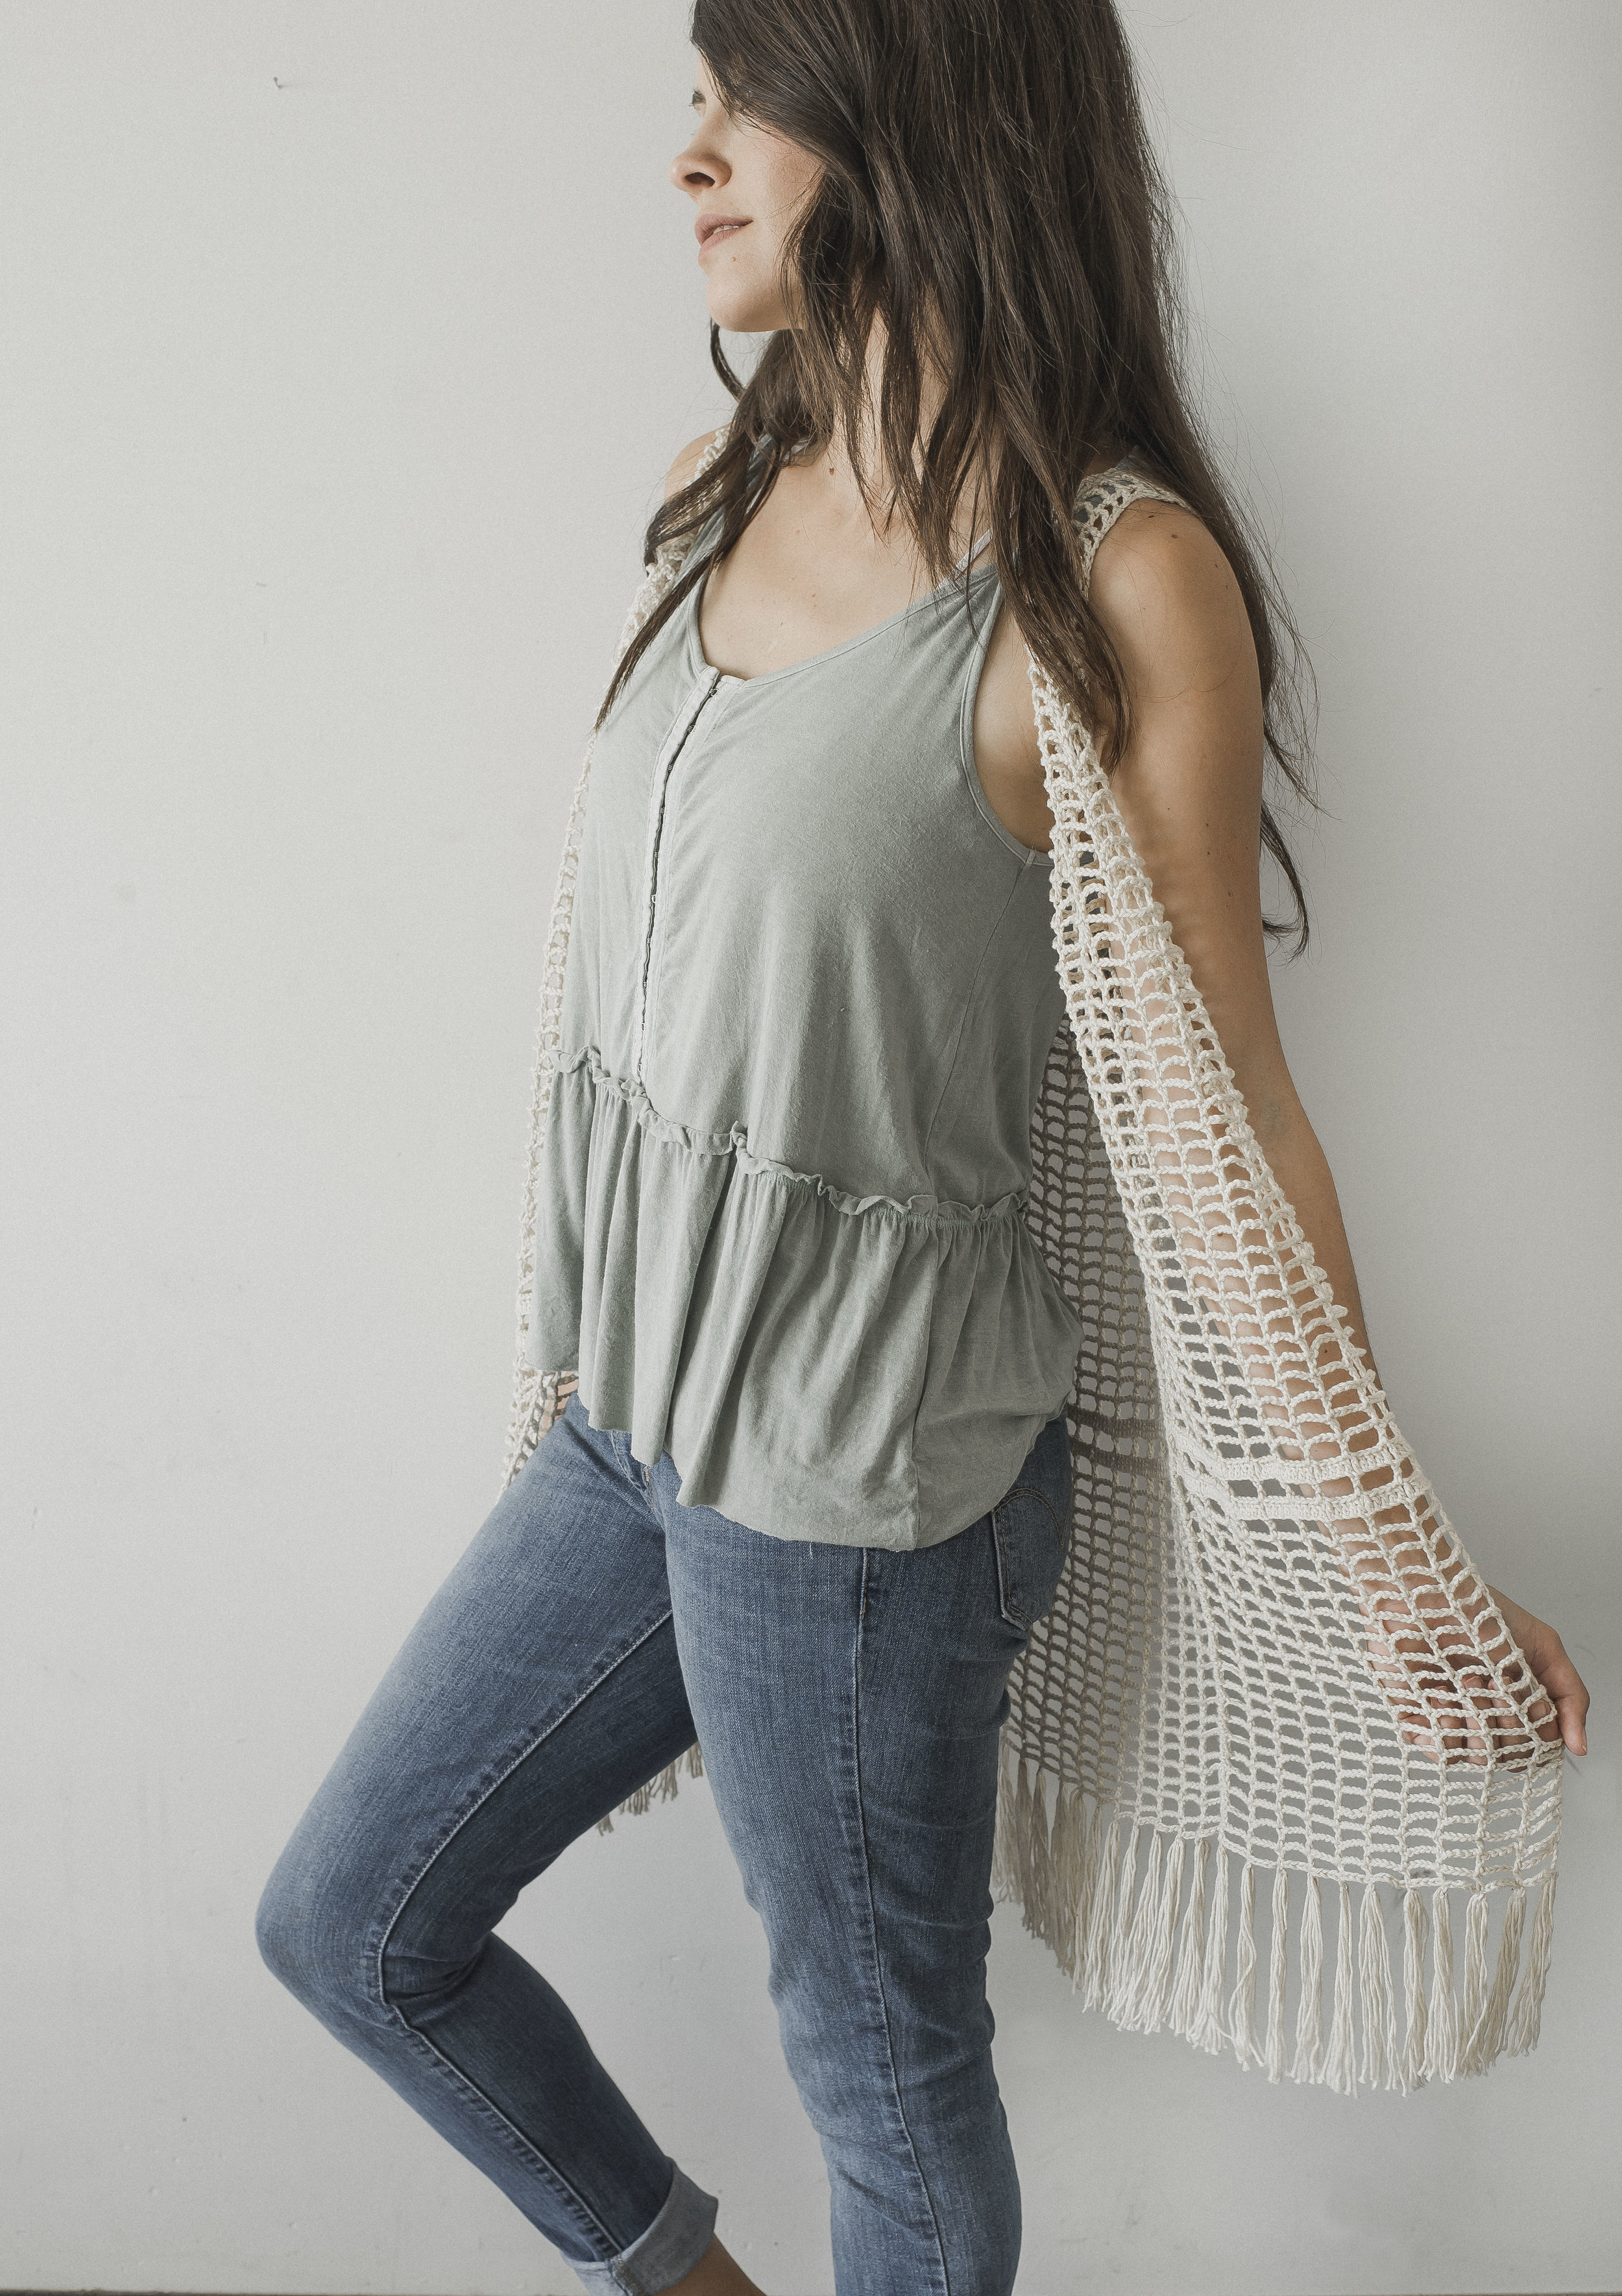
The pattern is made up of three pieces: two front panels and one back panel. They all decrease at the top to create a "tank top" type of design. It's written for multiple sizes, so hopefully errbody and their dog will be able to sport their own Daydreamer Vest!
***PDF version of this pattern can be found by clicking HERE, makes for easier printing!***
What you'll need:
-Fingering (Super Fine) weight yarn (I used Knit Picks Comfy Fingering Cotton Yarn in "Ivory-- couldn't recommend this yarn enough-- a super super soft cotton-- linked HERE. See notes for yardage information)
-Size E (3.5 mm) hook, or size needed to obtain gauge
-yarn needle
-sewing/safety pins to help with sewing
Gauge:
(since the vest is made up of mostly chains, I thought I'd offer a couple of ways to assess gauge)
12 chains = 2 inches
10 rows & 5 (ch 5 + dc) "sections" = 4 inch square
Abbreviations:
ch=chain, sk=skip, st(s)=stitch(es), dc=double crochet, sl=slip, sc=single crochet
Difficulty:
Intermediate
Notes:
Sizing:
Small
-Fits up to 34" bust, approx. 26" long
-Requires 550 yards of yarn (excluding fringe)
Medium
-Fits up to 36" bust, approx. 26" long
-Requires 575 yards of yarn (excluding fringe)
Large
-Fits up to 38" bust, approx. 27" long
-Requires 600 yards of yarn (excluding fringe)
X-Large
-Fits up to 41" bust, approx. 27" long
-Requires 650 yards of yarn (excluding fringe)
Plus
-Fits up to 44" bust, approx. 27" long
-Requires 700 yards of yarn (excluding fringe)
***pattern is formatted for the different sizes as follows: S (M, L, XL, PLUS)
-pattern is written in US terms
-chains do NOT count as stitches in this pattern
-length of vest could easily be adjusted by adding/taking away rows before the decreases begin
-vest is worked in three pieces: two front panels and one back panel
-you may find that you should block your vest after assembling
Pattern:
Formatted: S (M, L, XL, PLUS)
******FRONT PANEL (MAKE 2):
Row 1) ch 67 (73, 79, 85, 91), dc in 14th ch from hook, [ch 5, sk 5 ch's, dc] until end of row (total 10, 11, 12, 13, 14 dc's)
Rows 2-20) ch 8, turn, work dc on top of next dc from previous row, [ch 5, dc on top of next dc] 8 (9, 10, 11, 12) times, for last section: ch 5, sk 5 ch's dc into next ch (total 10, 11, 12, 13, 14 dc's)
Row 21) ch 3, turn, dc in next 5 ch's, [ch 1, sk st, dc in next 5 ch's] 9 (10, 11, 12, 13) times (total 50, 55, 60, 65, 70 dc's)
Row 22) ch 8, turn, dc into next ch 1 sp, [ch 5, dc into next ch 1 sp] 8 (9, 10, 11, 12) times, for last section: ch 5, dc into 3rd ch from the beginning of previous row (total 10, 11, 12, 13, 14 dc's)
Row 23) repeat row 21
Row 24) repeat row 22
Rows 25-50) ch 8, turn, work dc on top of next dc from previous row, [ch 5, dc on top of next dc] 8 (9, 10, 11, 12) times, for last section: ch 5, sk 5 ch's dc into next ch (total 10, 11, 12, 13, 14 dc's)
Row 51) ch 5, turn, dc on top of next dc, [ch 5, dc on top of next dc] 8 (9, 10, 11, 12) times, for last section: ch 4, sk 4 ch's, sc in next ch (total 9, 10, 11, 12, 13 dc's and 1 sc)
Row 52) turn, sl st into first 2 ch's, ch 4, dc on top of next dc [ch 5, dc on top of next dc] 8 (9, 10, 11, 12) times, for last section: ch 4, sk 2 ch's, sl st in next ch (total 9, 10, 11, 12, 13 dc's)
Row 53) turn, sl st into first 2 ch's, ch 3, dc on top of next dc, [ch 5, dc on top of next dc] 8 (9, 10, 11, 12) times, for last section: ch 3, sk 2 ch's, sl st in next ch (total 9, 10, 11, 12, 13 dc's)
Row 54) turn, sl st into first 2 ch, ch 2, dc on top of next dc, [ch 5, dc on top of next dc] 8 (9, 10, 11, 12) times, for last section: ch 2, sk 1 ch, sl st in next ch (total 9, 10, 11, 12, 13 dc's)
Row 55) turn, sl st up to first dc, ch 6, dc on top of next dc, [ch 5, dc on top of next dc] 6 (7, 8, 9, 10) times, ch 3, dc on top of last dc (total 8, 9, 10, 11, 12 dc's)
Row 56) ch 6, turn, dc on top of next dc, [ch 5, dc on top of next dc] 6 (7, 8, 9, 10) times, ch 3, sk 3 ch's, dc in next ch (total 8, 9, 10, 11, 12 dc's)
Row 57) ch 5, turn, dc on top of next dc, [ch 5, dc on top of next dc] 6 (7, 8, 9, 10) times, for last section: ch 4, sk 4 ch's, sc in next ch (total 7, 8, 9, 10, 11 dc's and 1 sc)
Row 58) turn, sl st into first 2 ch's, ch 4, dc on top of next dc [ch 5, dc on top of next dc] 6 (7, 8, 9, 10) times, for last section: ch 4, sk 2 ch's, sl st in next ch (total 7, 8, 9, 10, 11 dc's)
Row 59) turn, sl st into first 2 ch's, ch 3, dc on top of next dc, [ch 5, dc on top of next dc] 6 (7, 8, 9, 10) times, for last section: ch 3, sk 2 ch's, sl st in next ch (total 7, 8, 9, 10, 11 dc's)
Row 60) turn, sl st into first 2 ch, ch 2, dc on top of next dc, [ch 5, dc on top of next dc] 6 (7, 8, 9, 10) times, for last section: ch 2, sk 1 ch, sl st in next ch (total 7, 8, 9, 10, 11 dc's)
Row 61) turn, sl st up to first dc, ch 6, dc on top of next dc, [ch 5, dc on top of next dc] 4 (5, 6, 7, 8) times, ch 3, dc on top of last dc (total 6, 7, 8, 9, 10 dc's)
Row 62) ch 6, turn, dc on top of next dc, [ch 5, dc on top of next dc] 4 (5, 6, 7, 8) times, ch 3, sk 3 ch's, dc in next ch (total 6, 7, 8, 9, 10 dc's)
Row 63) ch 5, turn, dc on top of next dc, [ch 5, dc on top of next dc] 4 (5, 6, 7, 8) times, for last section: ch 4, sk 4 ch's, sc in next ch (total 5, 6, 7, 8, 9 dc's and 1 sc)
Row 64) turn, sl st into first 2 ch's, ch 4, dc on top of next dc [ch 5, dc on top of next dc] 4 (5, 6, 7, 8) times, for last section: ch 4, sk 2 ch's, sl st in next ch (total 5, 6, 7, 8, 9 dc's)
Row 65) turn, sl st into first 2 ch's, ch 3, dc on top of next dc, [ch 5, dc on top of next dc] 4 (5, 6, 7, 8) times, for last section: ch 3, sk 2 ch's, sl st in next ch (total 5, 6, 7, 8, 9 dc's)
Row 66) turn, sl st into first 2 ch, ch 2, dc on top of next dc, [ch 5, dc on top of next dc] 4 (5, 6, 7, 8) times, for last section: ch 2, sk 1 ch, sl st in next ch (total 5, 6, 7, 8, 9 dc's)
Row 67) turn, sl st up to first dc, ch 6, dc on top of next dc, [ch 5, dc on top of next dc] 2 (3, 4, 5, 6) times, ch 3, dc on top of last dc (total 4, 5, 6, 7, 8 dc's)
Row 68) ch 6, turn, dc on top of next dc, [ch 5, dc on top of next dc] 2 (3, 4, 5, 6) times, ch 3, sk 3 ch's, dc in next ch (total 4, 5, 6, 7, 8 dc's)
Row 69) ch 5, turn, dc on top of next dc, [ch 5, dc on top of next dc] 2 (3, 4, 5, 6) times, for last section: ch 4, sk 4 ch's, sc in next ch (total 3, 4, 5, 6, 7 dc's and 1 sc)
Row 70) turn, sl st into first 2 ch's, ch 4, dc on top of next dc [ch 5, dc on top of next dc] 2 (3, 4, 5, 6) times, for last section: ch 4, sk 2 ch's, sl st in next ch (total 3, 4, 5, 6, 7 dc's)
Row 71) turn, sl st into first 2 ch's, ch 3, dc on top of next dc, [ch 5, dc on top of next dc] 2 (3, 4, 5, 6) times, for last section: ch 3, sk 2 ch's, sl st in next ch (total 3, 4, 5, 6, 7 dc's)
Row 72) turn, sl st into first 2 ch, ch 2, dc on top of next dc, [ch 5, dc on top of next dc] 2 (3, 4, 5, 6) times, for last section: ch 2, sk 1 ch, sl st in next ch (total 3, 4, 5, 6, 7 dc's)
***FOR SIZE SMALL ONLY***
Row 73) turn, sl st up to first dc, ch 6, dc on top of next dc, ch 3, dc on top of last dc (total 2 dc's)
Row 74) ch 6, turn, dc on top of next dc, ch 3, sk 3 ch's, dc in next ch (total 2 dc's)
-At this point size small will finish off.
***FOR SIZES MEDIUM - PLUS***
Row 73) turn, sl st up to first dc, ch 6, dc on top of next dc, [ch 5, dc on top of next dc] 1 (2, 3, 4) times, ch 3, dc on top of last dc (total 3, 4, 5, 6 dc's)
Row 74) ch 6, turn, dc on top of next dc, [ch 5, dc on top of next dc] 1 (2, 3, 4) times, ch 3, sk 3 ch's, dc in next ch (total 3, 4, 5, 6 dc's)
-At this point size medium will finish off. Sizes large, xlarge & plus continue...
***For LARGE, XLARGE & PLUS***
Row 75) ch 5, turn, dc on top of next dc, [ch 5, dc on top of next dc] 2 (3, 4) times, for last section: ch 4, sk 4 ch's, sc in next ch (total 3, 4, 5 dc's and 1 sc)
Row 76) turn, sl st into first 2 ch's, ch 4, dc on top of next dc [ch 5, dc on top of next dc] 2 (3, 4) times, for last section: ch 4, sk 2 ch's, sl st in next ch (total 3, 4, 5 dc's)
Row 77) turn, sl st into first 2 ch's, ch 3, dc on top of next dc, [ch 5, dc on top of next dc] 2 (3, 4) times, for last section: ch 3, sk 2 ch's, sl st in next ch (total 3, 4, 5 dc's)
-At this point sizes large, xlarge & plus will finish off
******BACK PANEL:
Row 1) ch 139 (145, 151, 163, 175), dc in 14th ch from hook, [ch 5, sk 5 ch's, dc] until end of row (total 22, 23, 24, 26, 28 dc's)
Rows 2-20) ch 8, turn, work dc on top of next dc from previous row, [ch 5, dc on top of next dc] 20 (21, 22, 24, 26) times, for last section: ch 5, sk 5 ch's dc into next ch (total 22, 23, 24, 26, 28 dc's)
Row 21) ch 3, turn, dc in next 5 ch's, [ch 1, sk st, dc in next 5 ch's] 21 (22, 23, 25, 27) times (total 110, 115, 120, 130, 140 dc's)
Row 22) ch 8, turn, dc into next ch 1 sp, [ch 5, dc into next ch 1 sp] 20 (21, 22, 24, 26) times, for last section: ch 5, dc into 3rd ch from the beginning of previous row (total 22, 23, 24, 26, 28 dc's)
Row 23) repeat row 21
Row 24) repeat row 22
Rows 25-50) ch 8, turn, work dc on top of next dc from previous row, [ch 5, dc on top of next dc] 20 (21, 22, 24, 26) times, for last section: ch 5, sk 5 ch's dc into next ch (total 22, 23, 24, 26, 28 dc's)
Row 51) ch 5, turn, dc on top of next dc, [ch 5, dc on top of next dc] 20 (21, 22, 24, 26) times, for last section: ch 4, sk 4 ch's, sc in next ch (total 21, 22, 23, 25, 27 dc's and 1 sc)
Row 52) turn, sl st into first 2 ch's, ch 4, dc on top of next dc [ch 5, dc on top of next dc] 20 (21, 22, 24, 26) times, for last section: ch 4, sk 2 ch's, sl st in next ch (total 21, 22, 23, 25, 27 dc's)
Row 53) turn, sl st into first 2 ch's, ch 3, dc on top of next dc, [ch 5, dc on top of next dc] 20 (21, 22, 24, 26) times, for last section: ch 3, sk 2 ch's, sl st in next ch (total 21, 22, 23, 25, 27 dc's)
Row 54) turn, sl st into first 2 ch's, ch 2, dc on top of next dc, [ch 5, dc on top of next dc] 20 (21, 22, 24, 26) times, for last section: ch 2, sk 1 ch, sl st in next ch (total 21, 22, 23, 25, 27 dc's)
Row 55) turn, sl st up to first dc, ch 6, dc on top of next dc, [ch 5, dc on top of next dc] 18 (19, 20, 22, 24) times, ch 3, dc on top of last dc (total 20, 21, 22, 24, 26 dc's)
Row 56) ch 6, turn, dc on top of next dc, [ch 5, dc on top of next dc] 18 (19, 20, 22, 24) times, ch 3, sk 3 ch's, dc in next ch (total 20, 21, 22, 24, 26 dc's)
Row 57) ch 5, turn, dc on top of next dc, [ch 5, dc on top of next dc] 18 (19, 20, 22, 24) times, for last section: ch 4, sk 4 ch's, sc in next ch (total 19, 20, 21, 23, 25 dc's and 1 sc)
Row 58) turn, sl st into first 2 ch's, ch 4, dc on top of next dc [ch 5, dc on top of next dc] 18 (19, 20, 22, 24) times, for last section: ch 4, sk 2 ch's, sl st in next ch (total 19, 20, 21, 23, 25 dc's)
Row 59) turn, sl st into first 2 ch's, ch 3, dc on top of next dc, [ch 5, dc on top of next dc] 18 (19, 20, 22, 24) times, for last section: ch 3, sk 2 ch's, sl st in next ch (total 19, 20, 21, 23, 25 dc's)
Row 60) turn, sl st into first 2 ch's, ch 2, dc on top of next dc, [ch 5, dc on top of next dc] 18 (19, 20, 22, 24) times, for last section: ch 2, sk 1 ch, sl st in next ch (total 19, 20, 21, 23, 25 dc's)
Row 61) turn, sl st up to first dc, ch 6, dc on top of next dc, [ch 5, dc on top of next dc] 16 (17, 18, 20, 22) times, ch 3, dc on top of last dc (total 18, 19, 20, 22, 24 dc's)
Row 62) ch 6, turn, dc on top of next dc, [ch 5, dc on top of next dc] 16 (17, 18, 20, 22) times, ch 3, sk 3 ch's, dc in next ch (total 18, 19, 20, 22, 24 dc's)
Row 63) ch 5, turn, dc on top of next dc, [ch 5, dc on top of next dc] 16 (17, 18, 20, 22) times, for last section: ch 4, sk 4 ch's, sc in next ch (total 17, 18, 19, 21, 23 dc's and 1 sc)
Row 64) turn, sl st into first 2 ch's, ch 4, dc on top of next dc [ch 5, dc on top of next dc] 16 (17, 18, 20, 22) times, for last section: ch 4, sk 2 ch's, sl st in next ch (total 17, 18, 19, 21, 23 dc's)
Row 65) turn, sl st into first 2 ch's, ch 3, dc on top of next dc, [ch 5, dc on top of next dc] 16 (17, 18, 20, 22) times, for last section: ch 3, sk 2 ch's, sl st in next ch (total 17, 18, 19, 21, 23 dc's)
Row 66) turn, sl st into first 2 ch's, ch 2, dc on top of next dc, [ch 5, dc on top of next dc] 16 (17, 18, 20, 22) times, for last section: ch 2, sk 1 ch, sl st in next ch (total 17, 18, 19, 21, 23 dc's)
Row 67) turn, sl st up to first dc, ch 6, dc on top of next dc, [ch 5, dc on top of next dc] 14 (15, 16, 18, 20) times, ch 3, dc on top of last dc (total 16, 17, 18, 20, 22 dc's)
Row 68) ch 6, turn, dc on top of next dc, [ch 5, dc on top of next dc] 14 (15, 16, 18, 20) times, ch 3, sk 3 ch's, dc in next ch (total 16, 17, 18, 20, 22 dc's)
Row 69) ch 5, turn, dc on top of next dc, [ch 5, dc on top of next dc] 14 (15, 16, 18, 20) times, for last section: ch 4, sk 4 ch's, sc in next ch (total 15, 16, 17, 19, 21 dc's and 1 sc)
Row 70) turn, sl st into first 2 ch's, ch 4, dc on top of next dc [ch 5, dc on top of next dc] 14 (15, 16, 18, 20) times, for last section: ch 4, sk 2 ch's, sl st in next ch (total 15, 16, 17, 19, 21 dc's)
Row 71) turn, sl st into first 2 ch's, ch 3, dc on top of next dc, [ch 5, dc on top of next dc] 14 (15, 16, 18, 20) times, for last section: ch 3, sk 2 ch's, sl st in next ch (total 15, 16, 17, 19, 21 dc's)
Row 72) turn, sl st into first 2 ch's, ch 2, dc on top of next dc, [ch 5, dc on top of next dc] 14 (15, 16, 18, 20) times, for last section: ch 2, sk 1 ch, sl st in next ch (total 15, 16, 17, 19, 21 dc's)
Row 73) turn, sl st up to first dc, ch 6, dc on top of next dc, [ch 5, dc on top of next dc] 12 (13, 14, 16, 18) times, ch 3, dc on top of last dc (total 14, 15, 16, 18, 20 dc's)
Row 74) ch 6, turn, dc on top of next dc, [ch 5, dc on top of next dc] 12 (13, 14, 16, 18) times, ch 3, sk 3 ch's, dc in next ch (total 14, 15, 16, 18, 20 dc's)
-At this point sizes small & medium will finish off. Sizes large, xlarge & plus continue...
***For LARGE, XLARGE & PLUS***
Row 75) ch 5, turn, dc on top of next dc, [ch 5, dc on top of next dc] 14 (16, 18) times, for last section: ch 4, sk 4 ch's, sc in next ch (total 15, 17, 19 dc's and 1 sc)
Row 76) turn, sl st into first 2 ch's, ch 4, dc on top of next dc [ch 5, dc on top of next dc] 14 (16, 18) times, for last section: ch 4, sk 2 ch's, sl st in next ch (total 15, 17, 19 dc's)
Row 77) turn, sl st into first 2 ch's, ch 3, dc on top of next dc, [ch 5, dc on top of next dc] 14 (16, 18) times, for last section: ch 3, sk 2 ch's, sl st in next ch (total 15, 17, 19 dc's)
-At this point sizes large, xlarge & plus will finish off
Assembly:
To assemble your vest, you'll take lay out your three pieces like in the photo below.. (forgive all my wild yarn ends!)
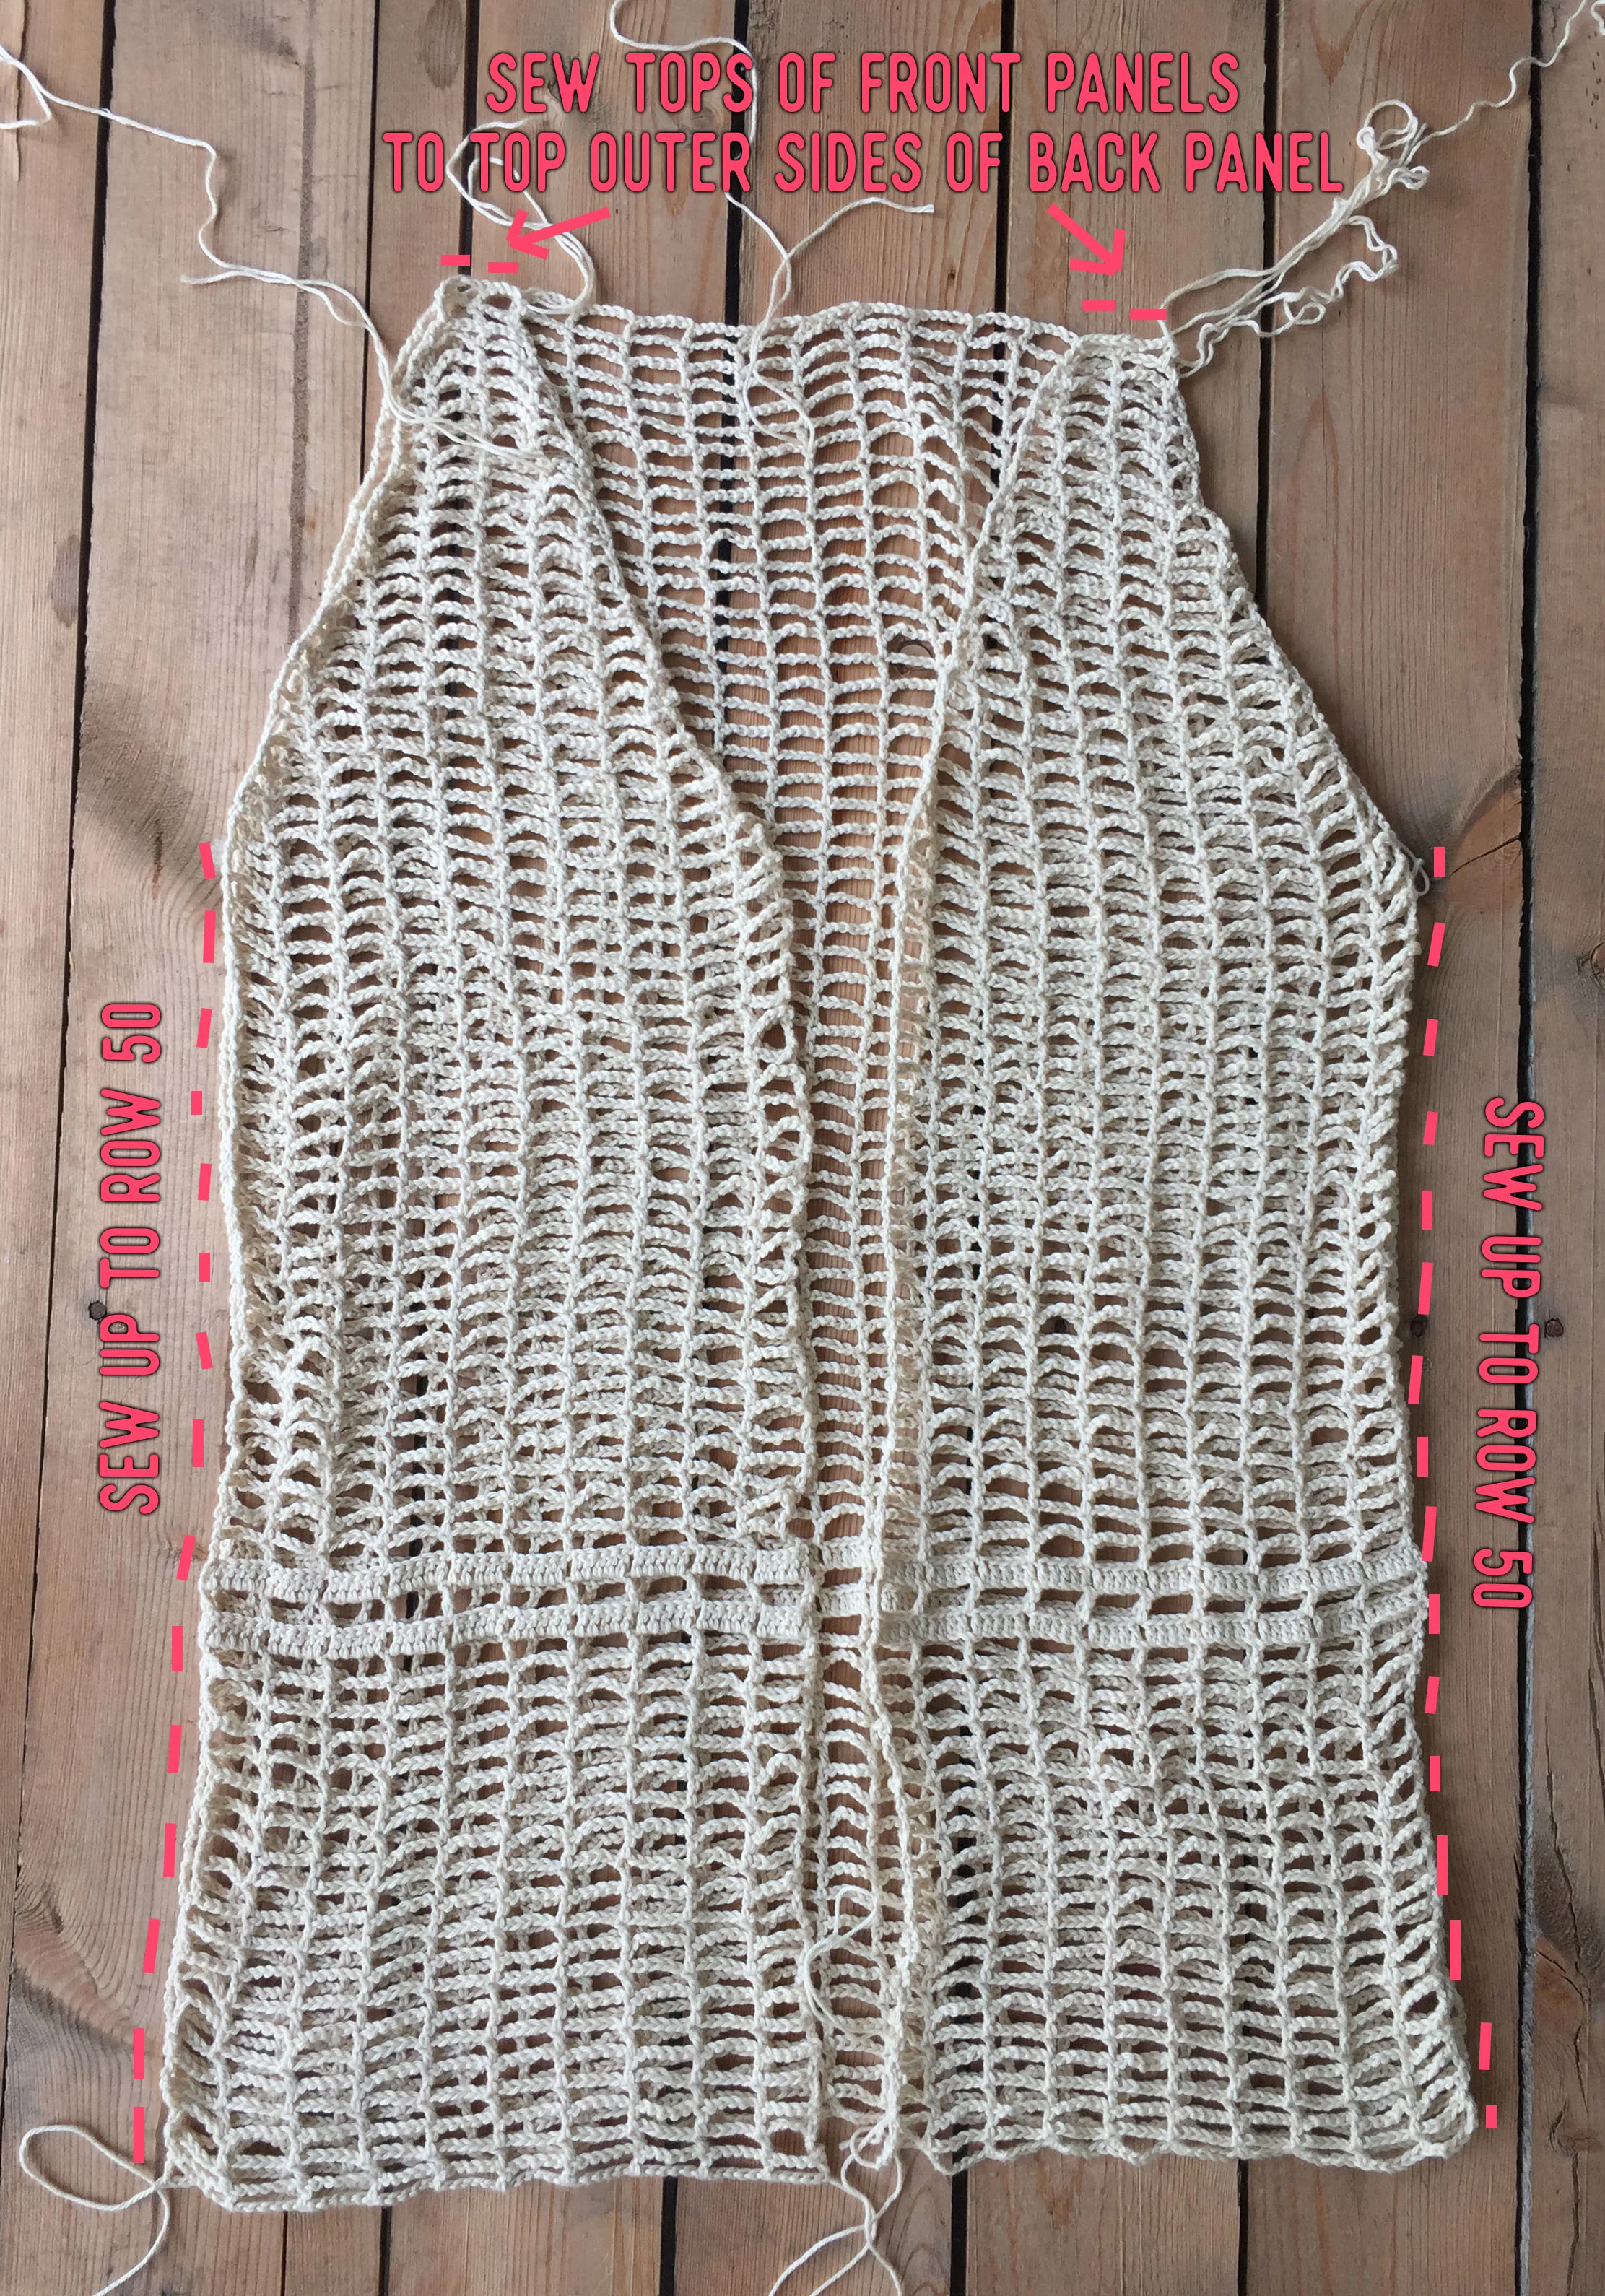
Place the back panel down first, right side up. Then put the two front panels on top of it, right sides down (meaning right sides are together). You'll align the front panels along the outer edges of the back panel, also aligning the tops of your front panels to the top outer edges of the back panel. You can pin them together now to help during sewing.
It is very important to line up the rows of the front and back panels-- because you'll want your "stripes" to line up and also to help with sewing up to the correct row.
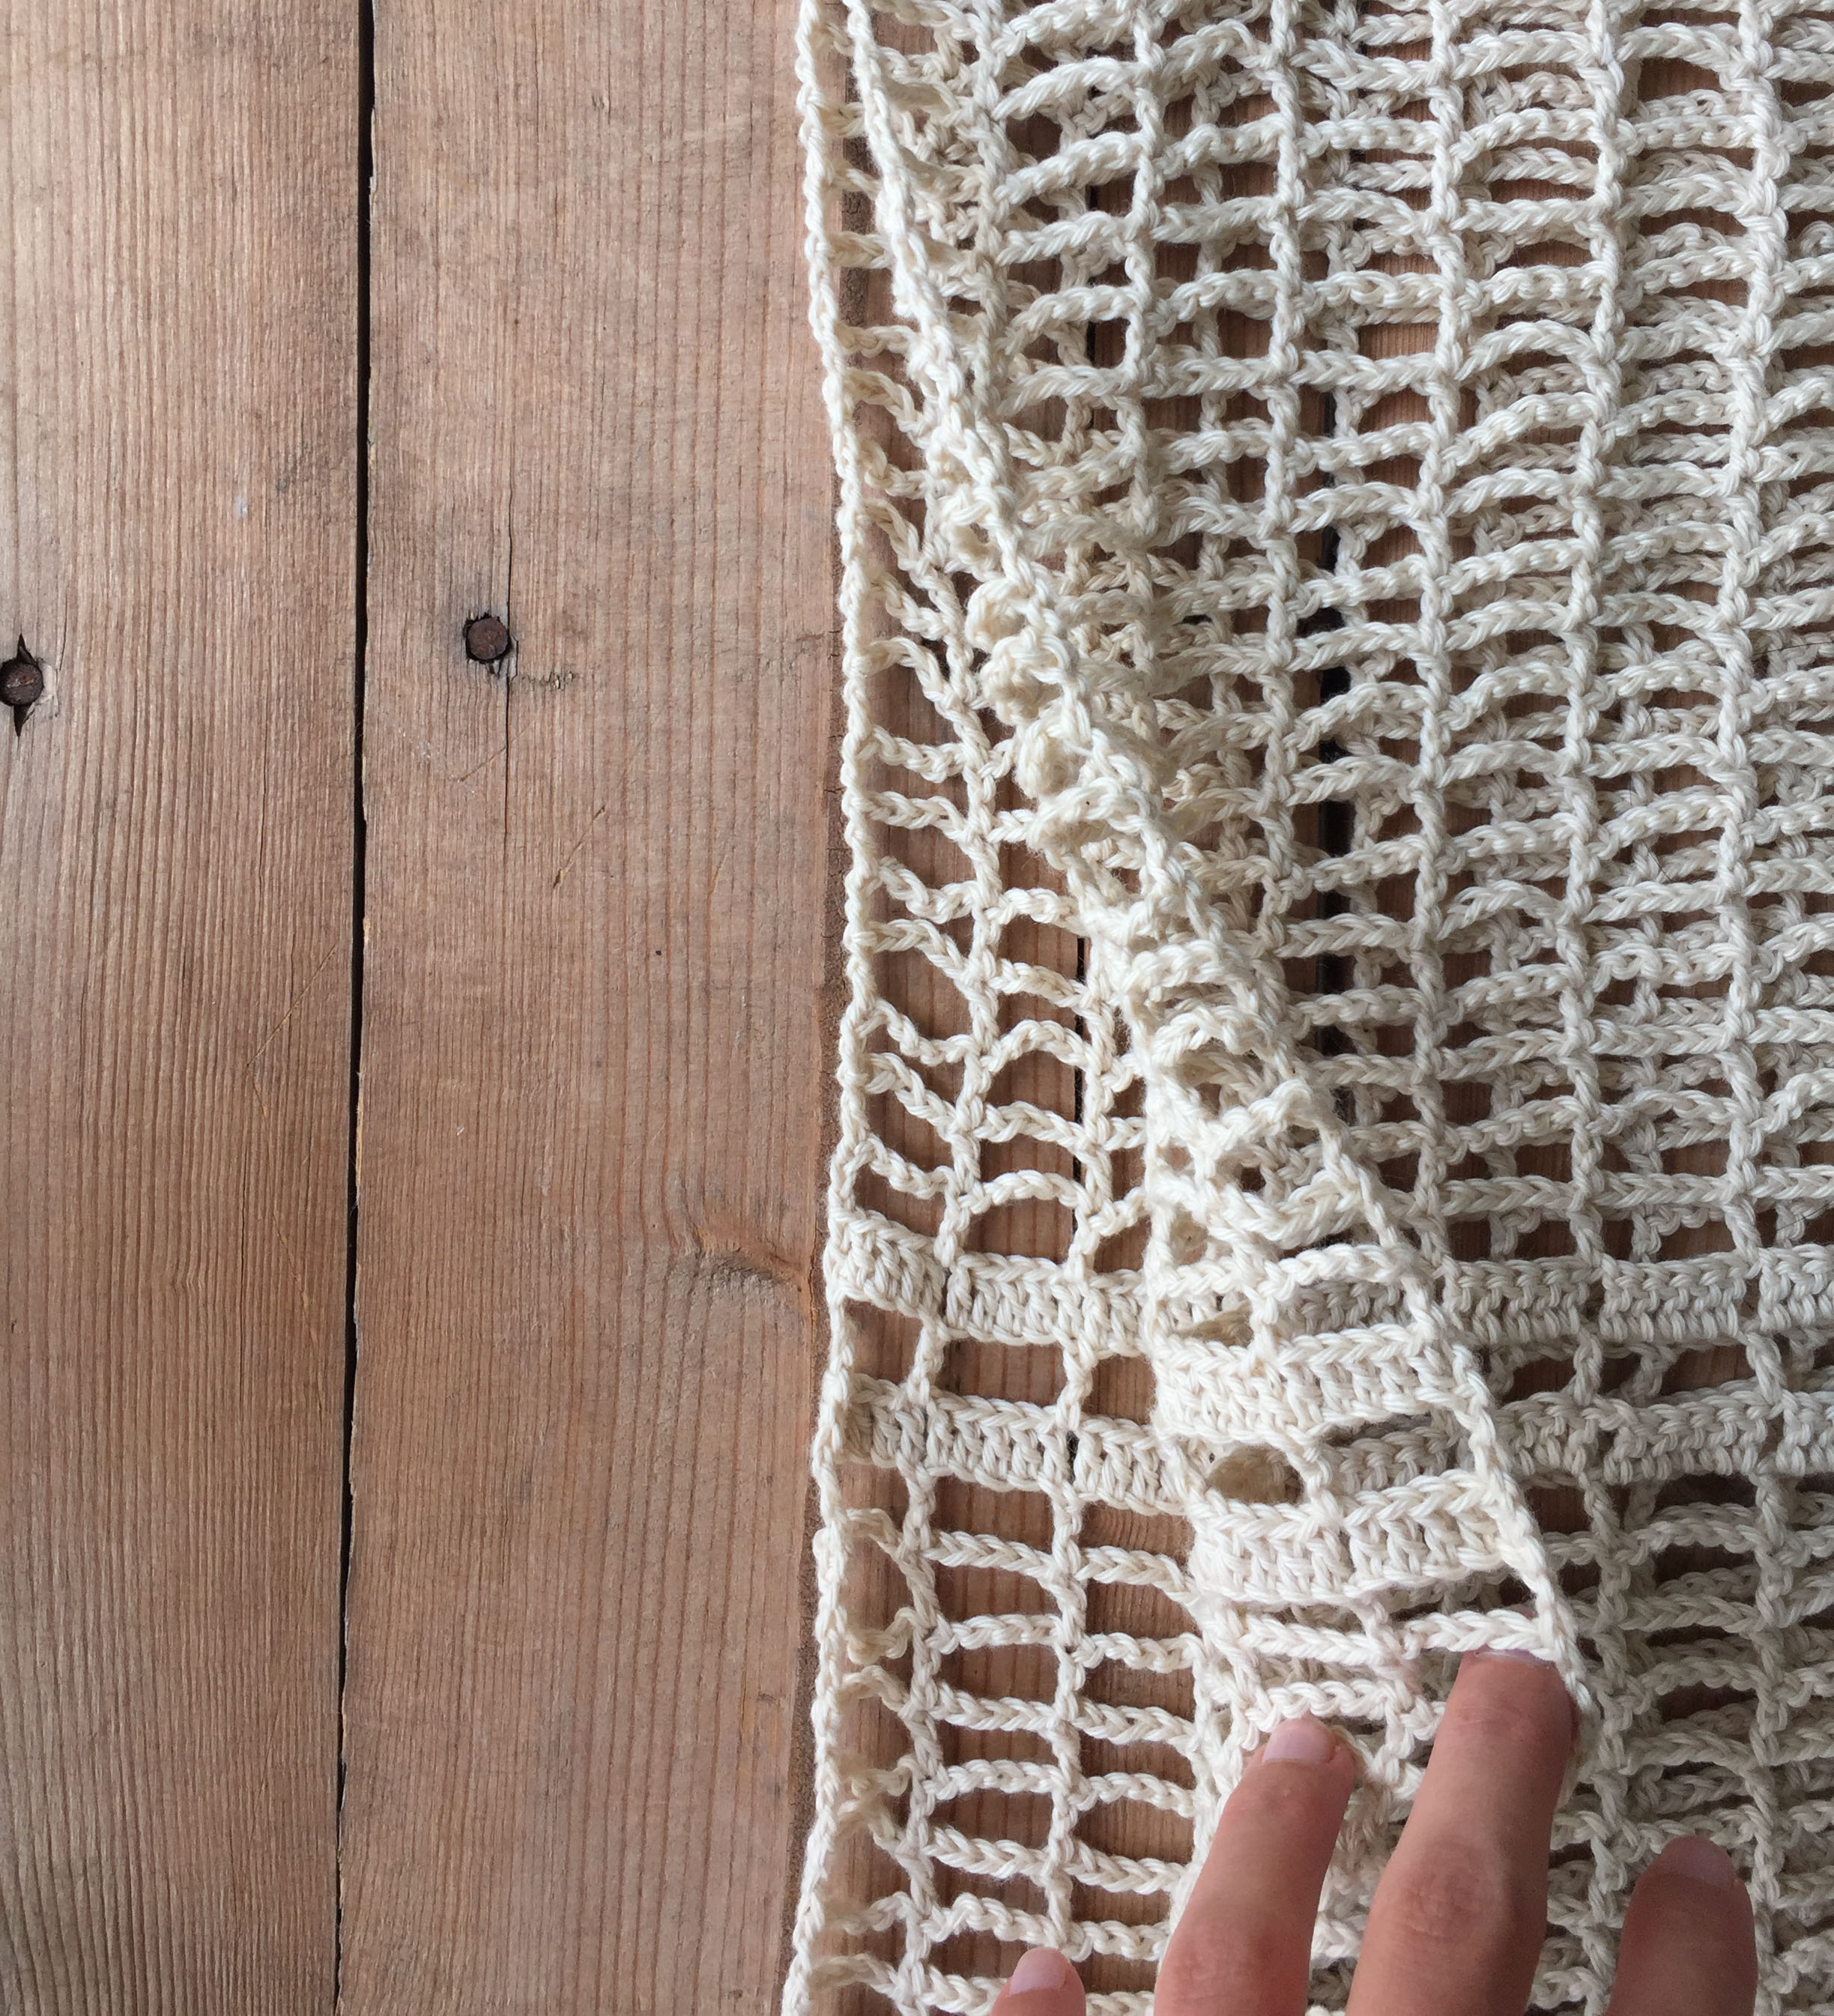
Next you're ready for sewing.. I used a whip stitch to seam up the pieces along the very edges. You'll sew up the two sides, starting at the bottom, using your yarn needle and long strand of yarn (remember to align rows!!) **up to row 50. You will also sew along the tops of the front panels, connecting them to the outer edges of the back panel.
Optional: if you wanted the edges to look extra tidy, you could sc around the entire outside perimeter of the vest. I chose not to do this because I thought it looked fine.. just thought I'd throw that out there!
Once your vest is seamed up, ends woven in, and if you'd prefer-- blocked... you've got your very own Daydreamer Vest!!

Go ahead and try it on and give it a good twirl... you know you wanna :)
Hope you love this design as much as I do! Even though it calls for such thin yarn, it actually isn't too slow to work up. Do please share with me over on Instagram if you make one yourself, I'd love, love, love to admire it.
Happy hooking!
Meg