Free Crochet Pattern for the Cross My Heart Sweater
/
****You can purchase the PDF version of this pattern in my shop by clicking here. It's a nine-page, detailed PDF that includes photos. Plus it's paired with a PDF that contains tutorials on how to apply the eyelets and make the i-cord!****
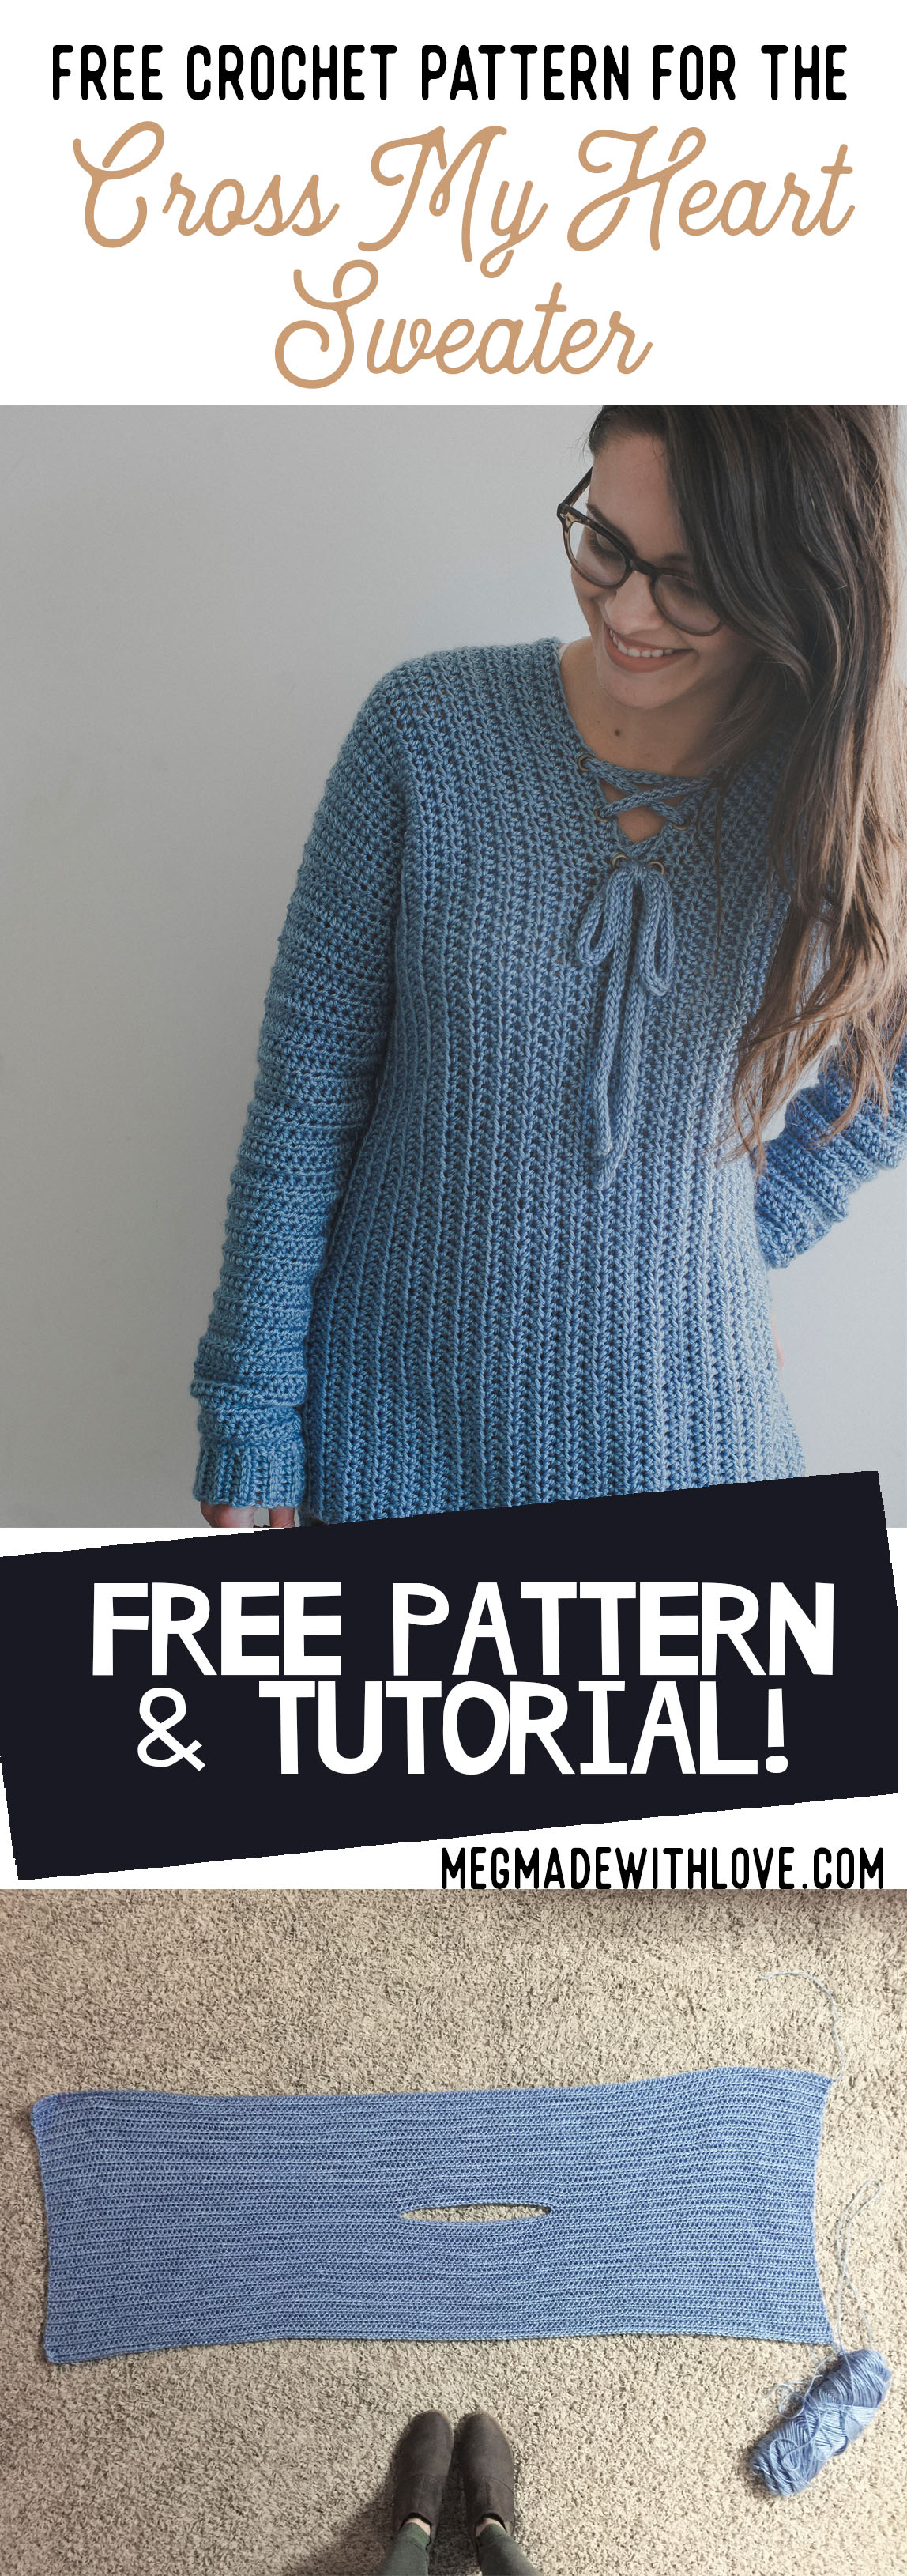
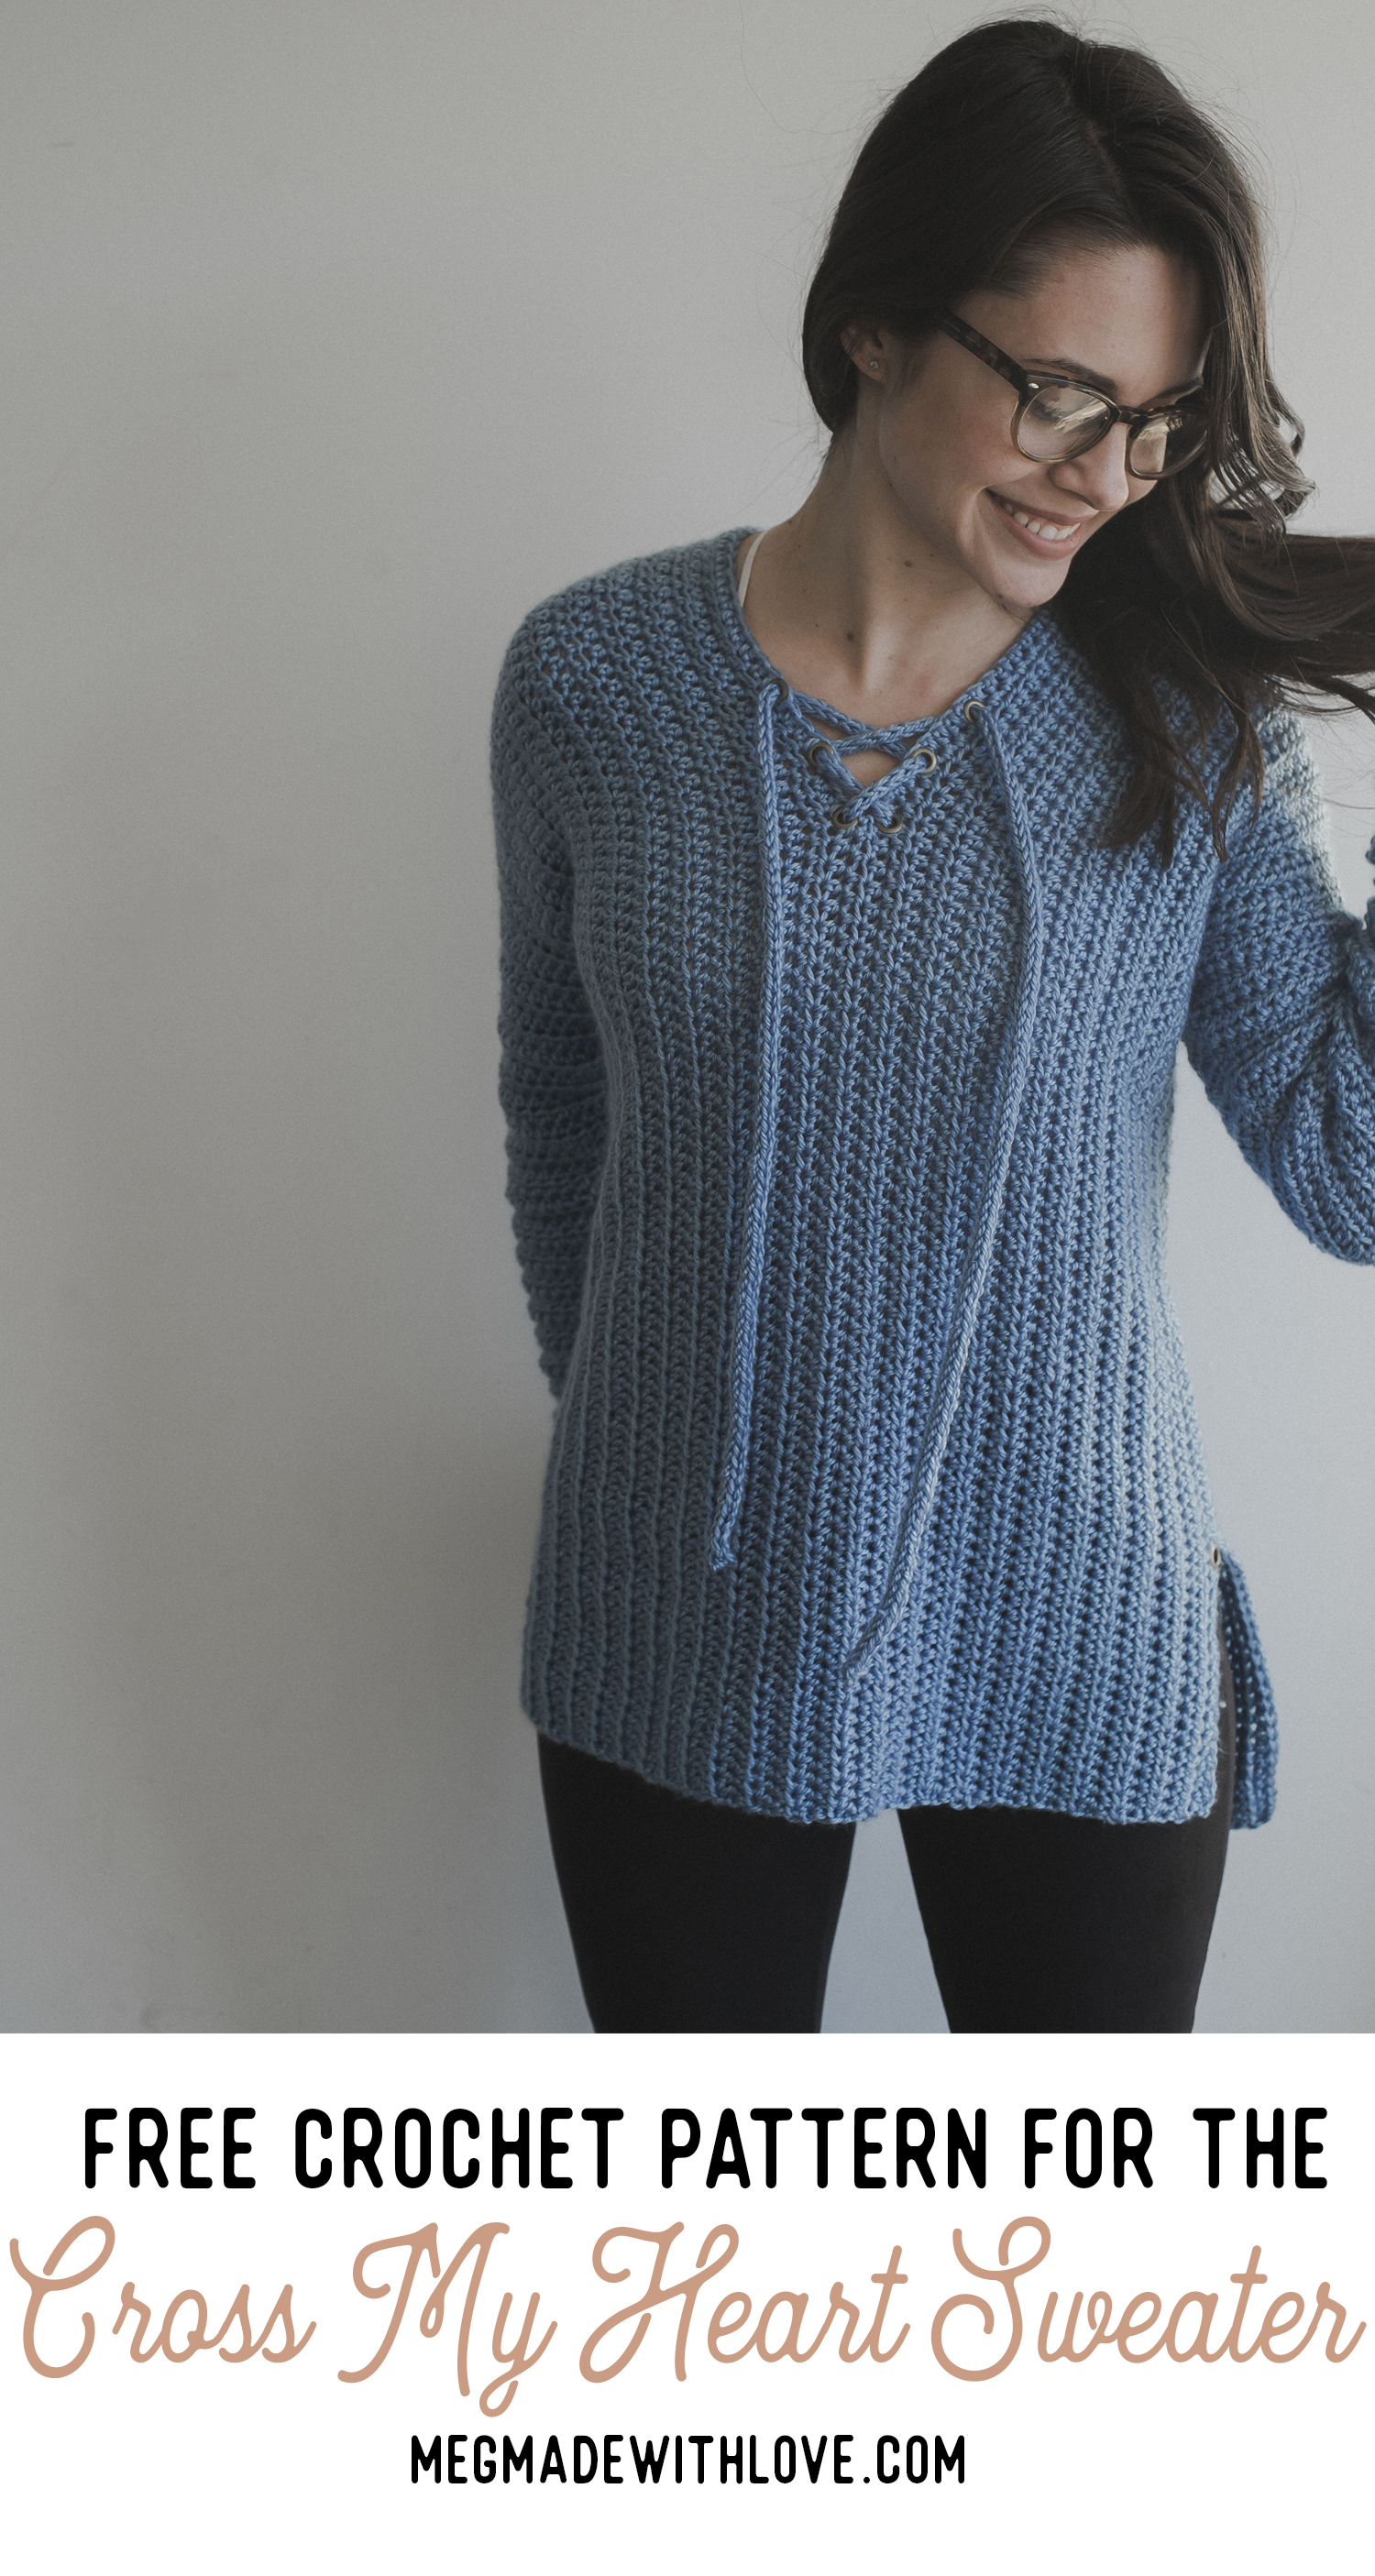
I am so so so happy to finally get this sweater pattern out in the world! It's the Cross My Heart Sweater, and it's the cutest little thing, featuring a unique eyelet and i-cord display along the front neckline. My favorite part about this sweater?? The body is worked in ONE PIECE! Gasp!

Yep, the simplicity and ease of this pattern is possibly my favorite part about it. Okay maybe tied with the cool eyelets. It's designed to be longer in the back than in the front, so it'd pair great with a pair of comfy leggings!

The pattern includes sizes XS-3X, so there's lots of options for sizing. And there's even a photo tutorial for how to add on those eyelets (it's way easier than you think!). The yarn I used was Yarn Bee Yarn Soft Secret in Light Denim (found at Hobby Lobby), it's a "lighter" yarn than others it's weight so take mind of that- I talk about this below.
Be extra sure to read all the notes before starting in on the pattern!

What you'll need:
-Worsted weight (4) yarn (I used Yarn Bee Yarn, Soft Secret in “Light Denim” it seems this yarn is a bit “lighter” in weight than other yarns in this category, so take note of that, see yardage information in the notes)
-Size K Hook, or hook to obtain gauge (6.5 mm)(for sweater)
-Size G Hook (4.0 mm)(for i-cord)
-Yarn needle
-Safety or sewing pins
-6 sets (12 pieces) of 1/4” Large Eyelets & Eyelet Tool Kit (I used Dritz brand found at Walmart, can also be found on Amazon)
Abbreviations:
ch=chain, st(s)=stitch(es), hdc=half double crochet, sk=skip, sc=single crochet, fphdc=front post half double crochet, 2hdc= two half double crochet in one stitch
Gauge:
12 hdc by 10 rows equals a four inch square
Notes:
Measurements & yarn yardage for the sweater sizes (approximately):
XS:
Bust: 34 inches, Length 25 inches-front, 28 inches-back (Approx 1,000 yards)
S:
Bust: 36 inches, Length: 25 inches-front, 28 inches-back (Approx 1,100 yards)
M:
Bust: 38 inches, Length: 25.5 inches-front, 28 inches-back (Approx 1,200 yards)
L:
Bust: 40 inches, Length: 25.5 inches-front, 28.5 inches-back (Approx 1,300 yards)
XL:
Bust: 42 inches, Length: 26 inches-front, 28.5 inches-back (Approx 1,400 yards)
2XL:
Bust: 46 inches, Length: 26.5 inches-front, 29 inches-back (Approx 1,600 yards)
3XL:
Bust: 50 inches, Length: 26.5 inches-front, 29 inches-back (Approx 1,800 yards)
**please note that the yarn I used was a rather light “4” weight yarn. You can find good substitutes for this yarn by going to yarnsub.com or just keep this in mind when getting yarn. A good substitute I would recommend is Caron Simply Soft.
-it's true that the K hook is larger than suggested for this weight of yarn. The reason for the larger hook is for more of a drape. Although, I HIGHLY RECOMMEND checking your gauge and adjust hook accordingly for an accurately-sized sweater.
-ch’s at beginning of rows/rounds do not count as a stitch
-the sweater body is worked in one piece, the skipped sts you work will create the neck hole. If you'd like to make your neck hole deeper, you could skip additional sts when working the neck hole row.
-I designed the sleeves of this sweater to be a bit longer, which is just a preference of mine. To shorten them up a bit, you can skip working the last rows of the sleeve after the last decrease.
-I used a whip stitch to sew the pieces together- making sure not to sew too tight
-I chose to add three eyelets to each side of the neckline, how many you’d like to do is obviously up to you!
-I provide the link to the eyelet tutorial below, but I will put it here as well: How to Apply Eyelets to Crochet Projects
Pattern:

Body of the Sweater:
***USING K (6.5mm) HOOK***
Size XS:
Row 1) ch 155, hdc in 2nd ch from hook and across (154 total sts)
Rows 2-23) ch 1, turn, hdc across row (154 total sts)
Row 24) ch 1, turn, hdc 70, ch 29, sk 29 sts (be sure not to twist your ch’s), hdc in last 55 sts (154 total sts, including ch’s)
Row 25) ch 1, turn, hdc across, working one hdc into each ch from previous row (154 total sts)
Rows 26-47) ch 1, turn, hdc across row (154 total sts)
-Finish off
Size S:
Row 1) ch 155, hdc in 2nd ch from hook and across (154 total sts)
Rows 2-24) ch 1, turn, hdc across row (154 total sts)
Row 25) ch 1, turn, hdc 70, ch 29, sk 29 sts (be sure not to twist your ch’s), hdc in last 55 sts (154 total sts, including ch’s)
Row 26) ch 1, turn, hdc across, working one hdc into each ch from previous row (154 total sts)
Rows 27-49) ch 1, turn, hdc across row (154 total sts)
-Finish off
Size M:
Row 1) ch 157, hdc in 2nd ch from hook and across (156 total sts)
Rows 2-25) ch 1, turn, hdc across row (156 total sts)
Row 26) ch 1, turn, hdc 70, ch 31, sk 31 sts (be sure not to twist your ch’s), hdc in last 55 sts (156 total sts, including ch’s)
Row 27) ch 1, turn, hdc across, working one hdc into each ch from previous row (156 total sts)
Rows 28-51) ch 1, turn, hdc across row (156 total sts)
-Finish off
Size L:
Row 1) ch 159, hdc in 2nd ch from hook and across (158 total sts)
Rows 2-26) ch 1, turn, hdc across row (158 total sts)
Row 27) ch 1, turn, hdc 70, ch 33, sk 33 sts (be sure not to twist your ch’s), hdc in last 55 sts (158 total sts, including ch’s)
Row 28) ch 1, turn, hdc across, working one hdc into each ch from previous row (158 total sts)
Rows 29-53) ch 1, turn, hdc across row (158 total sts)
-Finish off
Size XL:
Row 1) ch 161, hdc in 2nd ch from hook and across (160 total sts)
Rows 2-27) ch 1, turn, hdc across row (160 total sts)
Row 28) ch 1, turn, hdc 70, ch 35, sk 35 sts (be sure not to twist your ch’s), hdc in last 55 sts (160 total sts, including ch’s)
Row 29) ch 1, turn, hdc across, working one hdc into each ch from previous row (160 total sts)
Rows 30-55) ch 1, turn, hdc across row (160 total sts)
-Finish off
Size 2X:
Row 1) ch 163, hdc in 2nd ch from hook and across (162 total sts)
Rows 2-29) ch 1, turn, hdc across row (162 total sts)
Row 30) ch 1, turn, hdc 70, ch 37, sk 37 sts (be sure not to twist your ch’s), hdc in last 55 sts (162 total sts, including ch’s)
Row 31) ch 1, turn, hdc across, working one hdc into each ch from previous row (162 total sts)
Rows 32-59) ch 1, turn, hdc across row (162 total sts)
-Finish off
Size 3X:
Row 1) ch 163, hdc in 2nd ch from hook and across (162 total sts)
Rows 2-31) ch 1, turn, hdc across row (162 total sts)
Row 32) ch 1, turn, hdc 70, ch 37, sk 37 sts (be sure not to twist your ch’s), hdc in last 55 sts (162 total sts, including ch’s)
Row 33) ch 1, turn, hdc across, working one hdc into each ch from previous row (162 total sts)
Rows 34-63) ch 1, turn, hdc across row (162 total sts) -Finish off
Sleeves (make 2):
**Also using K Hook**

Size XS:
-Band-
Row 1) ch 8, sc in 2nd ch from hook and across (7)
Row 2) ch 1, turn, fphdc across row (7)
Row 3) ch 1, turn, sc across row (7)
Rows 4-22) repeat rows 2 & 3 alternately (row 22 will be a fphdc row)
-Body of the sleeve-
Row 1) ch 1, work one hdc into the end of each row of the band (the long side of the sleeve band--see photo above) (22 total sts)
Rows 2-6) ch 1, turn, hdc across (22 total sts)
Row 7) ch 1, turn, 2hdc, work 20 hdc, then 2hdc in last st (24 total sts)
Rows 8-12) ch 1, turn, hdc across (24 total sts)
Row 13) ch 1, turn, 2hdc, work 22 hdc, then 2hdc in last st (26 total sts)
Rows 14-18) ch 1, turn, hdc across (26 total sts)
Row 19) ch 1, turn, 2hdc, work 24 hdc, then 2hdc in last st (28 total sts)
Rows 20-24) ch 1, turn, hdc across (28 total sts)
Row 25) ch 1, turn, 2hdc, work 26 hdc, then 2hdc in last st (30 total sts)
Rows 26-30) ch 1, turn, hdc across (30 total sts)
Row 31) ch 1, turn, 2hdc, work 28 hdc, then 2hdc in last st (32 total sts)
Rows 32-36) ch 1, turn, hdc across (32 total sts)
Row 37) ch 1, turn, 2hdc, work 30 hdc, then 2hdc in last st (34 total sts)
Rows 38-42) ch 1, turn, hdc across (34 total sts)
Row 43) ch 1, turn, 2hdc, work 32 hdc, then 2hdc in last st (36 total sts)
Rows 44-48) ch 1, turn, hdc across (36 total sts)
-Finish off, leave long tail for sewing onto body
Size S:
-Band-
Row 1) ch 8, sc in 2nd ch from hook and across (7)
Row 2) ch 1, turn, fphdc across row (7)
Row 3) ch 1, turn, sc across row (7)
Rows 4-24) repeat rows 2 & 3 alternately (row 24 will be a fphdc row)
-Body of the sleeve-
Row 1) ch 1, work one hdc into the end of each row of the band (the long side of the sleeve band--see photo above) (24 total sts)
Rows 2-6) ch 1, turn, hdc across (24 total sts)
Row 7) ch 1, turn, 2hdc, work 22 hdc, then 2hdc in last st (26 total sts)
Rows 8-12) ch 1, turn, hdc across (26 total sts)
Row 13) ch 1, turn, 2hdc, work 24 hdc, then 2hdc in last st (28 total sts)
Rows 14-18) ch 1, turn, hdc across (28 total sts)
Row 19) ch 1, turn, 2hdc, work 26 hdc, then 2hdc in last st (30 total sts)
Rows 20-24) ch 1, turn, hdc across (30 total sts)
Row 25) ch 1, turn, 2hdc, work 28 hdc, then 2hdc in last st (32 total sts)
Rows 26-30) ch 1, turn, hdc across (32 total sts)
Row 31) ch 1, turn, 2hdc, work 30 hdc, then 2hdc in last st (34 total sts)
Rows 32-36) ch 1, turn, hdc across (34 total sts)
Row 37) ch 1, turn, 2hdc, work 32 hdc, then 2hdc in last st (36 total sts)
Rows 38-42) ch 1, turn, hdc across (36 total sts)
Row 43) ch 1, turn, 2hdc, work 34 hdc, then 2hdc in last st (38 total sts)
Rows 44-48) ch 1, turn, hdc across (38 total sts)
-Finish off, leave long tail for sewing onto body
Size M:
-Band-
Row 1) ch 8, sc in 2nd ch from hook and across (7)
Row 2) ch 1, turn, fphdc across row (7)
Row 3) ch 1, turn, sc across row (7)
Rows 4-26) repeat rows 2 & 3 alternately (row 26 will be a fphdc row)
-Body of the sleeve-
Row 1) ch 1, work one hdc into the end of each row of the band (the long side of the sleeve band--see photo above) (26 total sts)
Rows 2-6) ch 1, turn, hdc across (26 total sts)
Row 7) ch 1, turn, 2hdc, work 24 hdc, then 2hdc in last st (28 total sts)
Rows 8-12) ch 1, turn, hdc across (28 total sts)
Row 13) ch 1, turn, 2hdc, work 26 hdc, then 2hdc in last st (30 total sts)
Rows 14-18) ch 1, turn, hdc across (30 total sts)
Row 19) ch 1, turn, 2hdc, work 28 hdc, then 2hdc in last st (32 total sts)
Rows 20-24) ch 1, turn, hdc across (32 total sts)
Row 25) ch 1, turn, 2hdc, work 30 hdc, then 2hdc in last st (34 total sts)
Rows 26-30) ch 1, turn, hdc across (34 total sts)
Row 31) ch 1, turn, 2hdc, work 32 hdc, then 2hdc in last st (36 total sts)
Rows 32-36) ch 1, turn, hdc across (36 total sts)
Row 37) ch 1, turn, 2hdc, work 34 hdc, then 2hdc in last st (38 total sts)
Rows 38-42) ch 1, turn, hdc across (38 total sts)
Row 43) ch 1, turn, 2hdc, work 36 hdc, then 2hdc in last st (40 total sts)
Rows 44-48) ch 1, turn, hdc across (40 total sts)
-Finish off, leave long tail for sewing onto body
Size L:
-Band-
Row 1) ch 8, sc in 2nd ch from hook and across (7)
Row 2) ch 1, turn, fphdc across row (7)
Row 3) ch 1, turn, sc across row (7)
Rows 4-28) repeat rows 2 & 3 alternately (row 28 will be a fphdc row)
-Body of the sleeve-
Row 1) ch 1, work one hdc into the end of each row of the band (the long side of the sleeve band--see photo above) (28 total sts)
Rows 2-6) ch 1, turn, hdc across (28 total sts)
Row 7) ch 1, turn, 2hdc, work 26 hdc, then 2hdc in last st (30 total sts)
Rows 8-12) ch 1, turn, hdc across (30 total sts)
Row 13) ch 1, turn, 2hdc, work 28 hdc, then 2hdc in last st (32 total sts)
Rows 14-18) ch 1, turn, hdc across (32 total sts)
Row 19) ch 1, turn, 2hdc, work 30 hdc, then 2hdc in last st (34 total sts)
Rows 20-24) ch 1, turn, hdc across (34 total sts)
Row 25) ch 1, turn, 2hdc, work 32 hdc, then 2hdc in last st (36 total sts)
Rows 26-30) ch 1, turn, hdc across (36 total sts)
Row 31) ch 1, turn, 2hdc, work 34 hdc, then 2hdc in last st (38 total sts)
Rows 32-36) ch 1, turn, hdc across (38 total sts)
Row 37) ch 1, turn, 2hdc, work 36 hdc, then 2hdc in last st (40 total sts)
Rows 38-42) ch 1, turn, hdc across (40 total sts)
Row 43) ch 1, turn, 2hdc, work 38 hdc, then 2hdc in last st (42 total sts)
Rows 44-48) ch 1, turn, hdc across (42 total sts)
-Finish off, leave long tail for sewing onto body
Size XL:
-Band-
Row 1) ch 8, sc in 2nd ch from hook and across (7)
Row 2) ch 1, turn, fphdc across row (7)
Row 3) ch 1, turn, sc across row (7)
Rows 4-30) repeat rows 2 & 3 alternately (row 30 will be a fphdc row)
-Body of the sleeve-
Row 1) ch 1, work one hdc into the end of each row of the band (the long side of the sleeve band--see photo above) (30 total sts)
Rows 2-6) ch 1, turn, hdc across (30 total sts)
Row 7) ch 1, turn, 2hdc, work 28 hdc, then 2hdc in last st (32 total sts)
Rows 8-12) ch 1, turn, hdc across (32 total sts)
Row 13) ch 1, turn, 2hdc, work 30 hdc, then 2hdc in last st (34 total sts)
Rows 14-18) ch 1, turn, hdc across (34 total sts)
Row 19) ch 1, turn, 2hdc, work 32 hdc, then 2hdc in last st (36 total sts)
Rows 20-24) ch 1, turn, hdc across (36 total sts) R
ow 25) ch 1, turn, 2hdc, work 34 hdc, then 2hdc in last st (38 total sts)
Rows 26-30) ch 1, turn, hdc across (38 total sts)
Row 31) ch 1, turn, 2hdc, work 36 hdc, then 2hdc in last st (40 total sts)
Rows 32-36) ch 1, turn, hdc across (40 total sts)
Row 37) ch 1, turn, 2hdc, work 38 hdc, then 2hdc in last st (42 total sts)
Rows 38-42) ch 1, turn, hdc across (42 total sts)
Row 43) ch 1, turn, 2hdc, work 40 hdc, then 2hdc in last st (44 total sts)
Rows 44-48) ch 1, turn, hdc across (44 total sts)
-Finish off, leave long tail for sewing onto body
Size 2X:
-Band-
Row 1) ch 8, sc in 2nd ch from hook and across (7)
Row 2) ch 1, turn, fphdc across row (7)
Row 3) ch 1, turn, sc across row (7)
Rows 4-32) repeat rows 2 & 3 alternately (row 32 will be a fphdc row)
-Body of the sleeve-
Row 1) ch 1, work one hdc into the end of each row of the band (the long side of the sleeve band--see photo above) (32 total sts)
Rows 2-6) ch 1, turn, hdc across (32 total sts)
Row 7) ch 1, turn, 2hdc, work 30 hdc, then 2hdc in last st (34 total sts)
Rows 8-12) ch 1, turn, hdc across (34 total sts)
Row 13) ch 1, turn, 2hdc, work 32 hdc, then 2hdc in last st (36 total sts)
Rows 14-18) ch 1, turn, hdc across (36 total sts)
Row 19) ch 1, turn, 2hdc, work 34 hdc, then 2hdc in last st (38 total sts)
Rows 20-24) ch 1, turn, hdc across (38 total sts)
Row 25) ch 1, turn, 2hdc, work 36 hdc, then 2hdc in last st (40 total sts)
Rows 26-30) ch 1, turn, hdc across (40 total sts)
Row 31) ch 1, turn, 2hdc, work 38 hdc, then 2hdc in last st (42 total sts)
Rows 32-36) ch 1, turn, hdc across (42 total sts)
Row 37) ch 1, turn, 2hdc, work 40 hdc, then 2hdc in last st (44 total sts)
Rows 38-42) ch 1, turn, hdc across (44 total sts)
Row 43) ch 1, turn, 2hdc, work 42 hdc, then 2hdc in last st (46 total sts)
Rows 44-48) ch 1, turn, hdc across (46 total sts)
-Finish off, leave long tail for sewing onto body
Size 3X:
-Band-
Row 1) ch 8, sc in 2nd ch from hook and across (7)
Row 2) ch 1, turn, fphdc across row (7)
Row 3) ch 1, turn, sc across row (7)
Rows 4-34) repeat rows 2 & 3 alternately (row 34 will be a fphdc row)
-Body of the sleeve-
Row 1) ch 1, work one hdc into the end of each row of the band (the long side of the sleeve band--see photo above) (34 total sts)
Rows 2-6) ch 1, turn, hdc across (34 total sts)
Row 7) ch 1, turn, 2hdc, work 32 hdc, then 2hdc in last st (36 total sts)
Rows 8-12) ch 1, turn, hdc across (36 total sts)
Row 13) ch 1, turn, 2hdc, work 34 hdc, then 2hdc in last st (38 total sts)
Rows 14-18) ch 1, turn, hdc across (38 total sts)
Row 19) ch 1, turn, 2hdc, work 36 hdc, then 2hdc in last st (40 total sts)
Rows 20-24) ch 1, turn, hdc across (40 total sts)
Row 25) ch 1, turn, 2hdc, work 38 hdc, then 2hdc in last st (42 total sts)
Rows 26-30) ch 1, turn, hdc across (42 total sts)
Row 31) ch 1, turn, 2hdc, work 40 hdc, then 2hdc in last st (44 total sts)
Rows 32-36) ch 1, turn, hdc across (44 total sts)
Row 37) ch 1, turn, 2hdc, work 42 hdc, then 2hdc in last st (46 total sts)
Rows 38-42) ch 1, turn, hdc across (46 total sts)
Row 43) ch 1, turn, 2hdc, work 44 hdc, then 2hdc in last st (48 total sts)
Rows 44-48) ch 1, turn, hdc across (48 total sts)
-Finish off, leave long tail for sewing onto body
Assembly:

For all sizes:
To begin assembling the sweater, fold the body in half, so the bottoms are together (like in above photo). It doesn’t matter which side is on the inside because both sides are the same.
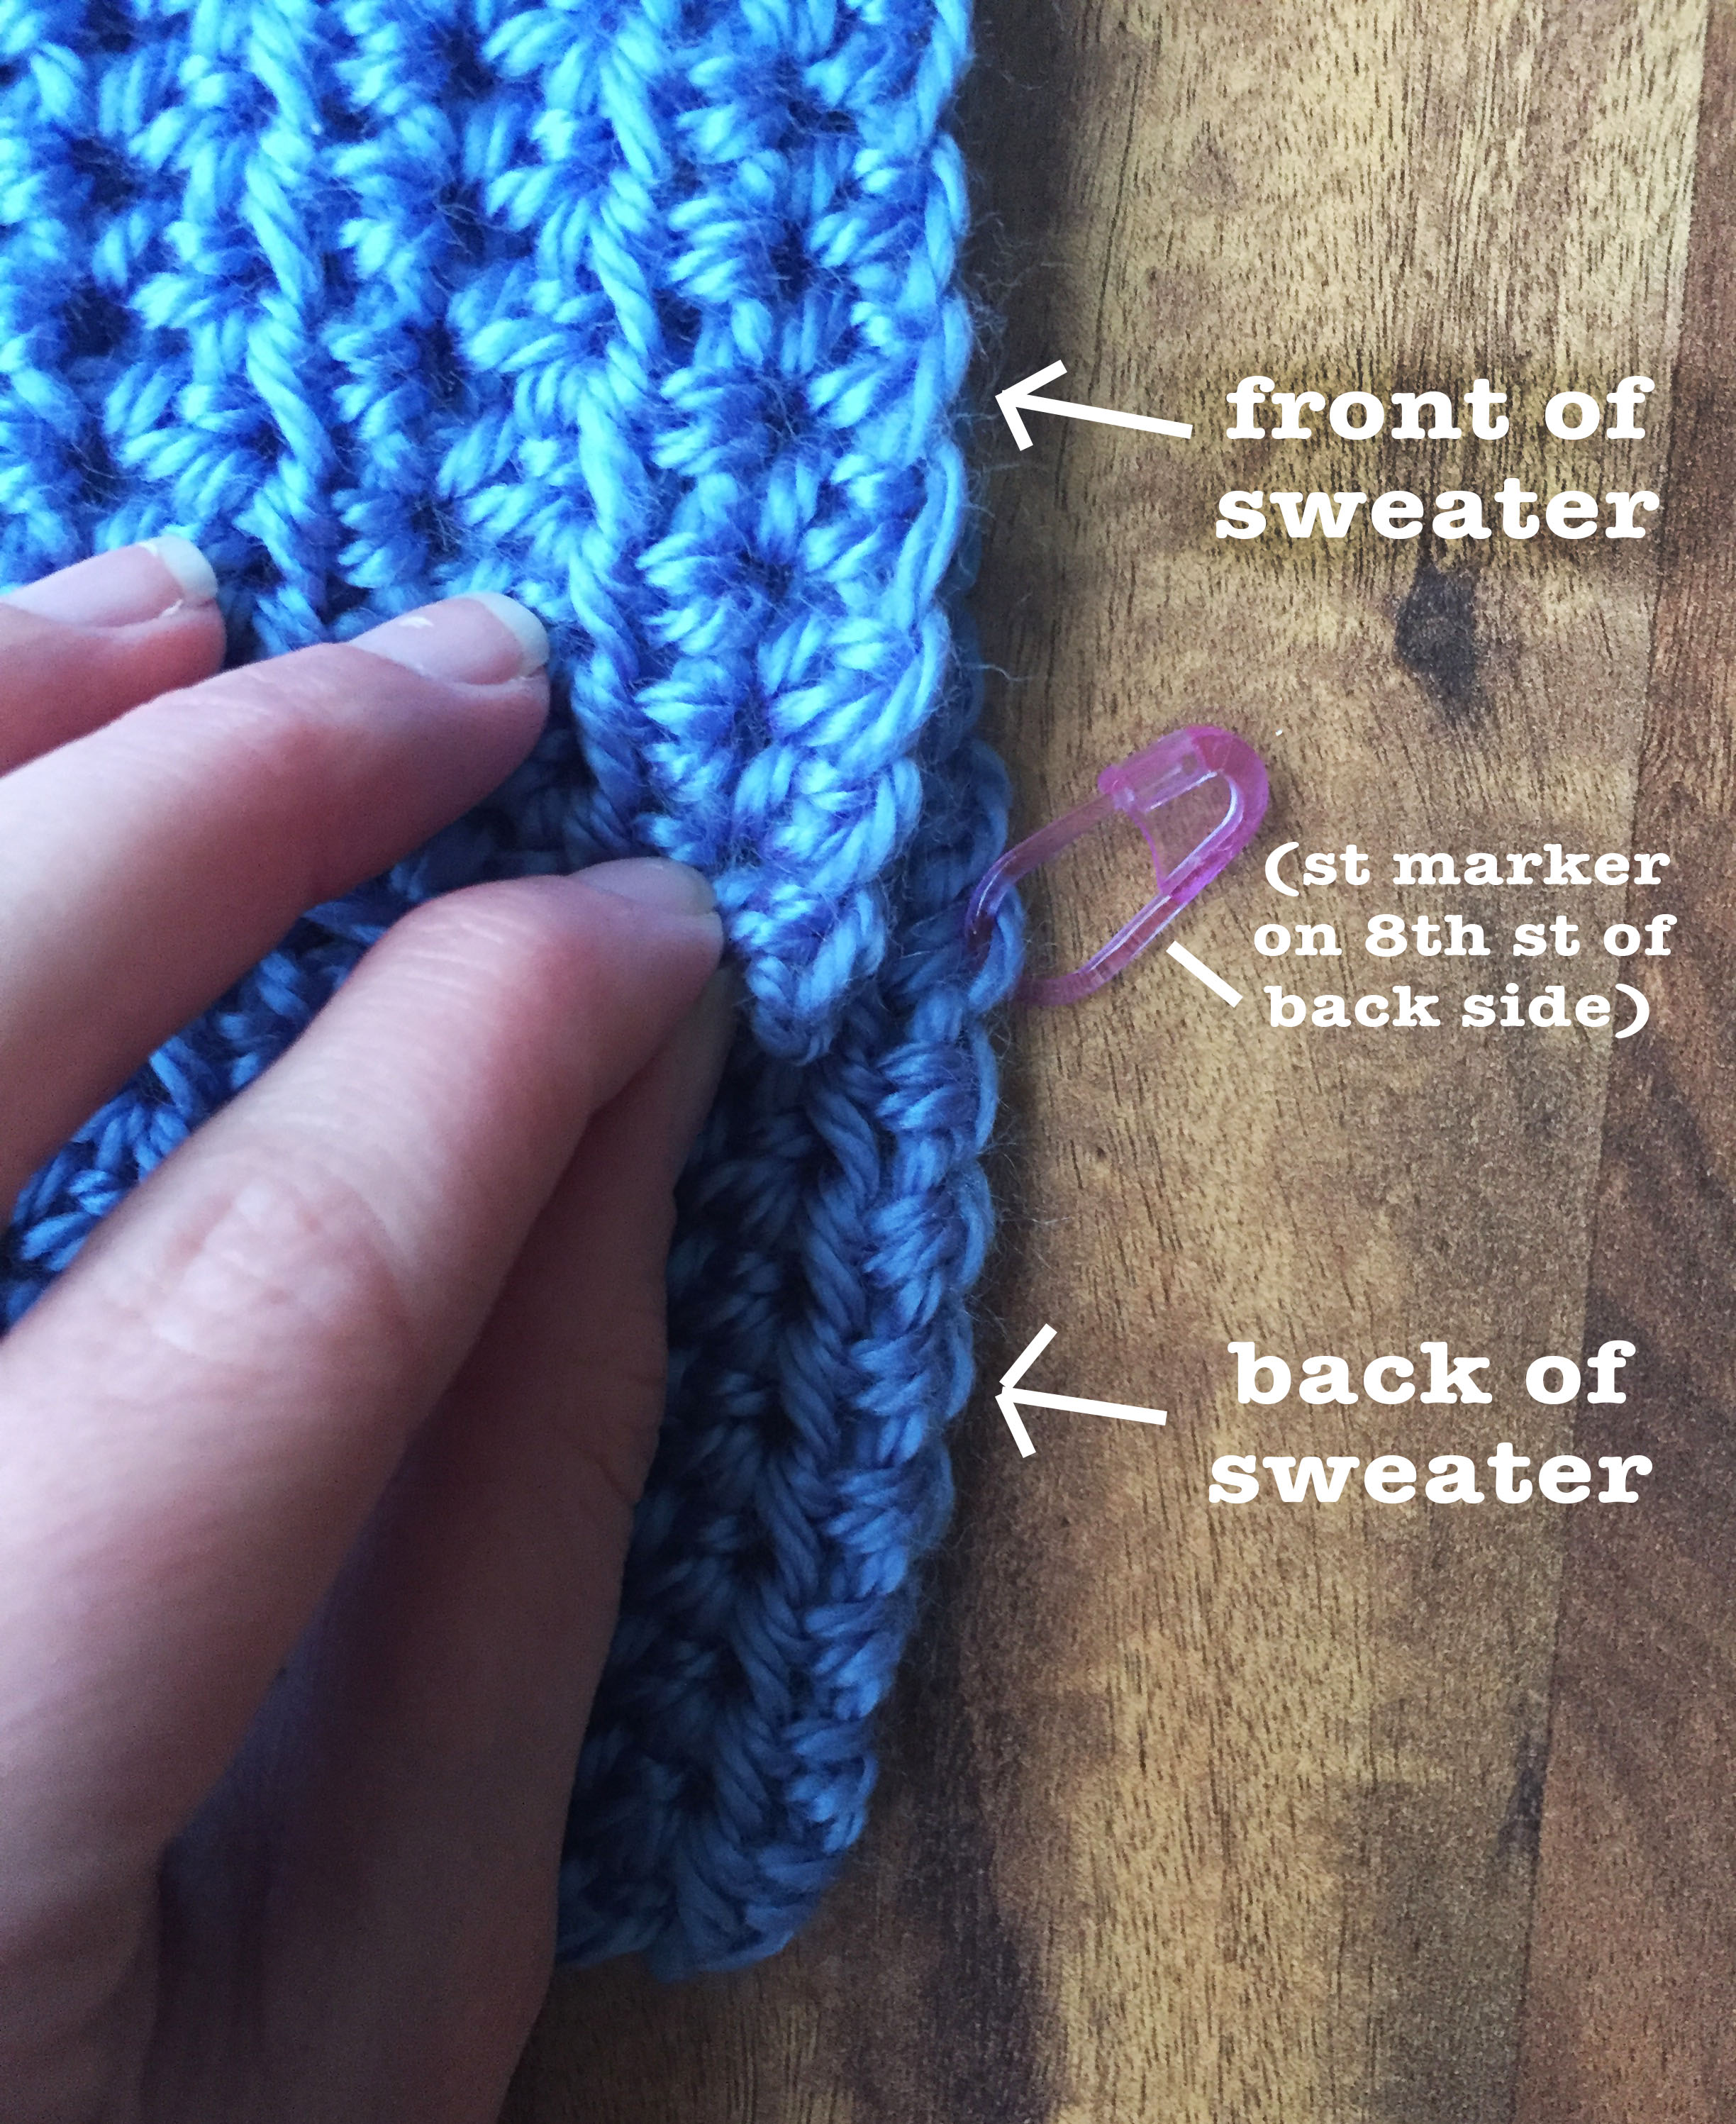
You will make the back side longer than the front side. You can tell the front and back sides apart by the length from the neck. The back side has more length from the neck than the front (the photo provided at the beginning of the pattern will help you identify which side is which). The back side will be 8 sts longer than the front. I put a st marker in the 8th st of the back side, and aligned the first st of the front side with that st marker.

****This is very important: you need to match up your sts exactly along each side of the sweater (this is important because you will need an exact amount of sts for your sleeves). You will start pinning 15 sts up from bottom of the front side (see above photo) To help in matching up the sts, I aligned them about 10 at a time, then put a st marker through both the front and back sides to secure. See below on how high up you should pin for each size..
You will begin sewing the sides of the sweater at that 15th st from the bottom of the front side. I used a whip st along the very edge with needle and yarn. See below on how far up you should sew to for each size...
XS:
Pin and sew up 55 sts from the bottom of the front side. This means that you should have 36 total sts that make up your sleeve on the top (18 on each the front and back side)
S:
Pin and sew up 54 sts from the bottom of the front side. This means that you should have 38 total sts that make up your sleeve on the top (19 on each the front and back side)
M:
Pin and sew up 54 sts from the bottom of the front side. This means that you should have 40 total sts that make up your sleeve on the top (20 on each the front and back side)
L:
Pin and sew up 54 sts from the bottom of the front side. This means that you should have 42 total sts that make up your sleeve on the top (21 on each the front and back side)
XL:
Pin and sew up 54 sts from the bottom of the front side. This means that you should have 44 total sts that make up your sleeve on the top (22 on each the front and back side)
2X:
Pin and sew up 54 sts from the bottom of the front side. This means that you should have 46 total sts that make up your sleeve on the top (23 on each the front and back side)
3X:
Pin and sew up 53 sts from the bottom of the front side. This means that you should have 48 total sts that make up your sleeve on the top (24 on each the front and back side)
For all sizes:
-Next you’ll move onto the sleeves...

You will fold the sleeve in half so that the long sides are aligned together, and right sides of the sleeve are touching.
Then you’ll pin them together and sew using a whip stitch along the long open edge just like on the body sides. Make sure you’re aligning the rows so it’s even.

After both your sleeves are sewed you will then connect them to the body. You will turn both sleeves to the right side, and the body will remain wrong side out (right sides together).
Then you’ll put the sleeve on the inside of the body and align the top of the sleeve with the sleeve opening on the body(see above photo).
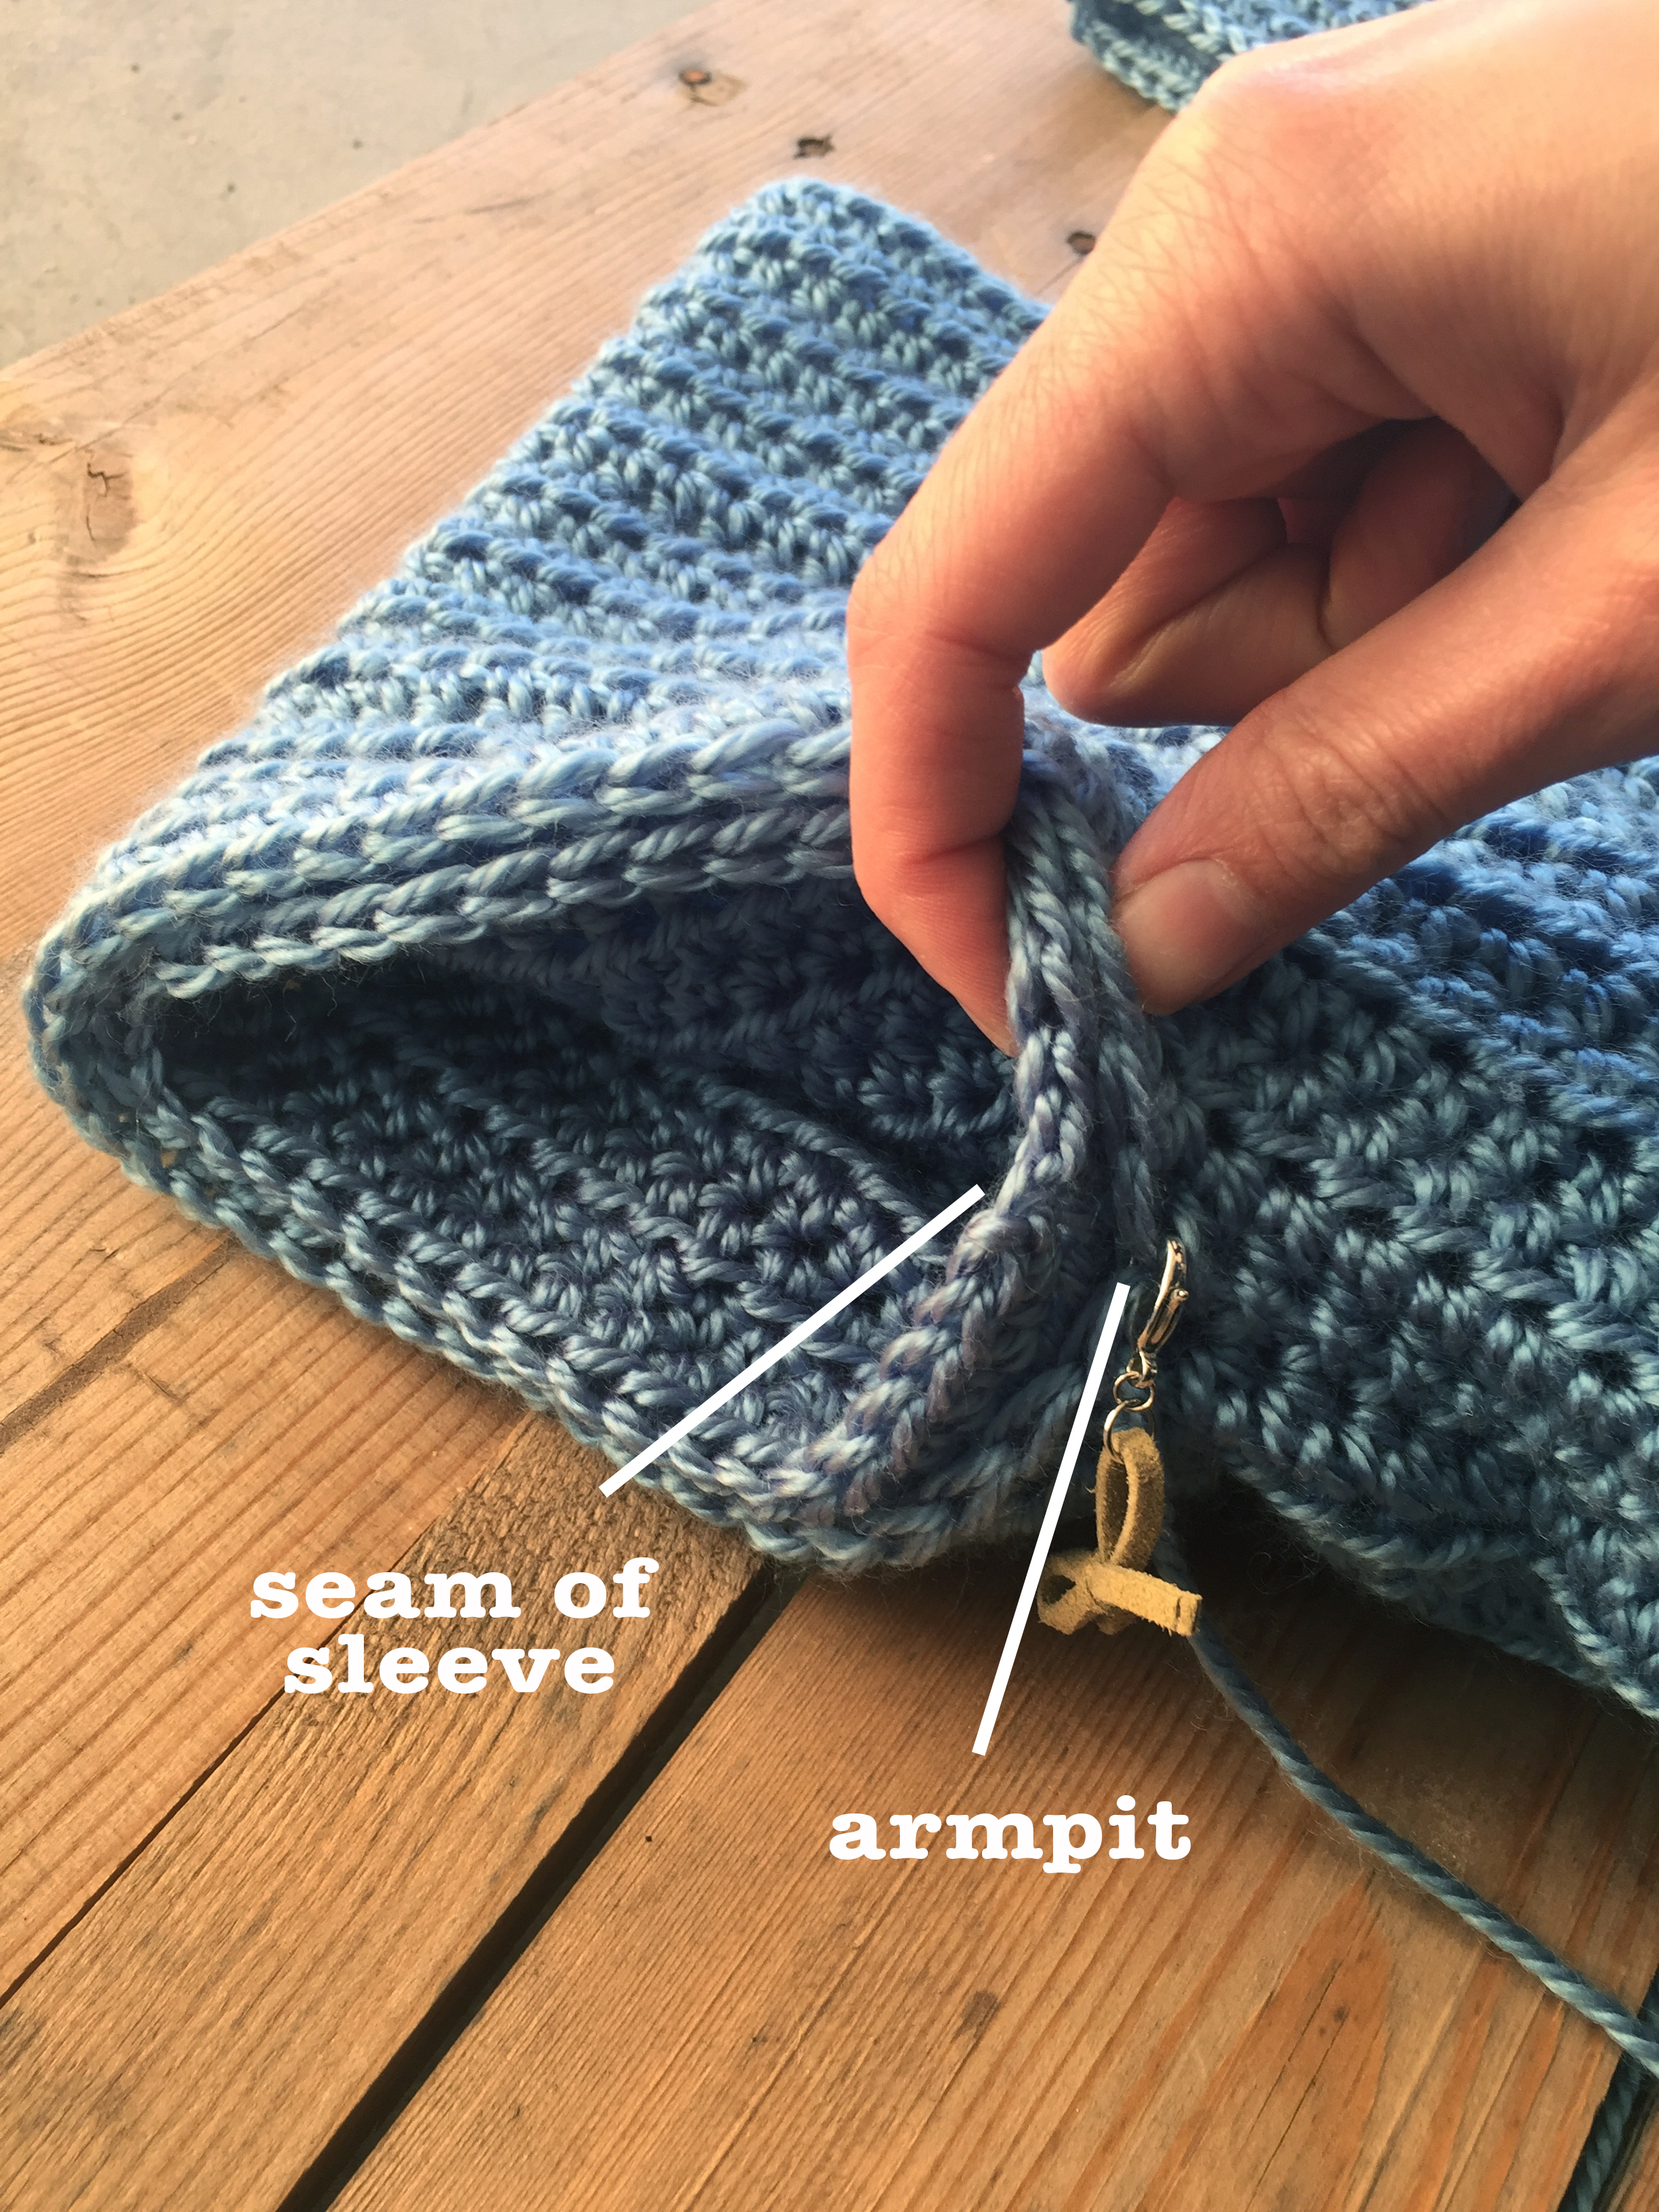
You will align the seam of the sleeve with the armpit of the sweater body (shown above).
Once both sleeves are attached, and your sweater’s turned right side out, you’re finished with the assembly of the sweater!

For the tutorial on adding the eyelets, see that post by clicking here.
To make the i-cord for the ties, you can view this super helpful video by June Gilbank below--- I made my cord about four feet long. The length is obviously up to your preference!
Then you'll weave in all your ends (ugh, I know-- if you're interested, though, I made a handy tutorial on a fail-proof way to weave in your ends found here). Then you're ready to lace up your sweater!

You can either lace the cord up from the bottom to the top-- which is personally my favorite way to wear it...

Or it even looks really cute laced down to the bottom and tied with a bow! Both ways look great.
Once it's laced, your new sweater just needs to be worn!!
I sure hope this sweater pattern treats you well.. It's so simple and most of all incredibly cute. Pretty please share with me over on Instagram if you end up making it, I'd love to admire it. :)
Take care, and happy hooking!!
Meg