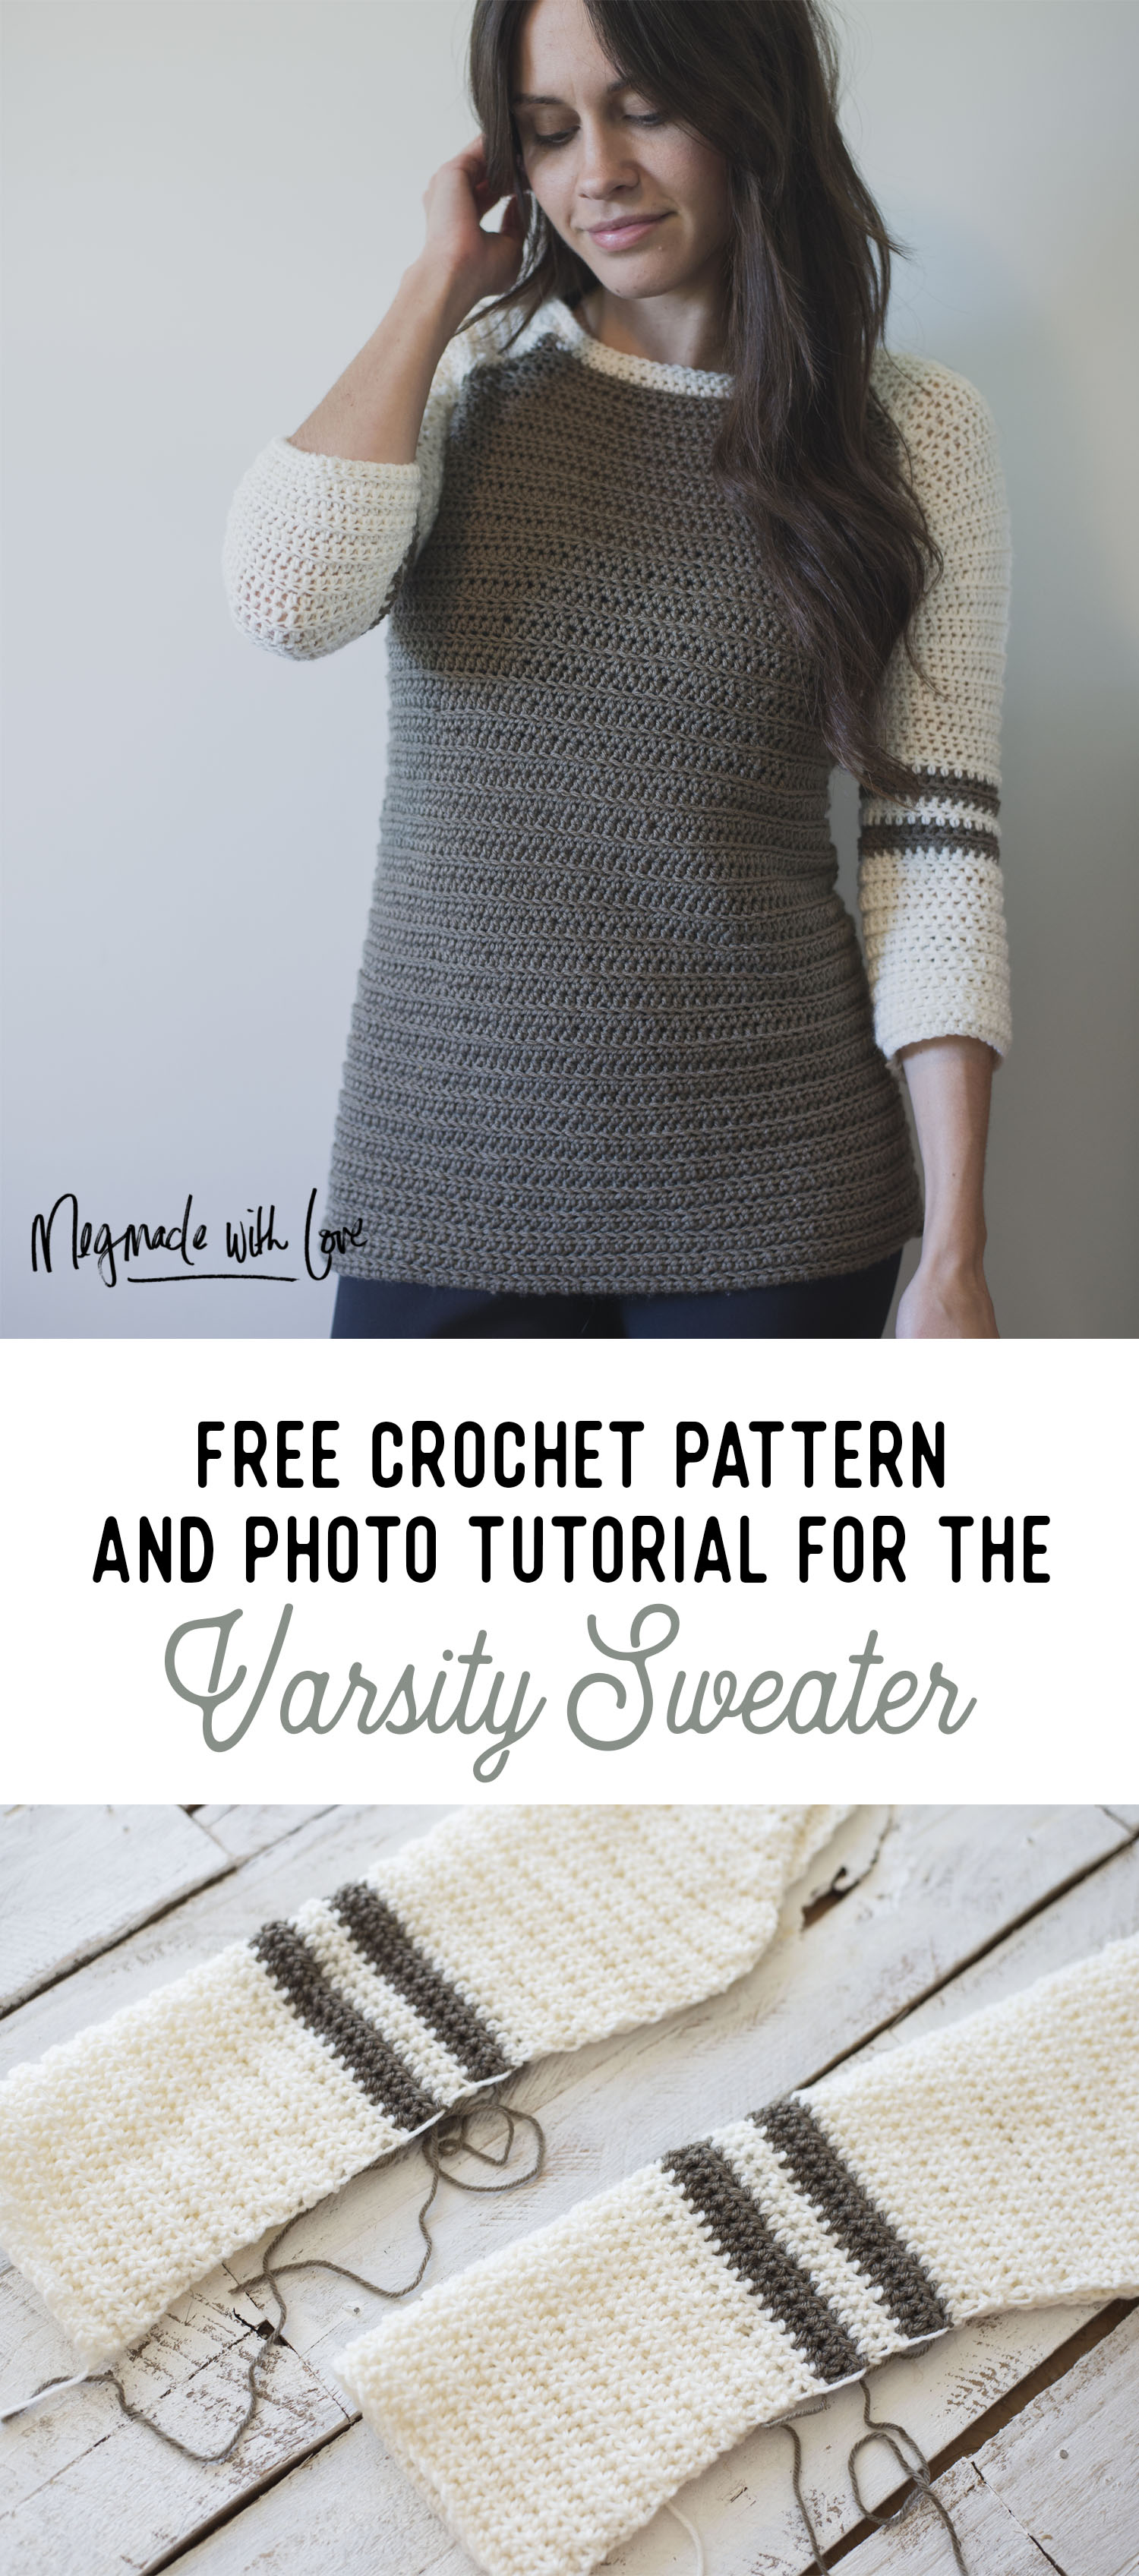
New Free Crochet Pattern for the Varsity Sweater!
/
****You can find the PDF version of this sweater in my shop by clicking here. Great for easy printing! Plus, I color coded it :) ****
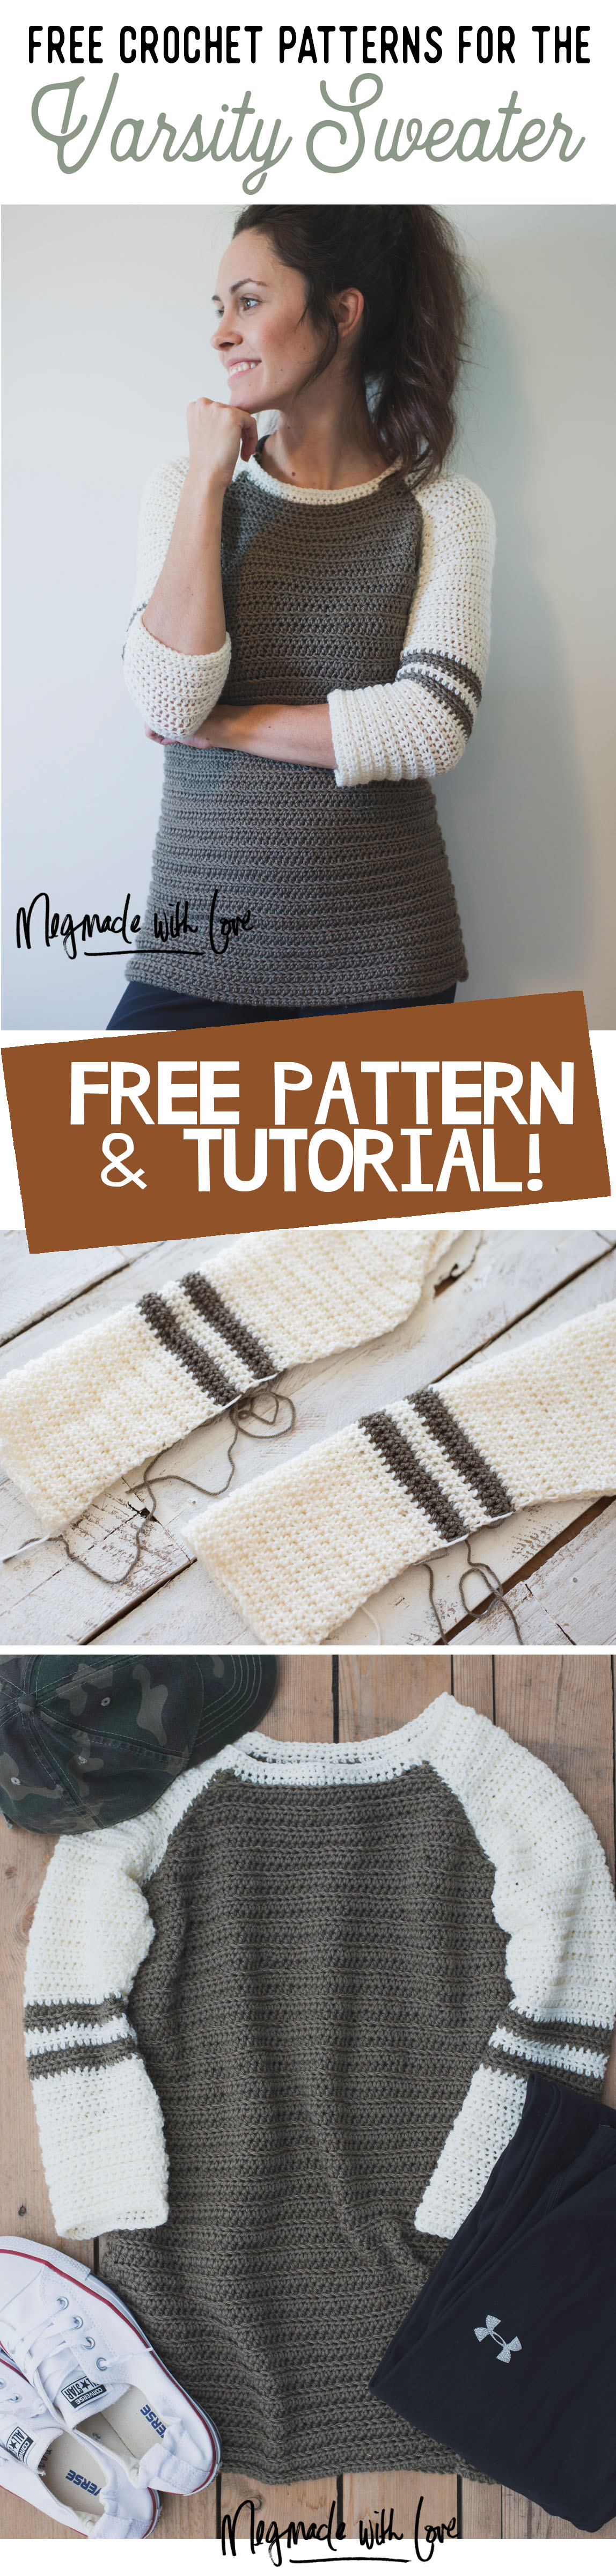
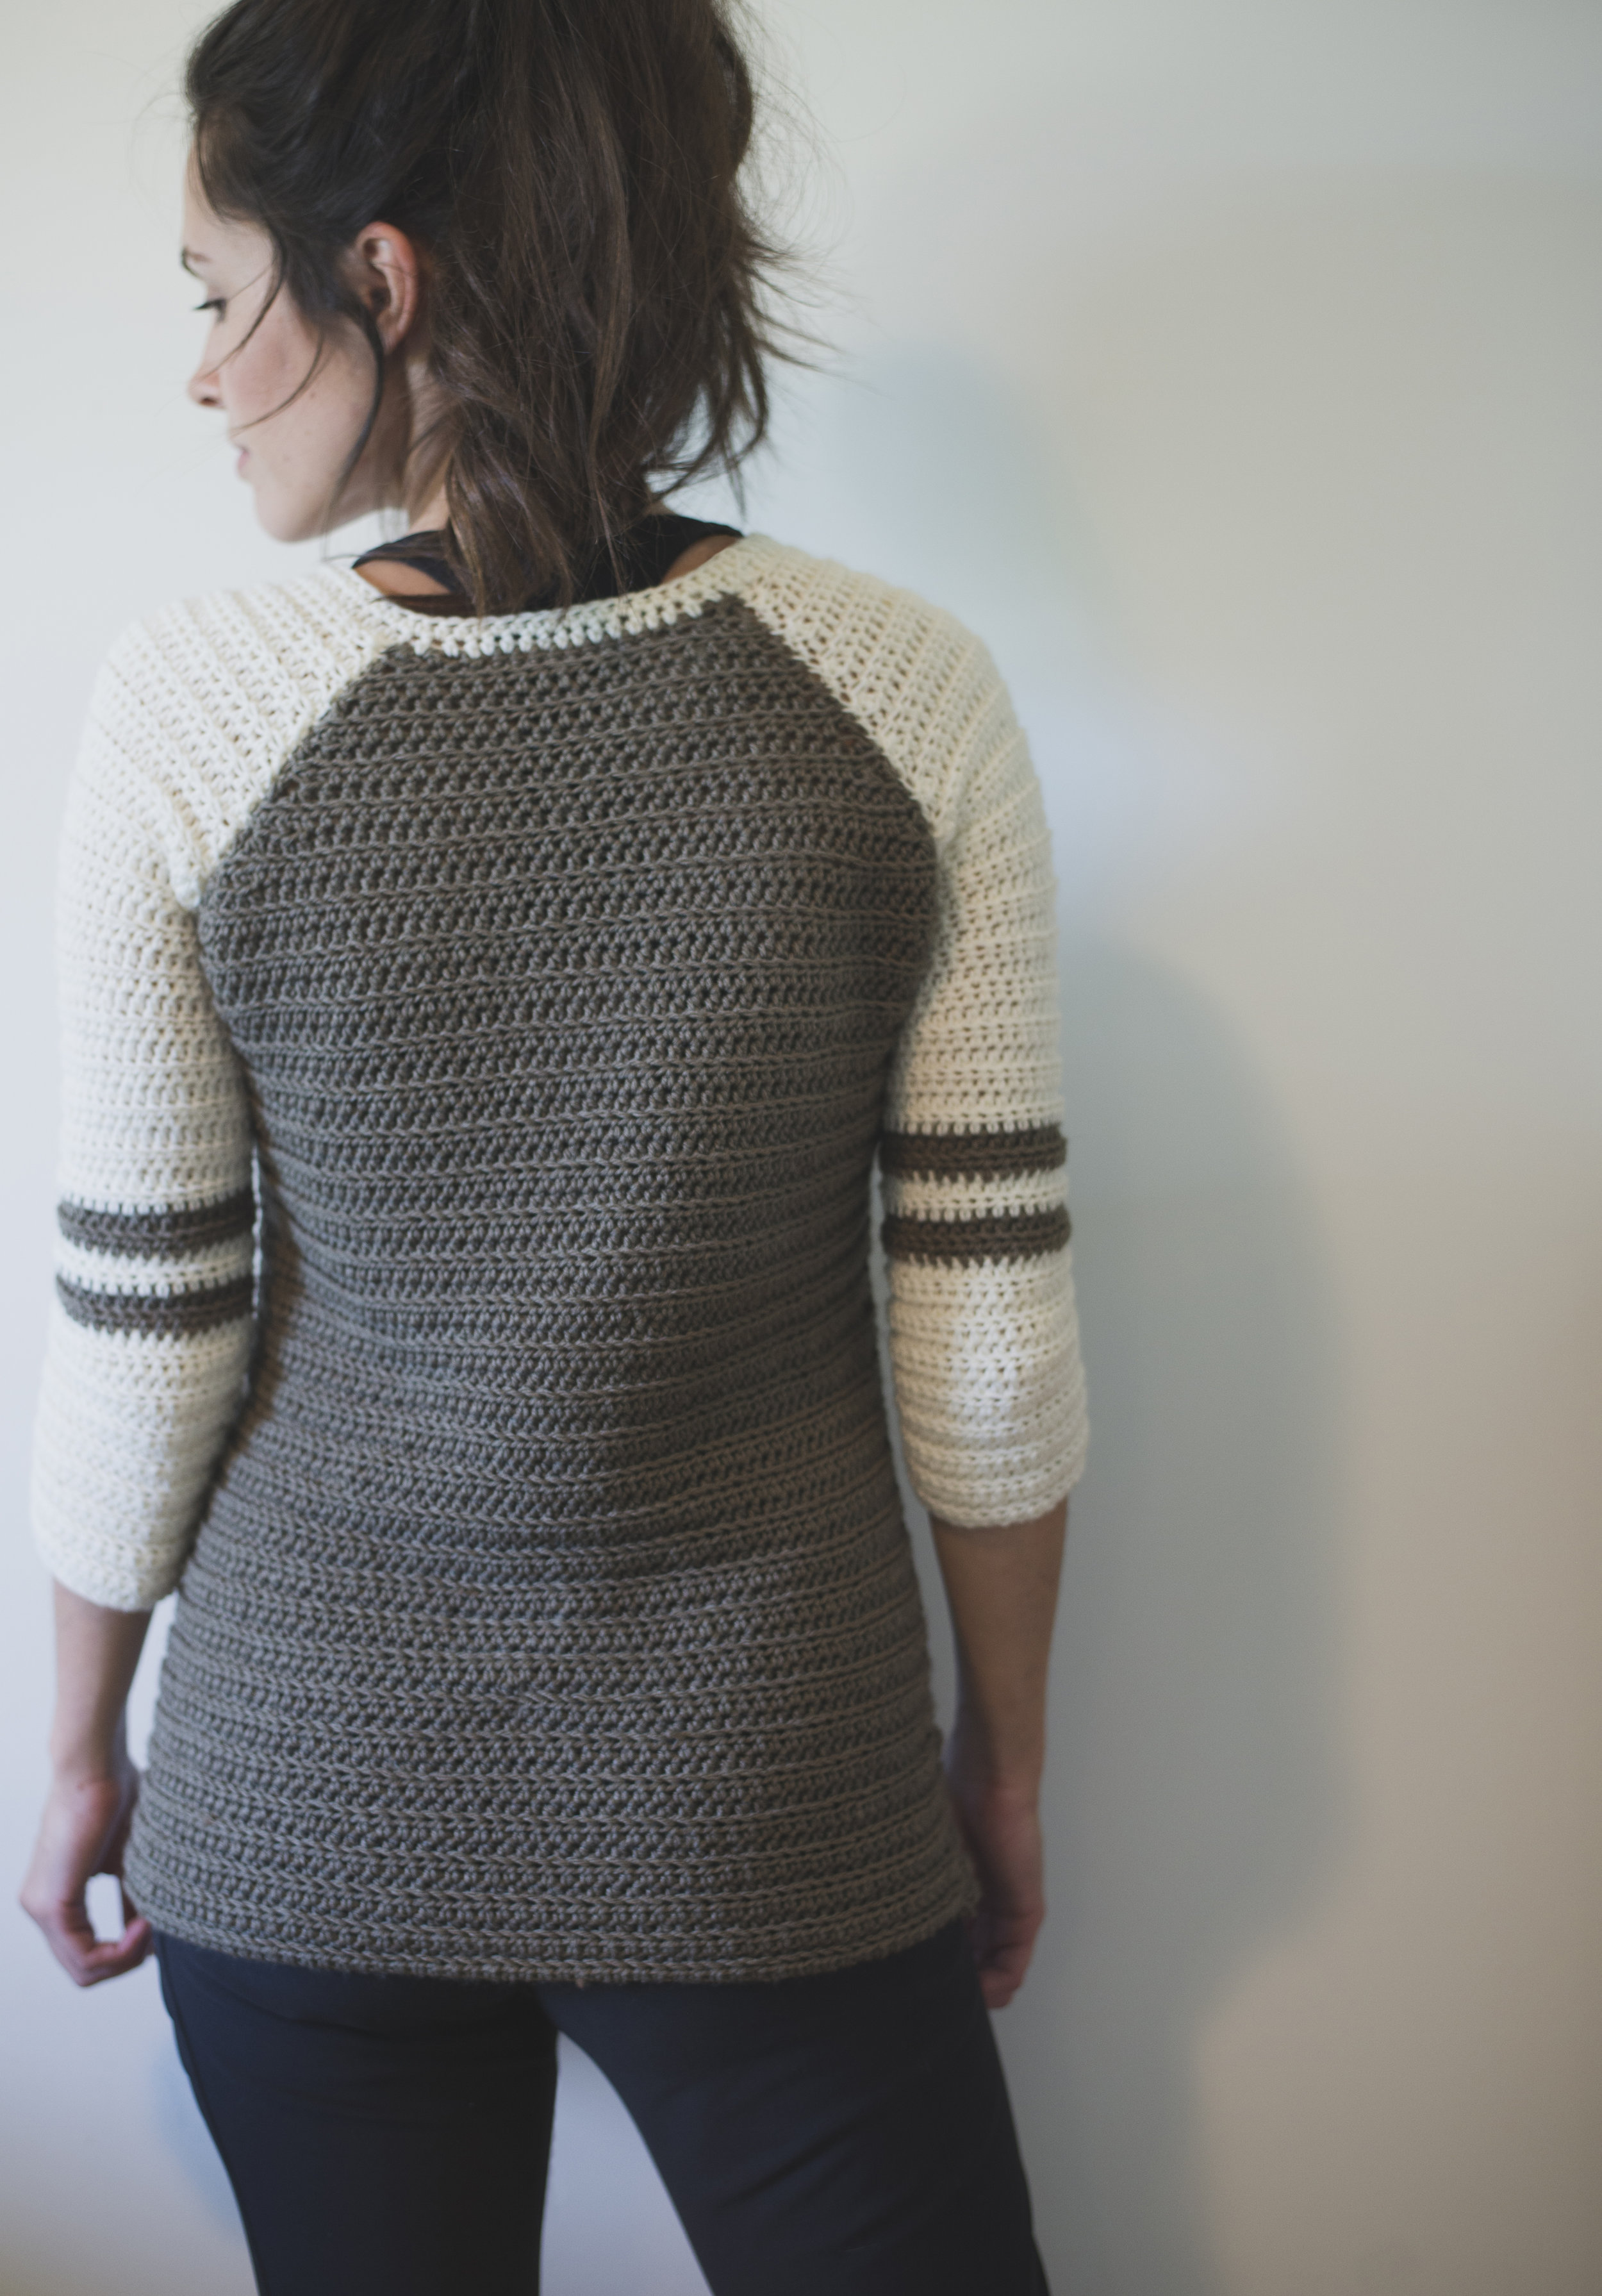
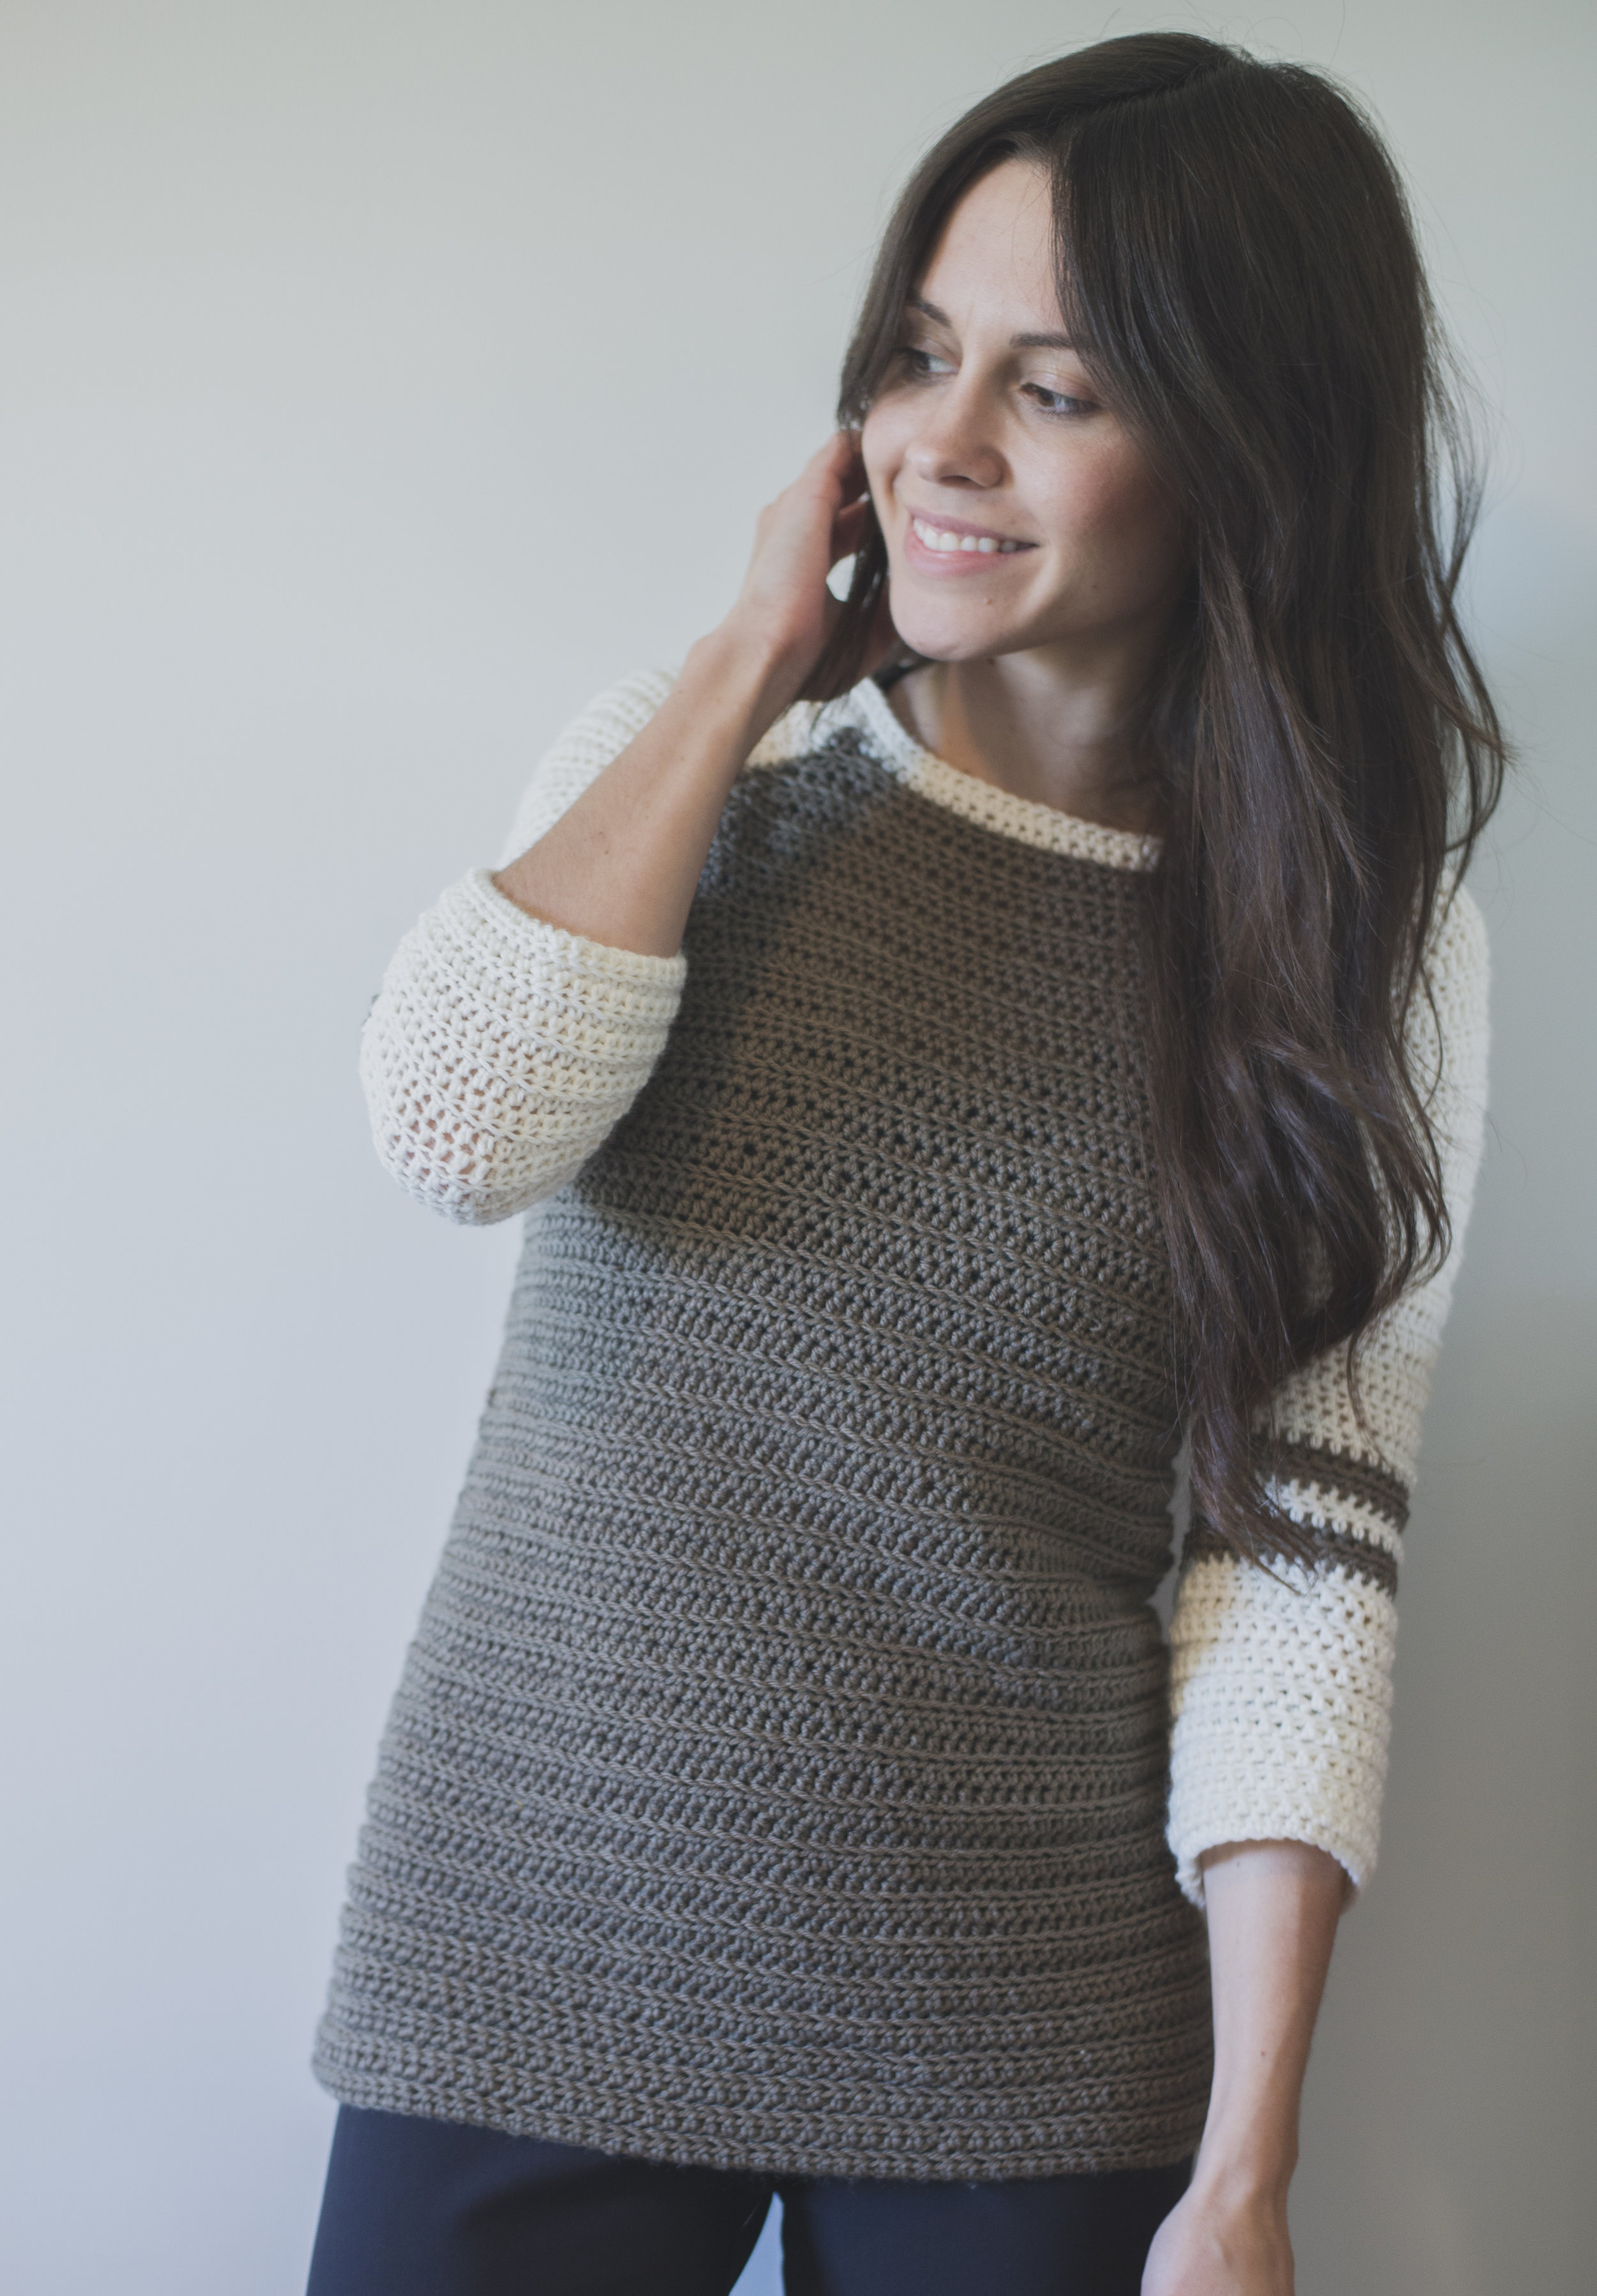
Hey guys! I am so incredibly excited to share my latest sweater pattern!!!
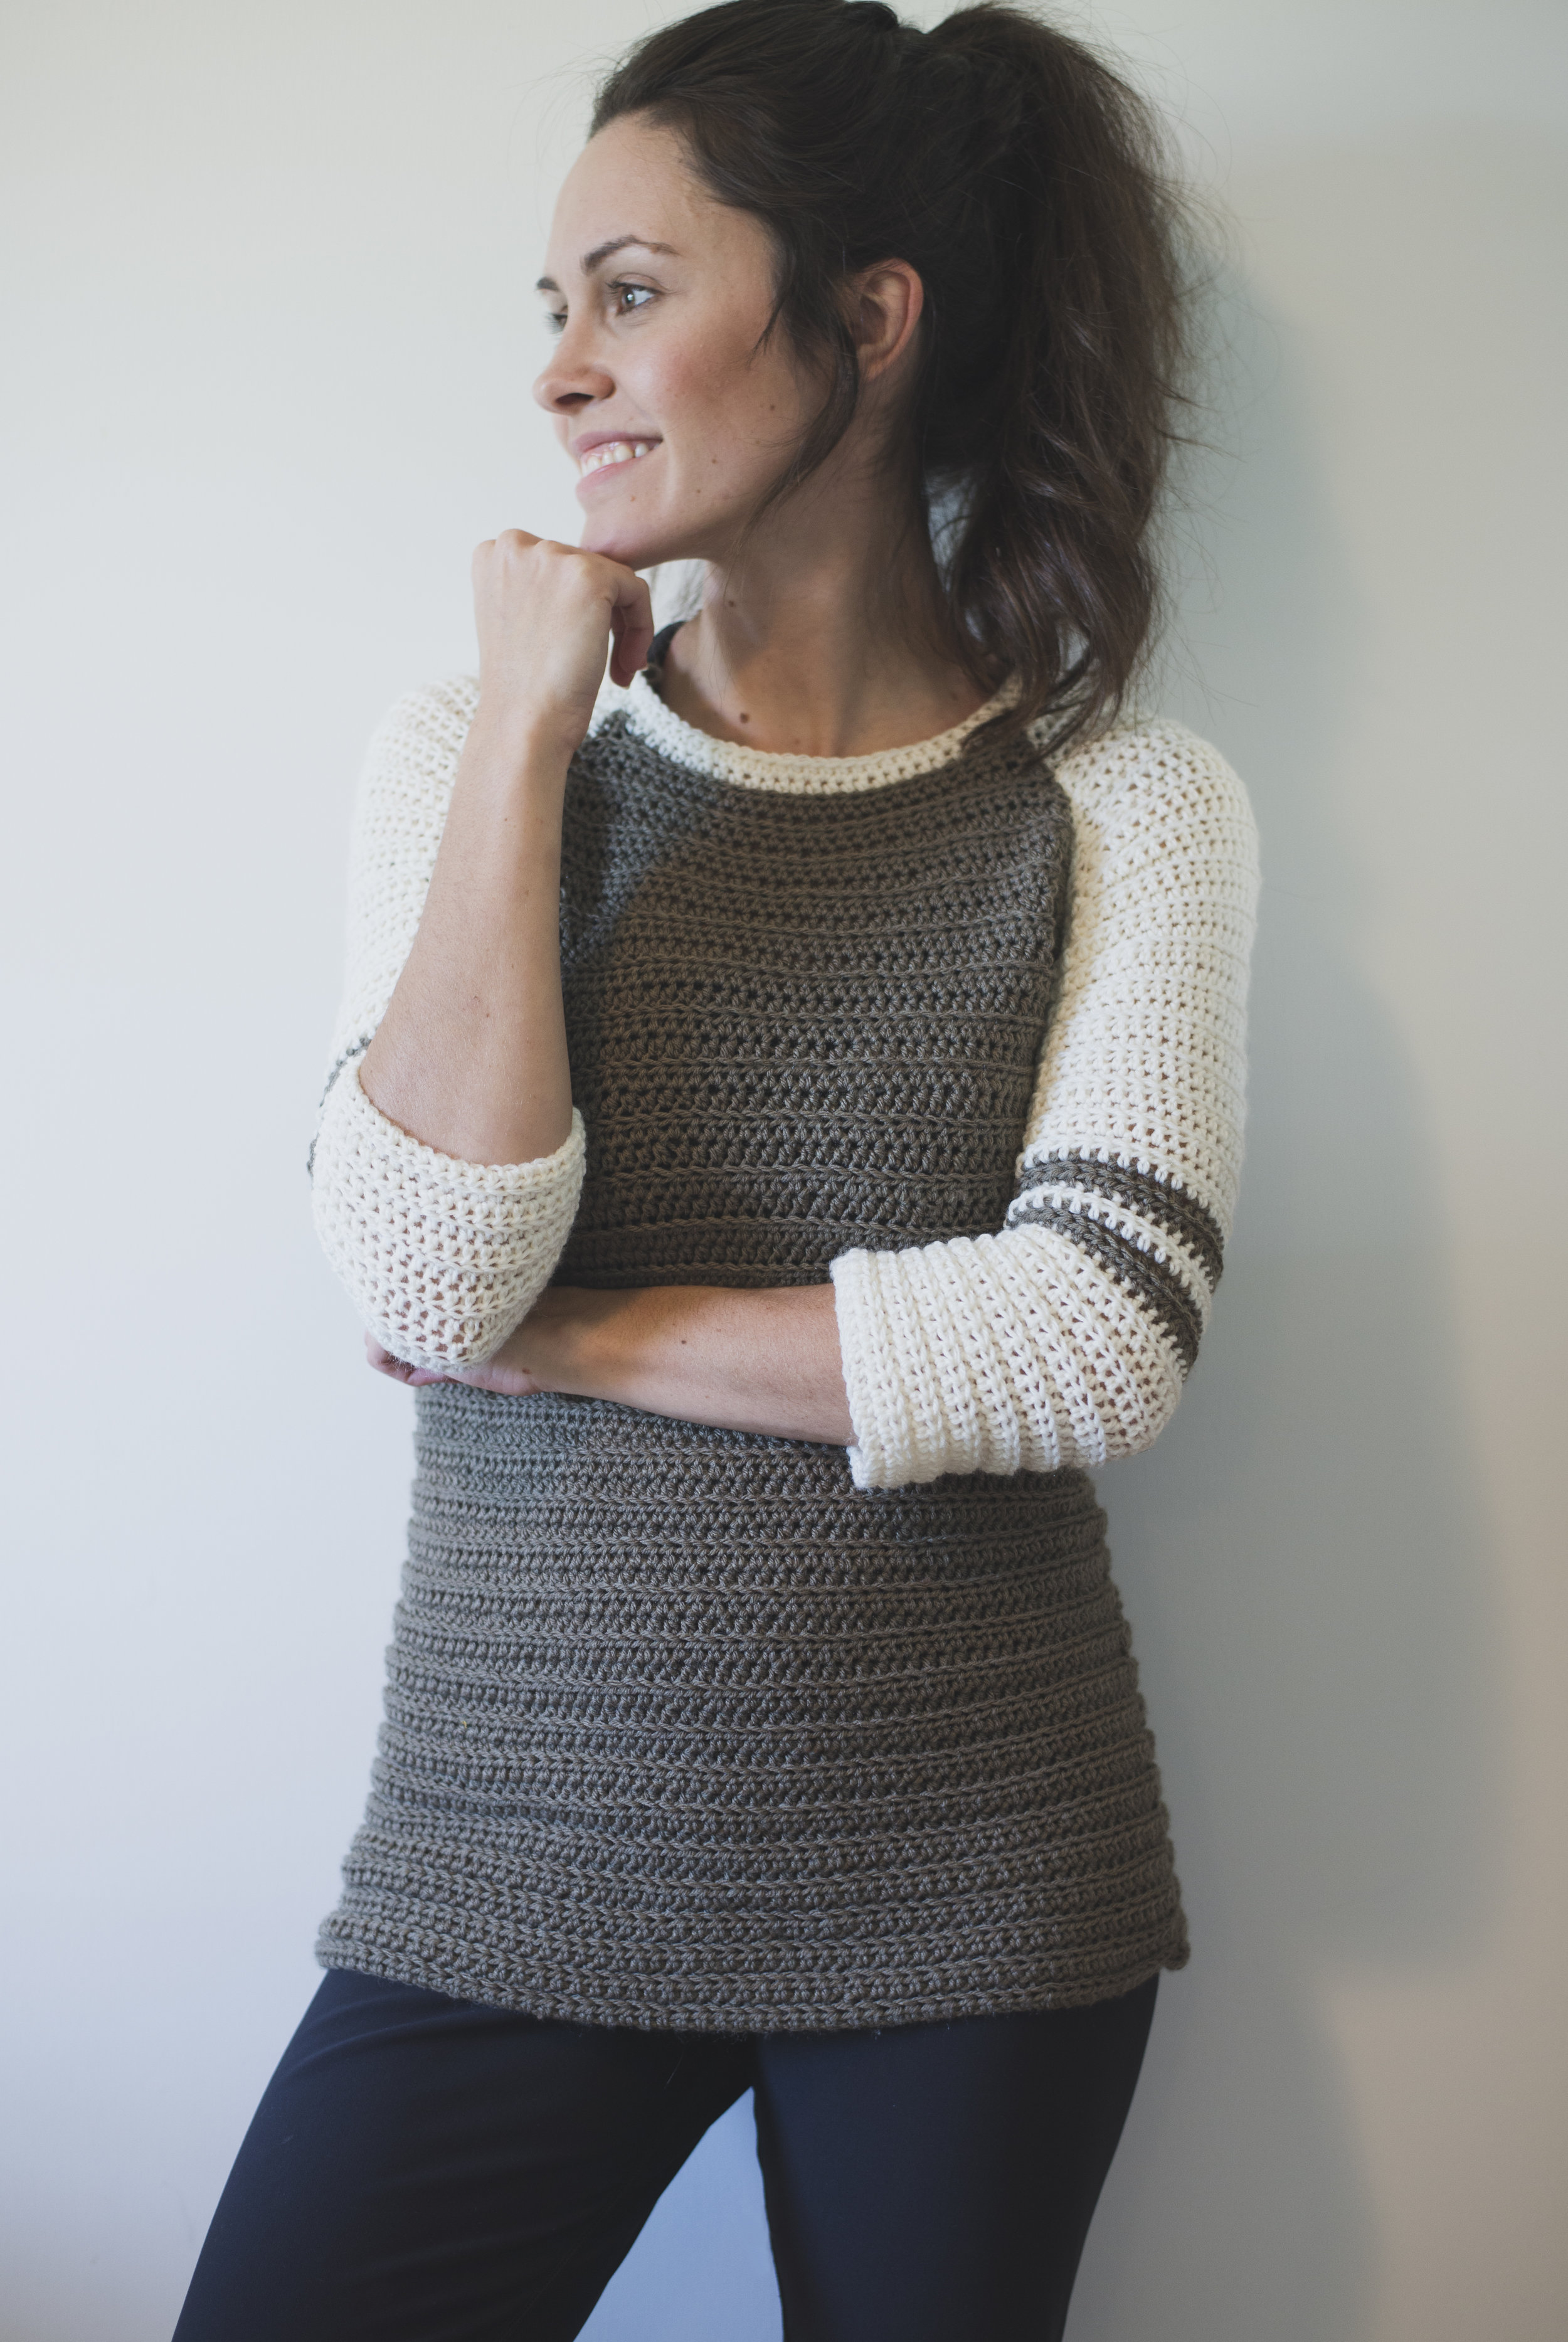
It's for a good ole' Varsity Sweater. :) I have been wanting to crochet a "baseball tee" (what I usually call these types of shirts) for what seems like forever. I love the simplicity of them, with their raglan-style sleeves.
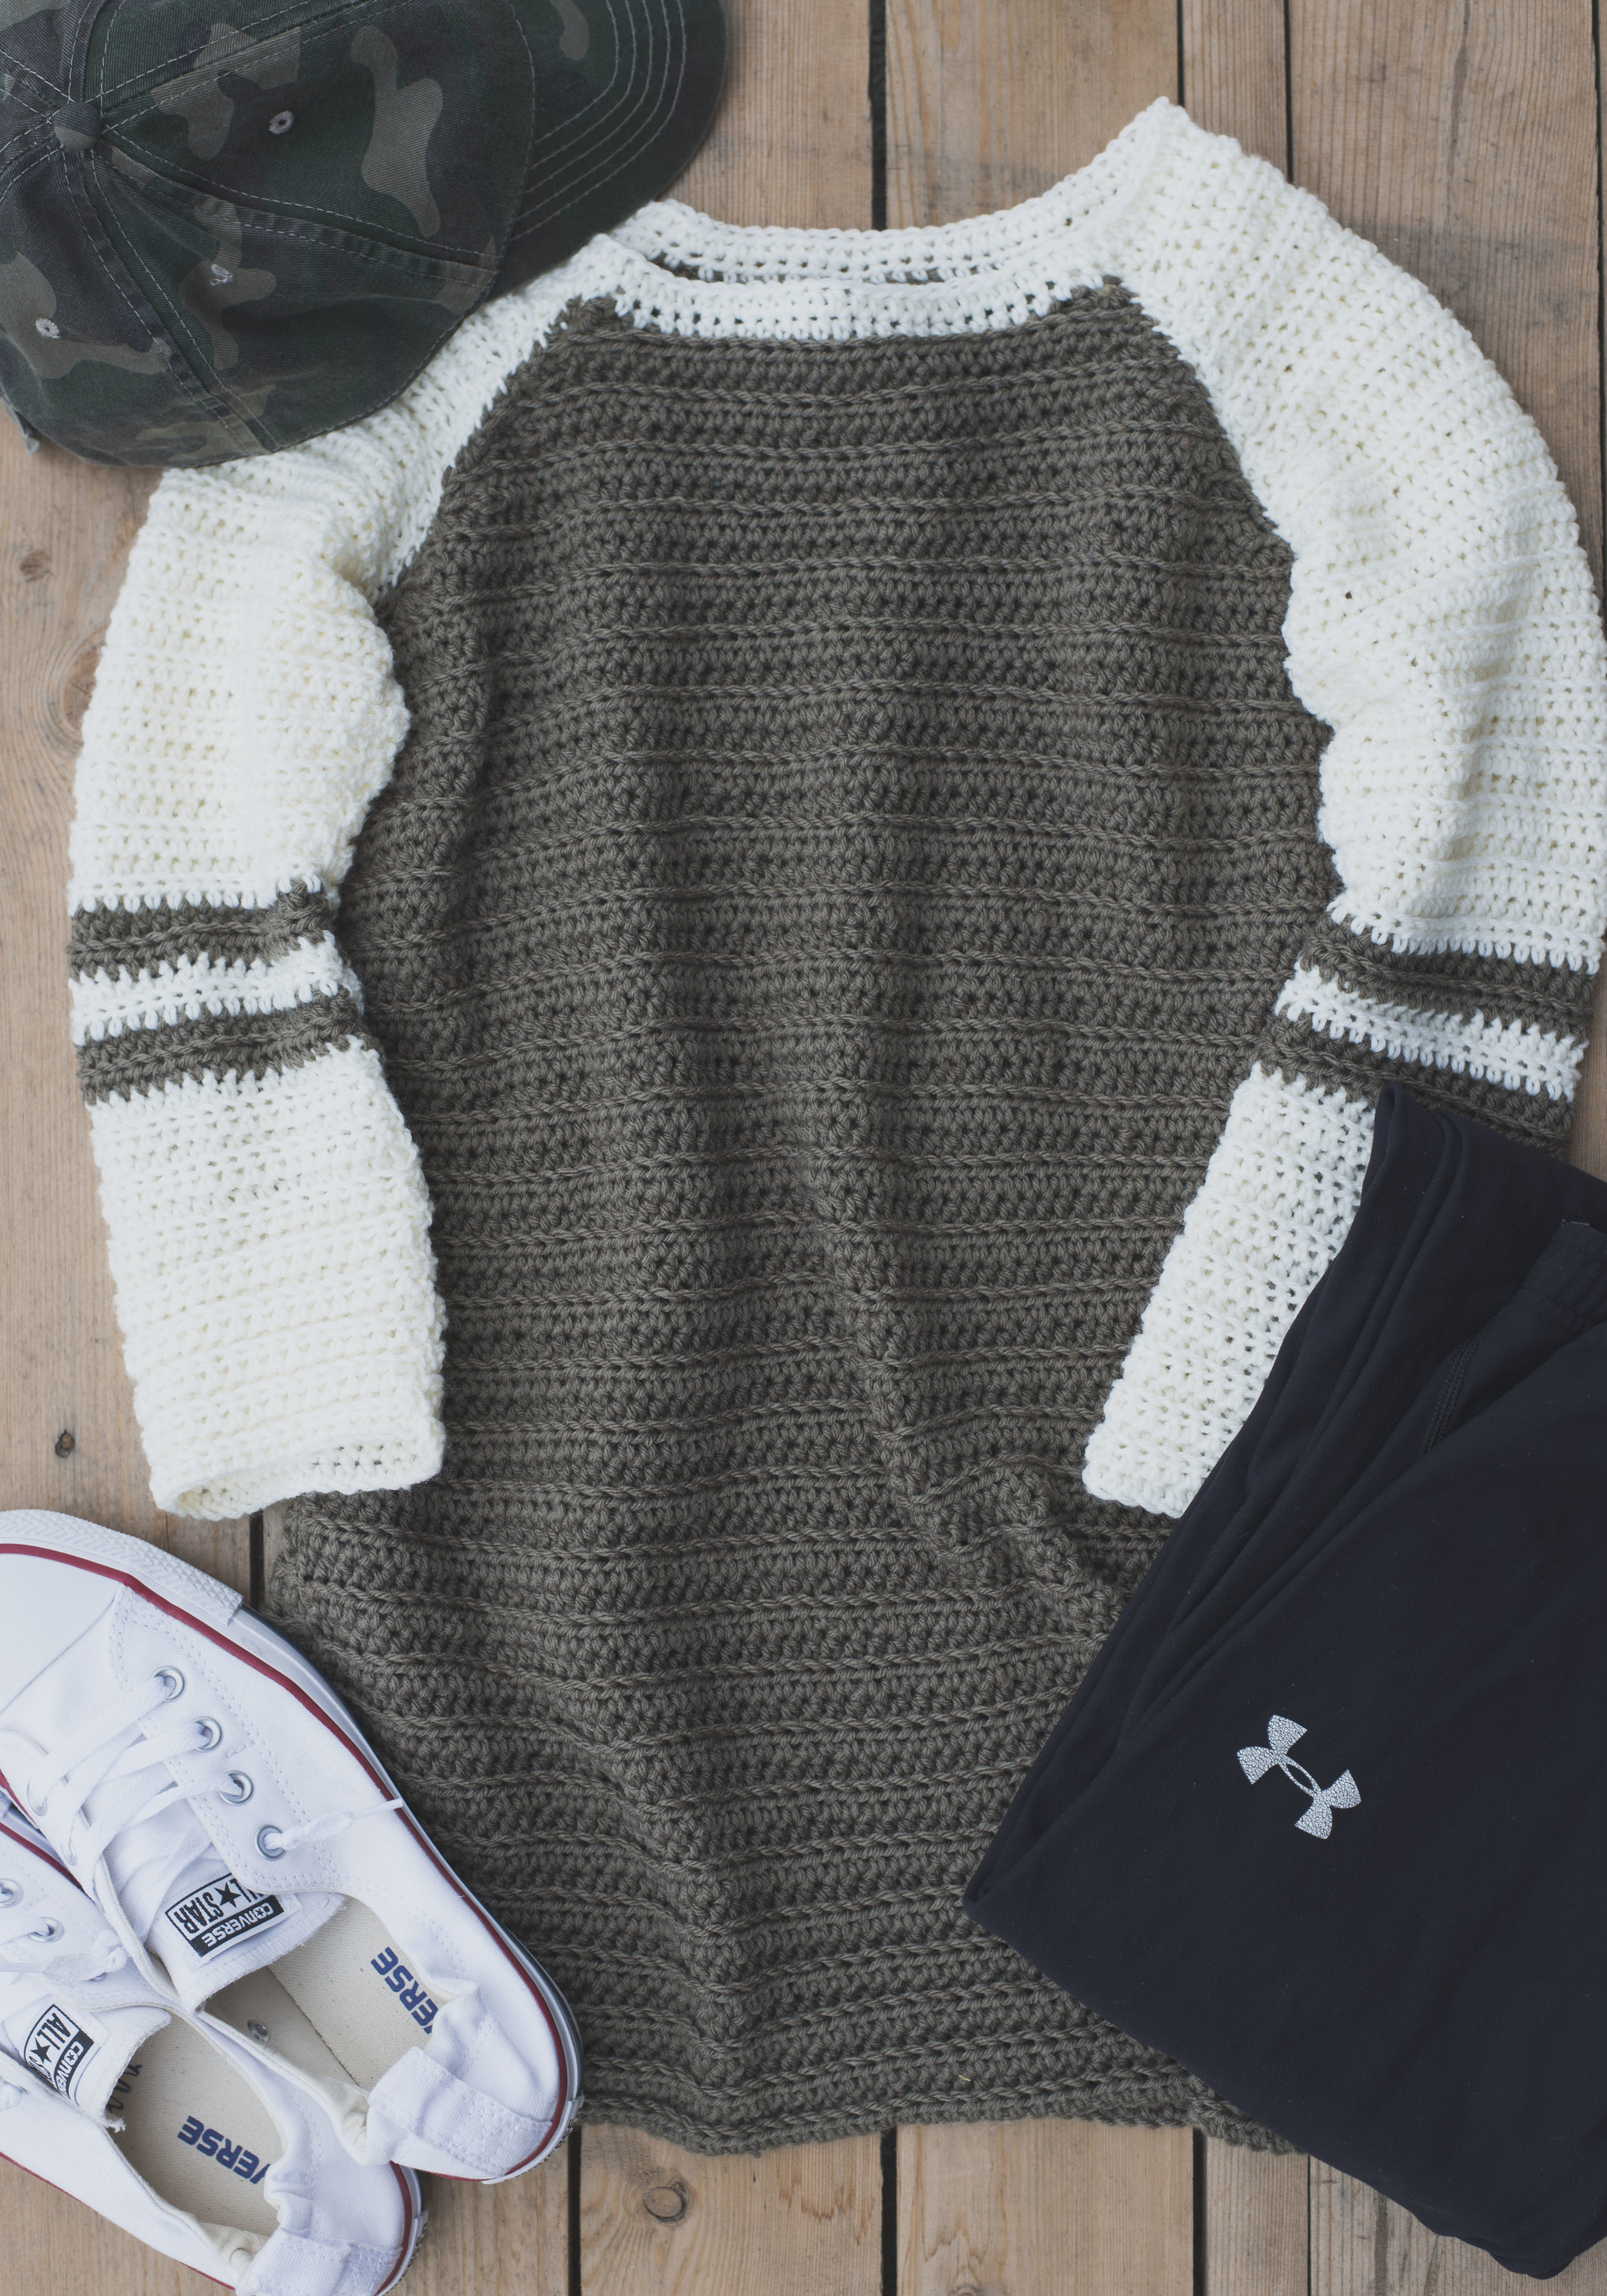
Despite the intimidating sleeves, this sweater is actually quite an easy make. It features a cool ribbed stitch, made up of hdc's.
The pattern is written for sizes XS-XL, and is designed to be more fitted. If you'd like a bit of a roomy sweater, I'd size up for sure!
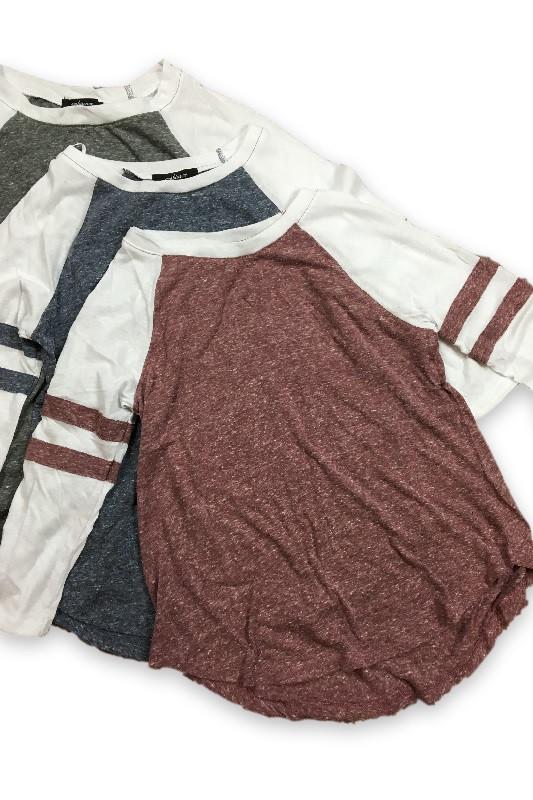
So when planning this sweater I was really inspired by this baseball tee I saw on Pinterest (see here). Once I saw it, I realized I had to make a crocheted version! I love the olive-y taupe color I did it in, and once I finished mine, my brain was swirling with all the color possibilities you could do with this sweater.
I think it makes the perfect casual top.. great for football games, am I right?
Anyways, I hope you like this pattern. I worked extra hard to make it clear and easy to understand. Please be sure to read all the notes below before starting!!
What you'll need:
-DK (category “3”) weight yarn in two colors (I used Baby Bee Sweet Delight in “Mocha” and “Naked”, see notes for yardage)
-Size I hook (5.5 mm)
-Size G hook (4 mm)
-Yarn needle
-Sewing pins
Abbreviations:
ch=chain, st(s)=stitch(es), hdc=half double crochet, BLO=back loop only, 2hdc=work two half double crochet in one stitch, sp=space, hdc2tog=half double crochet two together (read notes on this), FLO= front loop only, dc=double crochet
Gauge:
14 hdc by 11 rows of [one row hdc, one row hdc BLO -- alternately] equals a four-inch square
Notes:
-I will refer to the yarn colors as A & B (A=Mocha, or the darker color and B= Naked, or the cream color)
-this sweater is designed to be very fitted, if you have doubts about your size fitting, I would size up
**Measurements & yarn yardage for the sweater sizes (approximately):
XS: Bust: 33 inches, Length: 25 inches (Approx 550 yards color A, 250 yards color B)
S: Bust: 34 inches, Length: 25 inches (Approx 600 yards color A, 275 yards color B)
M: Bust: 36.5 inches, Length: 26 inches (Approx 650 yards color A, 300 yards color B)
L: Bust: 38.5 inches, Length: 26 inches (Approx 725 yards color A, 350 yards color B)
XL: Bust: 41.5 inches, Length: 27 inches (Approx 850 yards color A, 400 yards color B)
-the format for the different sizes in the pattern will be (xs, s, m, l, xl)
-the whole sweater is worked with the i (5.5mm) hook until the last row of the color, which is worked with a G hook (4 mm)
-yes, the hook is larger than what's recommended for the yarn weight-it's on purpose!
-ch’s at beginning of rows/rounds do not count as a stitch
-I worked all my decreases (hdc2tog) in the BLO, because in my opinion it looked neater than working them in both loops. Personal preference I suppose. **Also, important. I worked the hdc2tog a little different, so it wasn’t so bulky. See how below:
hdc2tog: yo, insert hook into first st, yo, draw back through, insert hook into next st, yo, draw back through, yo and go through all four loops on hook
-the “right” sides of all the pieces have the rib-like texture
-both body pieces are worked from the bottom-up and both sleeves are worked from the bottom-up as well
Pattern:
Front body panel (using color A) and I Hook:
1) ch 63 65 69 73 79, hdc in 2nd ch from hook and across (62, 64, 68, 72, 78 total sts)
2) ch 1, turn, hdc in BLO (62, 64, 68, 72, 78 total sts)
3) ch 1, turn, hdc across (62, 64, 68, 72, 78 total sts)
4-50) repeat rows 2 & 3 alternately, ending with a “BLO” row
51) ch 1, turn, hdc2tog, hdc2tog, hdc 54 56 60 64 70, hdc2tog, hdc2tog (58, 60, 64, 68, 74 total sts)
52) ch 1, turn, ALL STS BLO: hdc2tog, hdc2tog, hdc 50 52 56 60 66, hdc2tog, hdc2tog (54, 56, 60, 64, 70 total sts)
53) ch 1, turn, hdc2tog, hdc2tog, hdc 46 48 52 56 62, hdc2tog, hdc2tog (50, 52, 56, 60, 66 total sts)
54) ch 1, turn, ALL STS BLO: hdc2tog, hdc2tog, hdc 42 44 48 52 58, hdc2tog, hdc2tog (46, 48, 52, 56, 62 total sts)
55) ch 1, turn, hdc2tog, hdc2tog, hdc 38 40 44 48 54 , hdc2tog, hdc2tog (42, 44, 48, 52, 58 total sts)
56) ch 1, turn, ALL STS BLO: hdc2tog, hdc2tog, hdc 34 36 40 44 50, hdc2tog, hdc2tog (38, 40, 44, 48, 54 total sts)
57) ch 1, turn, hdc2tog, hdc2tog, hdc 30 32 36 40 46, hdc2tog, hdc2tog (34, 36, 40, 44, 50 total sts)
58) ch 1, turn, ALL STS BLO: hdc2tog, hdc2tog, hdc 26 28 32 36 42, hdc2tog, hdc2tog (30, 32, 36, 40, 46 total sts)
59) ch 1, turn, hdc2tog, hdc 26 28 32 36 42, hdc2tog (28, 30, 34, 38, 44 total sts)
FOR XSMALL & SMALL:
60) ch 1, turn, ALL STS BLO: hdc2tog, dc, hdc, sl st 20 22, hdc, dc, hdc2tog (26, 28 total sts) Finish off
FOR MEDIUM & LARGE:
60) ch 1, turn, ALL STS BLO: hdc2tog, hdc 30 34, hdc2tog (32, 36 total sts)
61) ch 1, turn, hdc2tog, hdc 28 32, hdc2tog (30, 34 total sts)
62) ch 1, turn, ALL STS BLO: hdc2tog, dc, hdc, sl st 22 26, hdc, dc, hdc2tog (28, 32 total sts) Finish off
FOR XLARGE:
60) ch 1, turn, ALL STS BLO: hdc2tog, hdc 40, hdc2tog (42 total sts)
61) ch 1, turn, hdc2tog, hdc 38, hdc2tog (40 total sts)
62) ch 1, turn, ALL STS BLO: hdc2tog, hdc 36, hdc2tog (38 total sts)
63) ch 1, turn, hdc2tog, hdc 34, hdc2tog (36 total sts)
64) ch 1, turn, ALL STS BLO: hdc2tog, dc, hdc, sl st 28, hdc, dc, hdc2tog (34 total sts)
Finish off
Back body panel (also using color A & I hook):
XSMALL & SMALL:
Follow the same instructions from the FRONT panel through row 59
60) ch 1, turn, ALL STS BLO: hdc2tog, hdc 24 26, hdc2tog (26, 28 total sts)
61) ch 1, turn, hdc2tog, hdc 22 24, hdc2tog (24, 26 total sts)
62) ch 1, turn, ALL STS BLO: hdc2tog, hdc 20 22, hdc2tog (22 24 total sts)
63) ch 1, turn, hdc2tog, hdc 18 20, hdc2tog (20, 22 total sts)
64) ch 1, turn, ALL STS BLO: hdc2tog, hdc 16 18, hdc2tog (18, 20 total sts)
65) ch 1, turn, hdc2tog, dc, hdc, sl st 10 12, hdc, dc, hdc2tog (16, 18 total sts)
Finish off
MEDIUM & LARGE:
Follow the same instructions from the FRONT panel through row 61
62) ch 1, turn, ALL STS BLO: hdc2tog, hdc 26 30, hdc2tog (28, 32 total sts)
63) ch 1, turn, hdc2tog, hdc 24 28, hdc2tog (26, 30 total sts)
64) ch 1, turn, ALL STS BLO: hdc2tog, hdc 22 26, hdc2tog (24, 28 total sts)
65) ch 1, turn, hdc2tog, hdc 20 24, hdc2tog (22, 26 total sts)
66) ch 1, turn, ALL STS BLO: hdc2tog, hdc 18 22, hdc2tog (20, 24 total sts)
67) ch 1, turn, hdc2tog, dc, hdc, sl st 12 16, hdc, dc, hdc2tog (18, 22 total sts)
Finish off
XLARGE:
Follow the same instructions from the FRONT panel through row 63
64) ch 1, turn, ALL STS BLO: hdc2tog, hdc 32, hdc2tog (34 total sts)
65) ch 1, turn, hdc2tog, hdc 30, hdc2tog (32 total sts)
66) ch 1, turn, ALL STS BLO: hdc2tog, hdc 28, hdc2tog (30 total sts)
67) ch 1, turn, hdc2tog, hdc 26, hdc2tog (28 total sts)
68) ch 1, turn, ALL STS BLO: hdc2tog, hdc 24, hdc2tog (26 total sts)
69) ch 1, turn, hdc2tog, dc, hdc, sl st 18, hdc, dc, hdc2togg (24 total sts)
Finish off
Right Sleeve
1) *using color “B”: ch 35 35 37 37 39, hdc in 2nd ch from hook and across (34, 34, 36, 36, 38 total sts)
2) ch 1, turn, ALL STS BLO: hdc across row (34, 34, 36, 36, 38 total sts)
3) ch 1, turn, hdc across row (34, 34, 36, 36, 38 total sts)
4-16) repeat rows 2 & 3 alternately, ending with a “BLO” row
17) change to “A”: ch 1, turn, hdc across (34, 34, 36, 36, 38 total sts)
18) ch 1, turn, hdc BLO across (34, 34, 36, 36, 38 total sts)
19) change to “B”: ch 1, turn, hdc across (34, 34, 36, 36, 38 total sts)
20) ch 1, turn, hdc BLO across (34, 34, 36, 36, 38 total sts)
21) change to “A”: ch 1, turn, hdc across (34, 34, 36, 36, 38 total sts)
22) ch 1, turn, hdc BLO across (34, 34, 36, 36, 38 total sts)
23) change to “B”: ch 1, turn, hdc across (34, 34, 36, 36, 38 total sts)
24) ch 1, turn, hdc BLO across (34, 34, 36, 36, 38 total sts)
25) ch 1, turn, 2hdc, hdc 32 32 34 34 36, 2hdc (36, 36, 38, 38, 40 total sts)
26) ch 1, turn, hdc BLO across (36, 36, 38, 38, 40 total sts)
27) ch 1, turn, 2hdc, hdc 34 34 36 36 38, 2hdc (38, 38, 40, 40, 42 total sts)
28) ch 1, turn, hdc BLO across (38, 38, 40, 40, 42 total sts)
29) ch 1, turn, 2hdc, hdc 36 36 38 38 40, 2hdc (40, 40, 42, 42, 44 total sts)
30) ch 1, turn, hdc BLO across (40, 40, 42, 42, 44 total sts)
31) ch 1, turn, 2hdc, hdc 38 38 40 40 42, 2hdc (42, 42, 44, 44, 46 total sts)
32) ch 1, turn, hdc BLO across (42, 42, 44, 44, 46 total sts)
33) ch 1, turn, hdc2tog, hdc 39 39 41 41 43, 2hdc (42, 42, 44, 44, 46 total sts)
34) ch 1, turn, hdc BLO across (42, 42, 44, 44, 46 total sts)
35) ch 1, turn, hdc2tog, hdc 40 40 42 42 44 (41, 41, 43, 43, 45 total sts)
36) ch 1, turn, hdc BLO across (41, 41, 43, 43, 45 total sts)
37) ch 1, turn, hdc2tog, hdc2tog, hdc 33 33 35 35 37, hdc2tog, hdc2tog (37, 37, 39, 39, 41 total sts)
38) ch 1, turn, hdc BLO across (37, 37, 39, 39, 41 total sts)
39) ch 1, turn, hdc2tog, hdc 31 31 33 33 35, hdc2tog, hdc2tog (34, 34, 36, 36, 38 total sts)
40) ch 1, turn, hdc BLO across (34, 34, 36, 36, 38 total sts)
41) ch 1, turn, hdc2tog, hdc 28 28 30 30 32, hdc2tog, hdc2tog (31, 31, 33, 33, 35 total sts)
42) ch 1, turn, hdc BLO across (31, 31, 33, 33, 35 total sts)
43) ch 1, turn, hdc2tog, hdc 25 25 27 27 29, hdc2tog, hdc2tog (28, 28, 30, 30, 32 total sts)
44) ch 1, turn, hdc BLO across (28, 28, 30, 30, 32 total sts)
45) ch 1, turn, hdc2tog, hdc 22 22 24 24 26, hdc2tog, hdc2tog (25 25 27 27 29 total sts)
46) ch 1, turn, hdc BLO across (25 25 27 27 29 total sts)
47) ch 1, turn, hdc2tog, hdc 21 21 23 23 25, hdc2tog (23, 23, 25, 25, 27 total sts)
48) ch 1, turn, hdc BLO across (23, 23, 25, 25, 27 total sts)
49) ch 1, turn, hdc2tog, hdc 19 19 21 21 23, hdc2tog (21, 21, 23, 23, 25 total sts)
50) ch 1, turn, hdc BLO across (21, 21, 23, 23, 25 total sts)
51) ch 1, turn, hdc2tog, hdc 17 17 19 19 21, hdc2tog (19, 19, 21, 21, 23 total sts)
52) ch 1, turn, hdc BLO across (19, 19, 21, 21, 23 total sts)
53) ch 1, turn, hdc2tog, hdc 15 15 17 17 19, hdc2tog (17, 17, 19, 19, 21 total sts)
FOR XMALL & SMALL:
54) ch 1, turn, ALL STS BLO: dc, sl st 15, dc (17 total sts)
Finish off
FOR MEDIUM & LARGE:
54) ch 1, turn, hdc BLO across (19 total sts)
55) ch 1, turn, hdc across (19 total sts)
56) ch 1, turn, ALL STS BLO: dc, sl st 17, dc (19 total sts)
Finish off
FOR XLARGE:
54) ch 1, turn, hdc BLO across (21 total sts)
55) ch 1, turn, hdc across (21 total sts)
56) ch 1, turn, hdc BLO across (21 total sts)
57) ch 1, turn, hdc2tog, hdc 17, hdc2tog (19 total sts)
58) ch 1, turn, ALL STS BLO: dc, sl st 17, dc (19 total sts)
Finish off
Left Sleeve
**ALL SIZES:
Follow the same instructions from the RIGHT sleeve through row 32
33) ch 1, turn, 2hdc, hdc 39 39 41 41 43, hdc2tog (42, 42, 44, 44, 46 total sts)
34) ch 1, turn, hdc BLO across (42, 42, 44, 44, 46 total sts)
35) ch 1, turn, hdc 40 40 42 42 44, hdc2tog (41, 41, 43, 43, 45 total sts)
36) ch 1, turn, hdc BLO across (41, 41, 43, 43, 45 total sts)
37) ch 1, turn, hdc2tog, hdc2tog, hdc 33 33 35 35 37, hdc2tog, hdc2tog (37, 37, 39, 39, 41 total sts)
38) ch 1, turn, hdc BLO across (37, 37, 39, 39, 41 total sts)
39) ch 1, turn, hdc2tog, hdc2tog, hdc 31 31 33 33 35, hdc2tog (34, 34, 36, 36, 38 total sts)
40) ch 1, turn, hdc BLO across (34, 34, 36, 36, 38 total sts)
41) ch 1, turn, hdc2tog, hdc2tog, hdc 28 28 30 30 32, hdc2tog (31, 31, 33, 33, 35 total sts)
42) ch 1, turn, hdc BLO across (31, 31, 33, 33, 35 total sts)
43) ch 1, turn, hdc2tog, hdc2tog, hdc 25 25 27 27 29, hdc2tog (28, 28, 30, 30, 32 total sts)
44) ch 1, turn, hdc BLO across (28, 28, 30, 30, 32 total sts)
45) ch 1, turn, hdc2tog, hdc2tog, hdc 22 22 24 24 26, hdc2tog (25 25 27 27 29 total sts)
46) ch 1, turn, hdc BLO across (25 25 27 27 29 total sts)
47) ch 1, turn, hdc2tog, hdc 21 21 23 23 25, hdc2tog (23, 23, 25, 25, 27 total sts)
48) ch 1, turn, hdc BLO across (23, 23, 25, 25, 27 total sts)
49) ch 1, turn, hdc2tog, hdc 19 19 21 21 23, hdc2tog (21, 21, 23, 23, 25 total sts)
50) ch 1, turn, hdc BLO across (21, 21, 23, 23, 25 total sts)
51) ch 1, turn, hdc2tog, hdc 17 17 19 19 21, hdc2tog (19, 19, 21, 21, 23 total sts)
52) ch 1, turn, hdc BLO across (19, 19, 21, 21, 23 total sts)
53) ch 1, turn, hdc2tog, hdc 15 15 17 17 19, hdc2tog (17, 17, 19, 19, 21 total sts)
FOR XSMALL & SMALL:
54) ch 1, turn, ALL STS BLO: dc, sl st 15, dc (17 total sts)
Finish off
FOR MEDIUM & LARGE:
54) ch 1, turn, hdc BLO across (19 total sts)
55) ch 1, turn, hdc across (19 total sts)
56) ch 1, turn, ALL STS BLO: dc, sl st 17, dc (19 total sts)
Finish off
FOR XLARGE:
54) ch 1, turn, hdc BLO across (21 total sts)
55) ch 1, turn, hdc across (21 total sts)
56) ch 1, turn, hdc BLO across (21 total sts)
57) ch 1, turn, hdc2tog, hdc 17, hdc2tog (19 total sts)
58) ch 1, turn, ALL STS BLO: dc, sl st 17, dc (19 total sts)
Finish off
Assembly:
First you will sew up the sides of the two body pieces. Lay RIGHT sides together, and make double sure to align the “stripes”, or rows, of both front and back pieces -- this is very important. Then pin the sides with sewing pins to keep secure while you sew.

right sides together, aligning stripes
Sew up the sides of the body pieces along the very edge of the two with needle and long piece of “color A” TO ROW 49. Double check as you sew along that you are still matching up the stripes of both pieces. Also be sure to not sew too tightly.

After both sides of your body pieces are sewed, you will move on to the sleeves. Above you can see a photo of how to tell the difference between the different sleeves, and the front or back side of the sleeves. The back side is a bit longer, and has less of an angle. The front is shorter and has more angle.
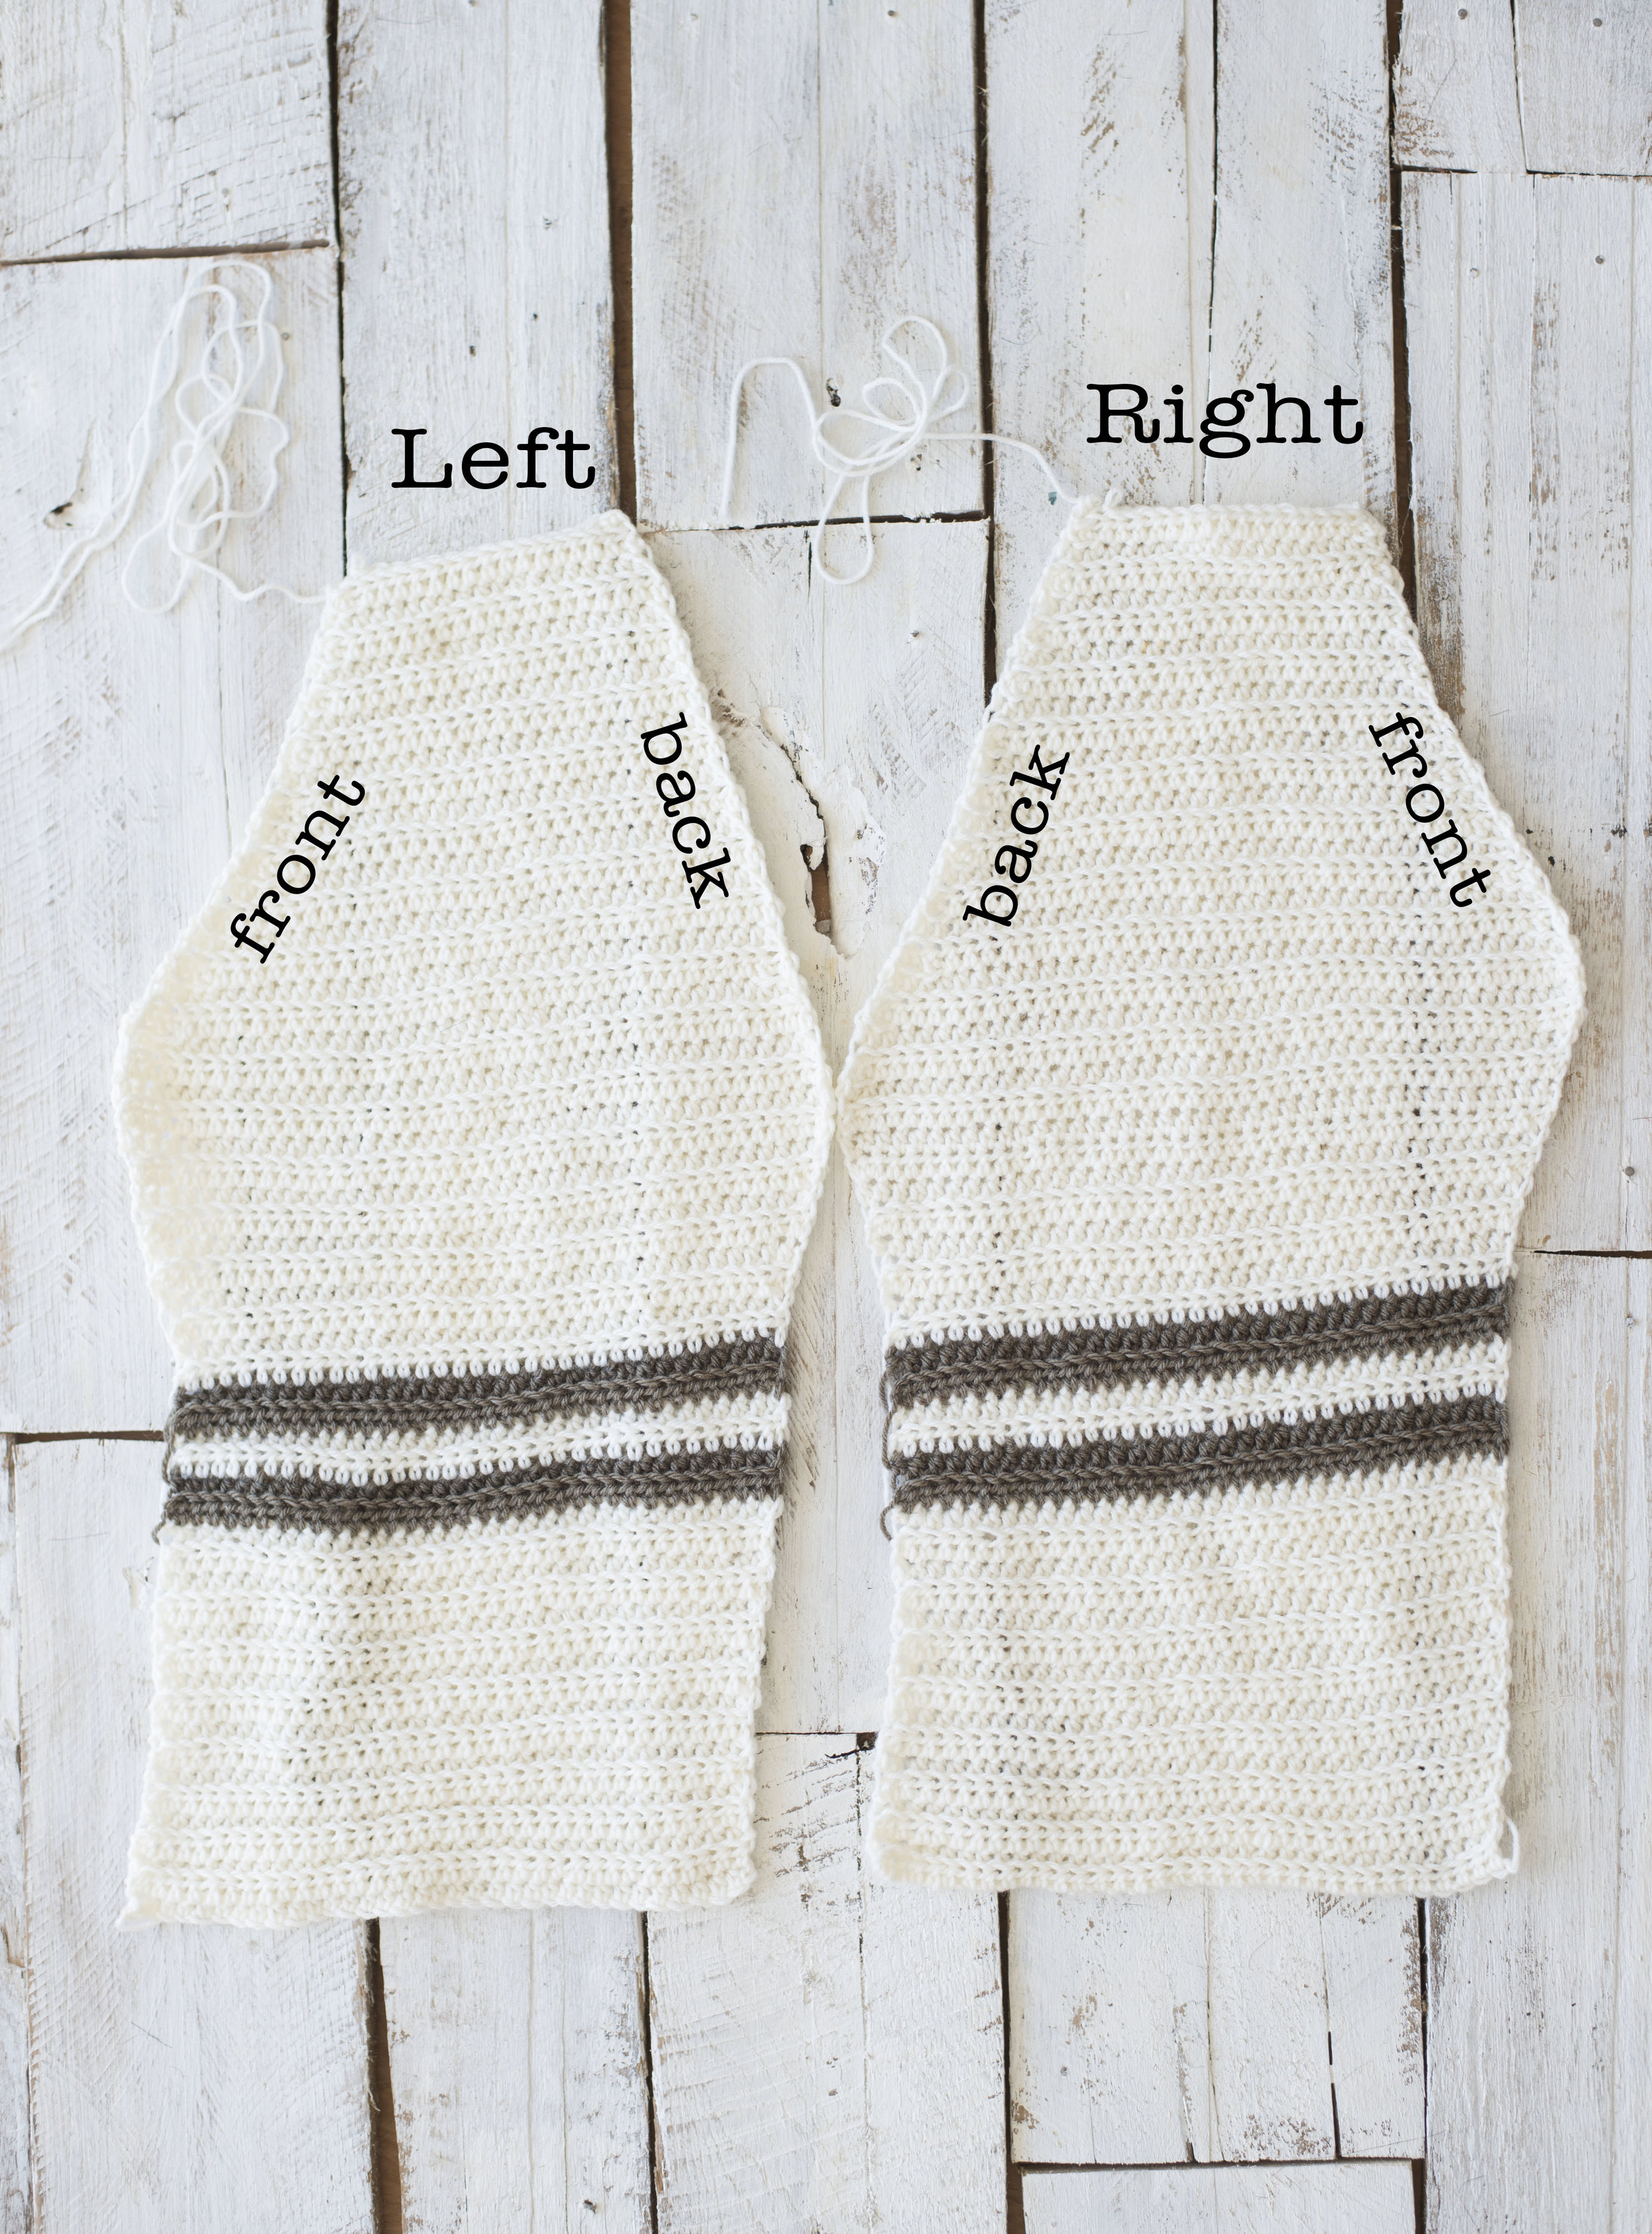
In the photo above, you can see how to tell the difference between the right or left sleeves, as well as the front or back side of the sleeves. The back side is a bit longer, and has less of an angle. The front is shorter and has more angle.

Next fold the sleeves in half length-wise (see far right photo), folding so the RIGHT sides are on the inside. Also, like on the body pieces you are going to align the stripes (or rows) together-- VERY IMPORTANT, and pin to keep secure.
Then using strand of “color B” and yarn needle, sew along the open edge (very edges) up to row 35. Make sure not to sew too tightly.
Next you will be attaching the sleeves to the body piece. *Remember which side is which when it comes to the sleeves.

aligning sleeve and body at armpit seam
To attach sleeves:
Turn both the sleeves and the body piece RIGHT side out, then you are going to first align the seam of the side of the body with the seam of the sleeve placing the RIGHT sides against each other (this is the armpit) and pin to secure.
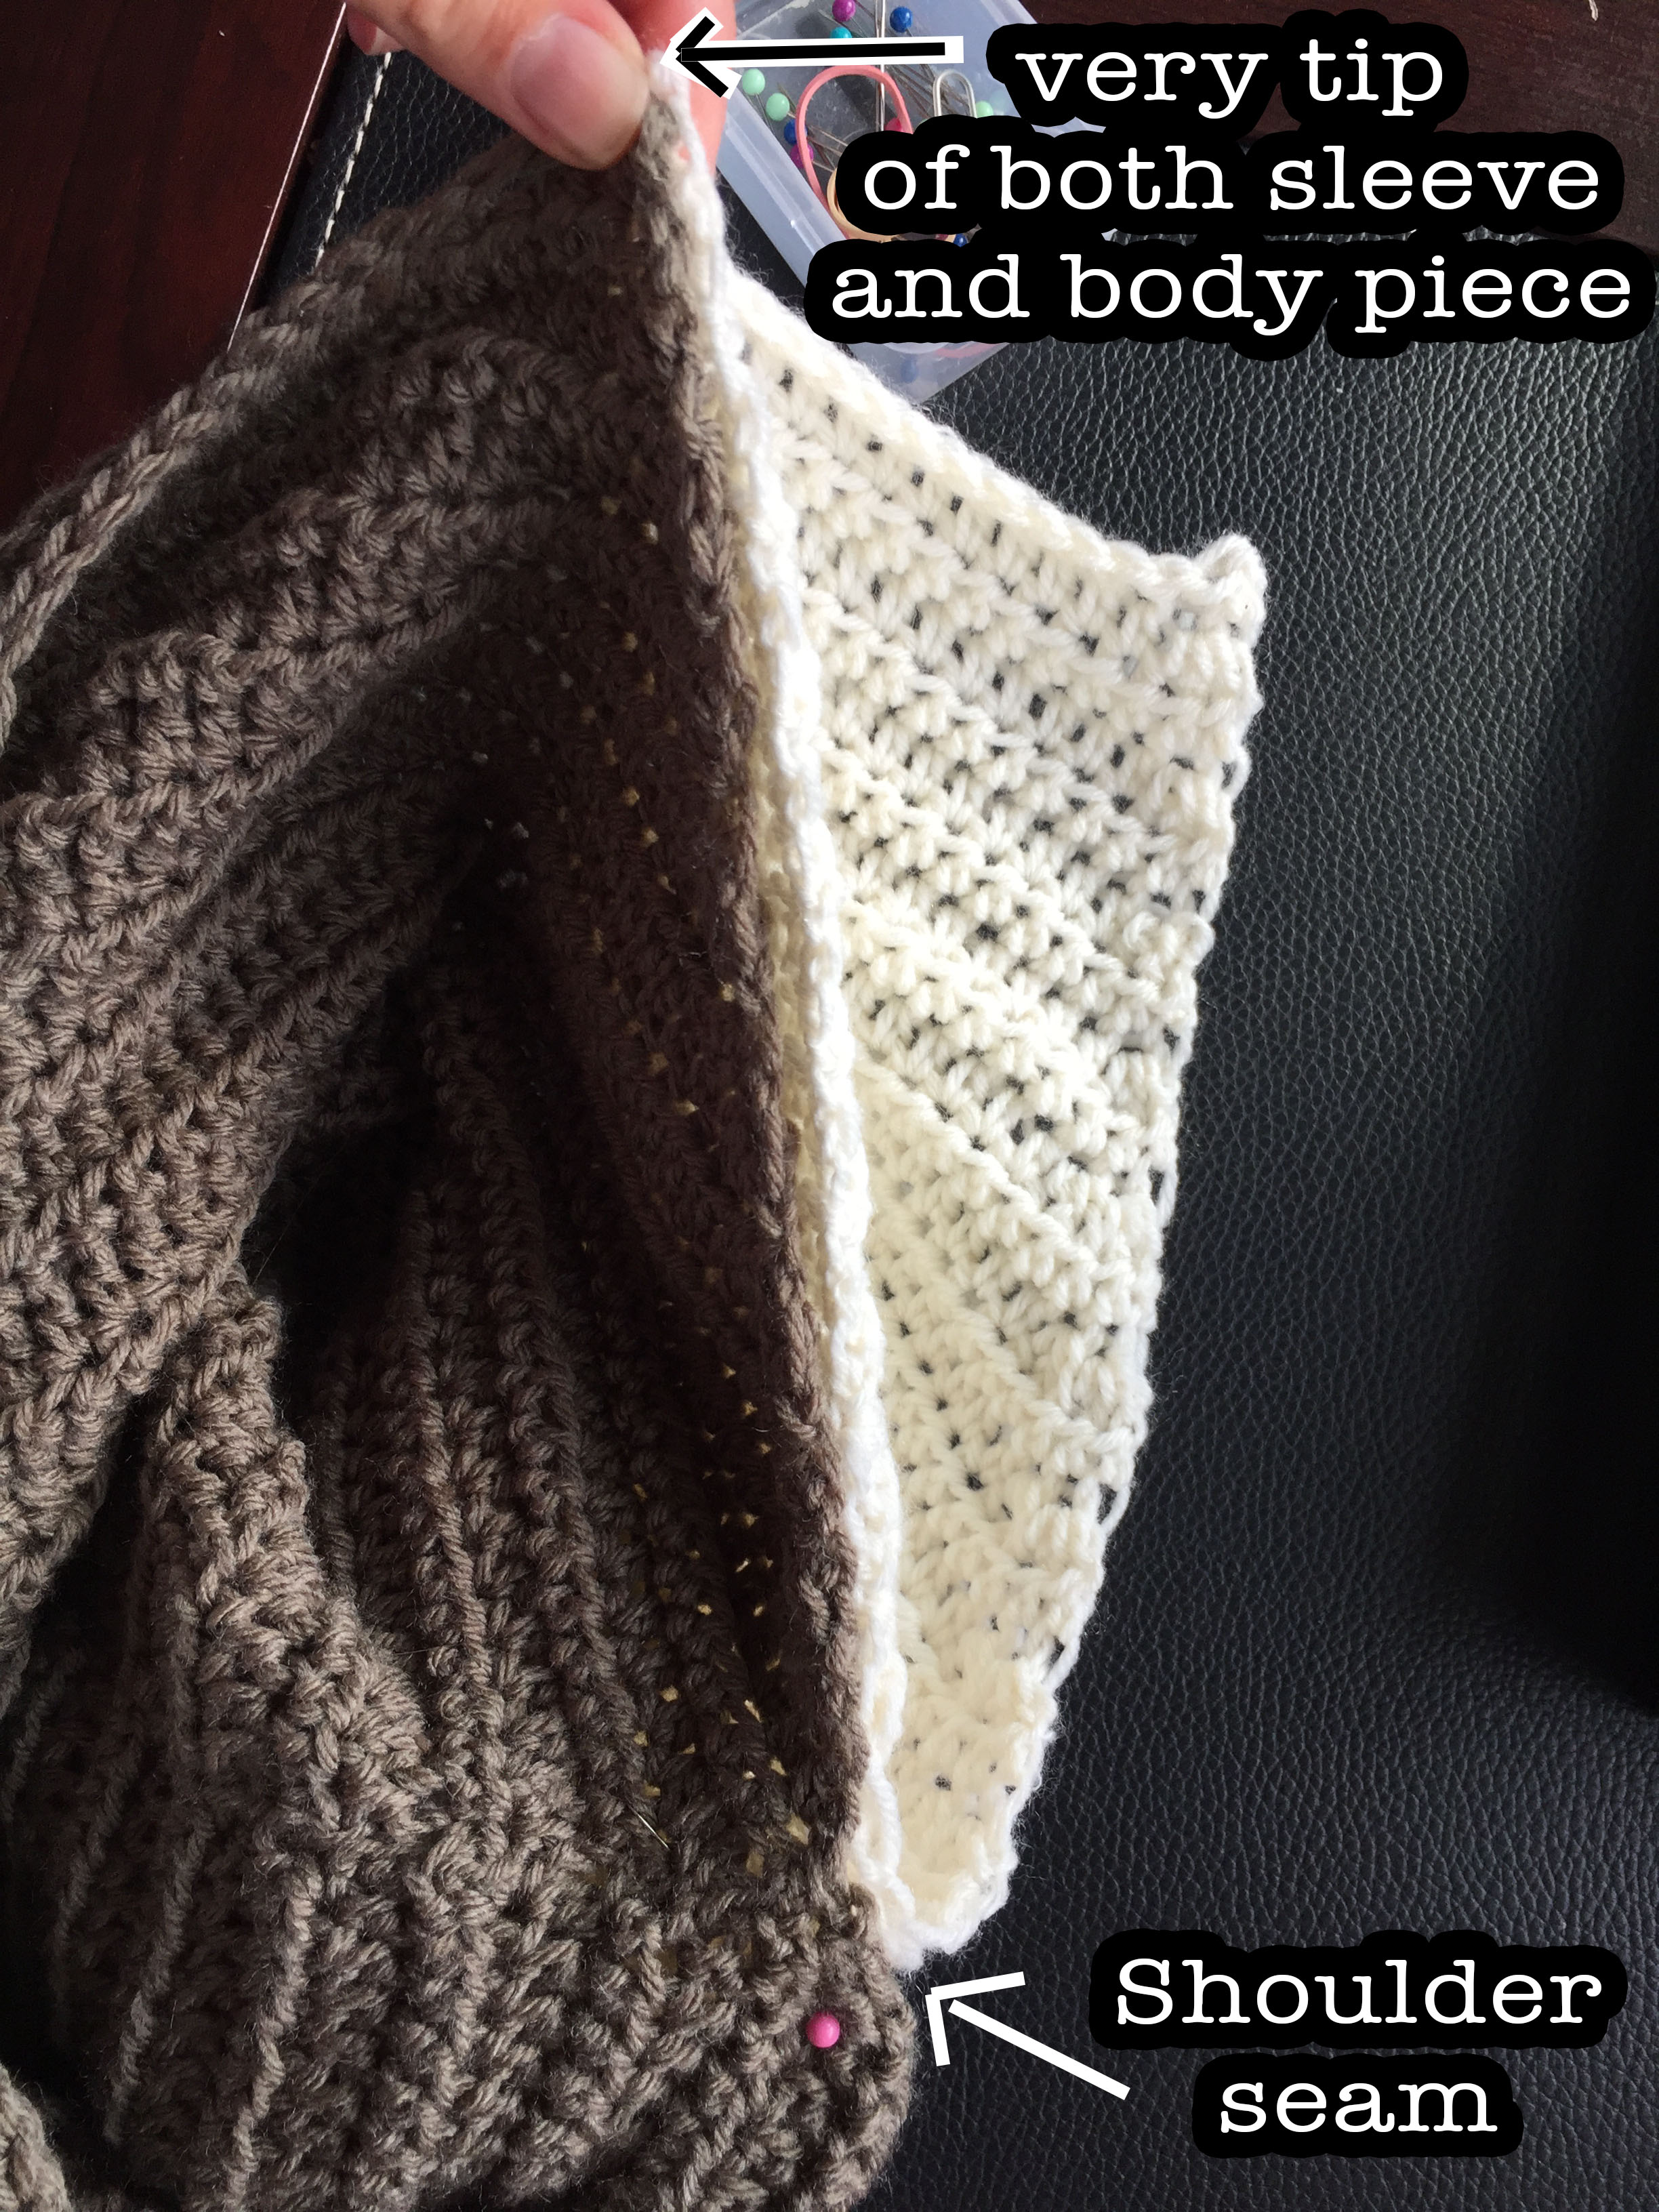
Next you will align the very most tip of the back body panel with the very most tip of the back side of the sleeve. And pin to secure.
Then you will align the edges of the body and sleeve from the tip of the back side you just pinned to the seam (armpit) pinning along the way.
Repeat that process for the front side, aligning the tips and pinning the edges together all the way down to the armpit seam. (Remember, RIGHT SIDES together.)
The front side has a little slack in the sleeve, but if you evenly distribute it as you pin it to the body it will will work out just fine.. you don’t have to worry about lining up the “stripes” on the sleeves.
Then using your yarn needle and strand of “color B” you will sew along the very edges, attaching the body to the sleeve. **I used a “back stitch” and made sure not to sew too tightly (important).
Repeat that same process to attach the other sleeve
Collar:
Working on the RIGHT side of your garment:
on the BACK RIGHT side of the body piece (on the seam), draw up color “B” with your crochet hook, ch 1, work a hdc into the same sp you drew up yarn, and hdc across the back body piece- working a total of 16, 18, 18, 22, 24 hdc on the back, then work one hdc into the next seam, and hdc across the left sleeve- working a total of 17, 17, 19, 19, 19 hdc in sleeve, then work one hdc into the next seam, now for the front- work 26, 28, 28, 32, 34 hdc, then one hdc into the next seam, and for the last sleeve- work 17, 17, 19, 19, 19 hdc, then join to the first hdc with a sl st (80, 84, 88, 96, 100 total sts)
*change to G hook: ch 1, hdc around, join to first hdc with sl st (80, 84, 88, 96, 100 total sts)
Finish off
After all ends are woven in, your varsity sweater is complete!
Whew! And that... is how you make the coolest ribbed raglan baseball tee.
I really hope you make this bad boy-- it's a little bit more work, assembly-wise. But man, it's so worth it. It's such a cute sweater, and it feels so good to say, "I made this".
As always, do PLEASE share your finished project with me over on Instagram. Pretty please. It always brightens my day to see your version of my patterns!
Feel free to leave any questions/comments below and I will get back to you ASAP.
Happy making :)
-Meg